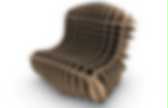
Circular Cardboard Shadowbox (Hot-glue method) How to Make A Corner Book Shelf from Cardboard. 3D Solids constructed from Concentric 2D Morphing Shapes. I developed this easy way to create 3D solids made from concentric 2D morphing shapes at Makerplace in San Diego, CA using their 100 watt Hurricane laser.
You can cut your objects from a variety of materials, such as plywood, MDF, bamboo or acrylic. For this demonstration I'll use 1/4" thick double walled corrugated cardboard. You'll note the beauty of using concentric shapes in how little of your material is wasted. Here's what you'll need: • A sheet of 1/4" thick double walled corrugated cardboard. (For demonstration purposes I painted one side of my corrugated cardboard black.) • Adobe's Illustrator or other comparable vector graphics authoring tool • Access to a Laser cutter • White glue and a sponge brush to apply it Prepare the Image Files I use Adobe's Illustrator CS4 as my vector image authoring tool.
Concentric 2D Morphing Shapes • Create a 6.5x10" file. Desktop Lamp simple. 1) I first drew the Overall shape of the lamp that I wanted to create.

This was done in Autodesk Inventor 2012. To begin, start a new part which is labeled as an .Ipt file. Inventor automatically knows that you want to start with a sketch, You can then use a combination of the line tool, arch tool, circle tool or whatever you need to get the profile shape you want. When your happy with it, click finish sketch on the upper right hand side and then go the extrusion comm and under the model tab. 2) I then created a sketch on the surface of the first extrusion by right clicking on the face of the extrusion and choosing the new sketch. 3)For the lamp head I simply started a new sketch off the same feature that I created my previous sketch and drew the shape that I wanted to Revolve. 4.
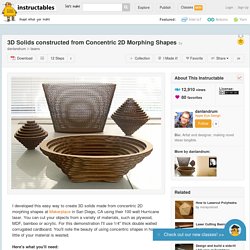
DIY project du jour: Make a lamp from cardboard. Slicing the lamp in 123D Make. I used a preview build of 123D Make to deconstruct the 3D model into a series of radial slices.
In case you haven't heard me rave about it before, 123D Make is a free app that does one thing and it does it extremely well. It takes any 3D model you give it and quickly lets you convert it into 2D vectors that can be cut from sheet material. At the moment, the publicly available version only allows you to perform simple slicing and to create perpendicular interlocking waffles, but future releases will allow for radial slicing, surface paneling, complex joint-making and a large handful of other cool things. With a bit of luck, these updates will appear online within the next couple of months.
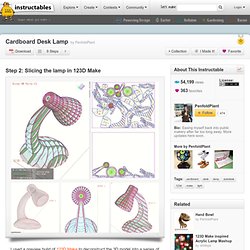
Watch this space! Once I'd adjusted the radial center of my grid to align with the center of the lampshade, I fiddled with the number of slices and the material thickness until I had something that could support its own weight when made from cardboard. Cardboard/Plywood Lounger. This spring, I taught a course at Little Black Pearl, an arts center on the South Side of Chicago.
LBP also runs a charter school, called the Options Laboratory, where young men and women can get an arts and technology based high school curriculum. Nine young men participated in WordsWood, wherein they studied creative writing one afternoon a week and woodshop on another afternoon. After a few classes understanding the basic mechanics of power tools, ergonomics, the dimensions of the human body, material characteristics, and the story they wanted to tell through their chair design, we settled on a hybrid cardboard/plywood form. The cardboard, as paper, represented their scholarship as students. This prototype was one of three proposed, the other two having mirrored single arms, so that the group of three chairs could be pushed together to make one couch-like structure, giving the user Options.
You will need these materials: Paper or Plastic Table. Inspired by the elegant, beautifully realized work of Shigeru Ban (en.wikipedia.org/wiki/Shigeru_Ban), I put this table together out of cardboard tubes and corrugated plastic.
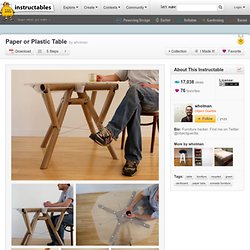
The frame is triangulated out of the tubes that come at the center of rolls of paper for architectural plotters. Each tube is an inch and a half in diameter and three feet long. They are incredibly strong, if loaded linearly, straight down their length -- each can support the weight of an adult with no problem. However, if laid flat between two supports and loaded in the middle, the tubes will buckle and fail. The trick, then, is to find a structure that takes advantage of that strength while retaining some visual delicacy.
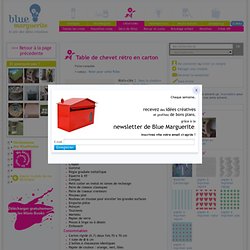
Cardboard furniture. Cardboard folder/creaser. Table de chevet rétro en carton, Tuto cartonnage. Fournitures Matériel Crayon Gomme Règle graduée métallique Equerre à 45° Compas Petit cutter en métal et lames de rechange Paire de ciseaux classiques Paire de ciseaux cranteurs Pinceau plat Rouleau en mousse pour encoller les grandes surfaces Emporte-pièce Poinçon Tournevis Marteau Papier de verre Pinces à linge ou à dessin Embossoir.
Makedo Desk Tray. Eco design chair. Folding Cardboard Chair and Desk, One Sheet, No cuts.