
background preloader

Creative

Facebook Twitter

101 Simple Handmade Gift Tutorials. These simple handmade gift tutorials will make any crafty person’s heart sing with joy! You don’t need special skills or a bunch of time because these can all be done super fast! Simple and cute…that works for me! Oh, and think of all the money you will save making these gifts. {At least that’s the story I tell my husband…shhhh!} You are going to love these fabulous tutorials!!! There’s a little something for everyone on your list and if I started talking about each one this would be a book, not a blog post.

You can make all your gifts for years from this list! If you love creative links, please subscribe to Everything Etsy! Thanks so much for all your tweets, stumbles, Facebook likes and pins on my Sewing Tutorials and Free Printables posts…you are the coolest crafty friends! If you want to be doubly awesome, try doing handmade gifts that are also eco-friendly! Handmade gifts make people feel special, don’t you think? ~Kim. Creative Guest: Watermark Tee by Sweet Verbana. Hello U-Create readers! I am so excited to be guest posting here today.

It just so happens to be my first guest post and I'm still a little shocked that it's here at Ucreate, one of my favorite blogs! A little bit about me.. I'm from a little town called Keller, Texas. I'm a junior at Texas A&M University (whoop!). I'm working on my education degree and expect to be an elementary school teacher in just two short years. When I'm not busy studying for classes, I love to sew. I just started blogging in May and have already met all kinds of wonderful women, I hope you'll stop by and say hi too! Watermark Tee Tutorial What I love about this project is that it's completely customizable.

Materials: Elmer's Blue Gel Glue (it must be the blue gel, white won't work) Fabric Dye (RIT is my tried and true brand) A white cotton Tee, Tank, Dress etc. Tutorial: If you're unfamiliar with Batiking, it's a method of dyeing fabric in which you create a design with a dye- resist. Step 1: Prepare Step 2: Design. How to cut glass.

I posted a picture about 1 week ago on Instagram, Facebook and Twitter of me cutting glass using just string. I got LOT’S of requests for a tutorial on how I DID THIS! So here it is. FINALLY! You will be able to learn how to cut glass. I want to warn you. It’s best to triple your yarn because it will burn longer! Soak it GOOD! I like to tie my yarn where I want my glass to “cut” then quickly pour polish remover over the string again. Get a big bowl with ice and water ready.
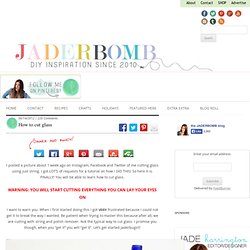
VERY IMPORTANT! Slowly turn your bottle. You can’t let the flame go OUT then dunk it in the ice water. YAY!!! I reallly hope you enjoyed this tutorial because I had ALOT of requests for it! © Copyright jaderbombllc, All rights Reserved. Rolled paper flowers {tutorial} |&jones design company. Welcome to flower week – five days of simple and delightful flower projects.

I could probably do three weeks of flowers because there are so many different ways to create them, but I’ve limited it to five of my current favorites. Before we get started, let me make a few disclaimers: 1. I find inspiration for projects all over the place {online, in shops, in magazines}, then figure out how to re-create them on my own. Each of these projects are my adaptation of something I’ve seen elsewhere. 2. 3. Okay, so let’s begin. Here’s what you’ll need: :: paper {either cover or text weight} :: florist wire :: scissors, pencil, glue gun STEP ONE: cut irregular circle This circle is approximately 8 inches, but you can do any size you wish. STEP TWO: cut spiral Start at the outside edge and cut in a spiral fashion to the center.

I like a sort of bumpy shape so that the petals end up a bit irregular If you aren’t so sure about your cutting skills, feel free to draw your spiral before cutting. Soap Making Instructions | Soap Making Recipes and Tutorials | Teach Soap. AdelynSTONE: dreamcatchers | {tutorial} I’m really diggin the whole hippy thing.
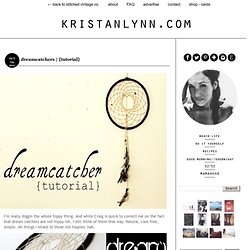
And while Craig is quick to correct me on the fact that dream catchers are not hippy-ish, I still think of them that way. Natural, care free, simple. All things I relate to those old hippies. hah. The point of a dream catcher is to weed out bad dreams. This is not a traditional Native- American dream catcher. What I used: Embroidery Hoop Yarn (or twine, hemp… whatever you have on hand) Beads Feathers Thread Felt Hot Glue Gun Want to make one too?? Grab your embroidery hoop, leave it as is, or wrap it up like I did. Take your webbing yarn and form a loop at the top, this will be where you dreamcatcher hangs from. The webbing is the same stitch through out. Pull tight and repeat.

For your second (and every other row), use the same stitch, but instead of going over the hoop, go through the string: Keep going until the hole in the middle is to your liking. Now you can tie extra string where ever you’d like, some tie it to the actual hoop. His view: Guest blogger - Sasha from The Guilded Bee: Here's another DIY project from our sweet friend, Sasha - from the The Gilded Bee. Be sure to check out her awesome shop full of handmade packaging lovelies. Thanks for being here with us Sasha! I'm delighted to share my book tutorial with you today: Supplies you’ll need to make this project: • One—8.5 x 5.5 sheet of cardstock • One---1/2 x 3 inch piece of cardstock or paper • Two---2 5/8 x 3 1/8 inch pieces of cardboard, chipboard or matboard (not corrugated) • Hot glue gun and glue sticks • 25---3 x 5 inch ruled or blank index cards • Two---3 x 5 inch sheets cardstock • 2 rubber bands • Pencil • ¼ inch wide Ribbon: One-6 inch piece, plus two-1 inch pieces To make the page block: * 1.
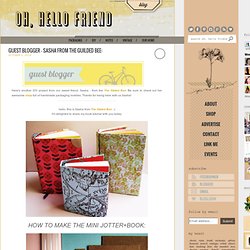
. * 2. . * 3. . * 4. . * 5. . * 6. To make the cover: * 1. Make a little mark at the center of each side of your paper (4.25 inches on center). On each side of those center marks, draw three lines paralleling each other (6 lines total): 5/16”, 5/8”, 13/16” inch from the center mark. * 3. . * 4. . * 5. . * 6. . * 8. . * 9. . * 10. Stay-at-Home Artist: stencil with freezer paper (harry potter tee)... Yes, I am a nerd. I came up with a brilliant idea for a Harry Potter t-shirt and I couldn't resist. "Expecto Patronum! " However, you can make whatever kind of design you want with a freezer paper stencil.

It doesn't have to be Harry Potter related. I learned about the joys of freezer paper back in my early college days. Basically, freezer paper is backed with a plastic coating that will stick to soft surfaces when ironed, but it peels off cleanly and easily. To make a sweet t-shirt you will need: paper & pencil a t-shirt an iron a piece of cardboard or poster board fabric paint & brush Start by drawing your design on some regular old paper. My design kept getting bigger, so I taped two sheets together. Next, place your design underneath a sheet of freezer paper and trace it neatly with a sharpie. The marker gives your lines greater width making it easier to cut them out and paint them in later.

Now place a piece of cardboard under your freezer paper to protect your table while you cut. On the Cheap: Scrapbook Paper iPhone Covers. I found this clever trick on Pinterest the other week from Oops I Craft My Pants and had to try it for myself: iPhone covers using scrapbook paper! Now when I had my first cell phone in high school (the old Nokia), I probably had about 15 different cell phone covers that I would switch out to match my clothes everyday! I figure this scrapbook paper iPhone phone cover is an easy way to update my phone without spending all the cash! First thing I did was purchase a couple sheets of scrapbook paper from Michael’s. I also purchased a clear iPhone 4 cover from Best Buy. You could really purchase any cheap clear phone cover, but I wanted one with protective rubber sides since I’m a klutz and always drop my phone!

First thing I did was trace the scrapbook paper around the iPhone cover to get the basic shape. I cut out the main section just using a pair of scissors. For the camera hole I used a pencil to sketch in the hole that I had to cut out using an exacto knife…. and that’s about it! Do-it-Yourself DIY String Wedding Lanterns Yarn Chandeliers. Jessica of Wednesday Inc shows us how to make those gorgeous twine chandeliers from the inspiration shoot she shared with us this morning. Using balloons, glue and twine, you can also make these lanterns for your wedding – and then bring it home and use it as your very own mid century lampshade. What you will need are: balloons, glue, yarn, tray for glue, corn starch 1/2 cup of Corn starch, 1/4 cup of Warm water, clear fast drying spray paint, hanging lamp cord or fishing line (depending on your desired final product), and a lighting kit if you’re looking for a fully functional lantern.

Jessica recommends using a sharpie to mark on the inflated balloon how much room you need to leave for the lighting cord. She also recommends coating the balloon with vaseline prior to wrapping the yarn coated with glue so it doesn’t stick on the balloon once it’s dry. Are you getting excited to try to do this at home as much I am? Instructions: 1. Magazine Bowls | How To | Cut Out. Clouds on the ceiling in Crafts for decorating and home decor. Paper punch heart garland in Crafts for decorating and home decor. DIY Fabric chandelier in Crafts for decorating and home decor. Create Sand Art in Recycled Containers. It may not be the 1980s anymore, but it is summer. But really, do you ever need an excuse for kitsch? Sand art, the practice of layering colored sand into glass jars, may seem a little nostalgic, but I assure you, it’s still around. However, children’s sand art kits tend to be very eco-unfriendly, with their inclusion of plastic containers instead of glass, and the other main outlet for sand art, the wedding market, can get pricey fast.

Fortunately, with the generous use of natural, recycled, or stash components, you can make sand art that’s eco-friendly, practically free, and centered on your own personal style. The first thing that you want to look for is a container that can be recycled. You can make colored sand, buy it new, or, if you’re lucky, thrift it (our six pounds of rainbow colors came from Goodwill), but to make it go farther, you can alternate layers with some of your stash craft supplies.

Completely beautiful, completely personal, and completely natural. About the Author. All That Is Humor & humor. Gameshows In Japan Funny stories and jokes, our main aim is to satisfy with you quality fun. Comics is a medium of expression in which images, often incorporating text, information such as narratives.

So stories in comics become funny. I think most of these things are funny, or cute, or interesting, or all of the above. fox nice faces Do you like listening to and reading stories? Penny (Kelly Cuoco) is dating Superman (Henry Cavill) ! We know that story is an account or recital of an event or a series of events, either true or fictitious. Murica!! In our world, there are many humor stories and funny events in the life. Where Is Edward Nobody is happy all the time, but some people are definitely more fulfilled than others if they get some humor or funny things.

What Will happen with little Arya Stark Here’s how to get started on the path to creating a happier you. Its too hot outside Can you learn how to be happy? Hipstergirl And Gamergirl only dots Many Razes Many Faces. Most Popular Repurposing Tricks of 2011. Make a Lunch Box from a Milk Jug.

Embroidery Designs at Urban Threads - Projects. Got ink? This fabulous ink belongs to our digitizer, Danielle. I’m a little jealous, I admit. I’ve always thought tattoos were pretty awesome, but I’ve been too much of a wuss to take the plunge and commit to one design forever. That’s not to say many other Urban Threadsters haven’t taken the plunge with UT designs, but what if you’re not ready for it just yet? Well, Halloween is starting to creep up on us, and it’s a perfect time to try out a whole new look, and whip up a fast costume.

Don’t know what to be this year? How 'bout some tattooed rockabilly style? Geek Living Daily 120502 | Geeky Design | Geeky Gift Ideas. This post is part of our daily blog that shows our collection of geeky home living products or designs. If you want to participate and share your discovery or own design, just send us from here: form to submit Do you want to see all images from Geek Living Blog? Check out –>Subscribe to Geek Living Blog<– 1)What is Geeky Light? 2)[DIY] make your own style bookshelf with few pieces of wood 3)This Elagone lamp made of oak wood with LED light installed inside. 4)Very cool wooden clock without any number. 5)Cannot imagine there are people who recycle wine bottles like this 6)Used beer bottle turn to beautiful vase, everybody can do it. 7)Does our iPad need this buddy?

8)Writeable table with 3 hidden chalkboards, flip it up, you can write messages and surprise people, great idea! 9)Cool vintage bathroom design 10)Iron faceless LED wrist watch, pretty suitable for Iron Man. DIY Friendship Bracelet - Honestly WTF. For several months now, we’ve been receiving emails requesting a friendship bracelet DIY. Well, friends, ask and you shall receive! Today, we’ll give you a step by step tutorial on the classic chevron pattern. If you used to whip up friendship bracelets like a champ in grade school and have since forgotten how, consider this a refresher course. And if you can make these with your eyes closed and arms tied . . . umm, can we still be friends?

You’ll need:embroidery threada safety pin or tapea pair of scissors Start by cutting several strands of embroidery thread at about 24 inches each. Start on the left side with the outermost color (shown here in red) and make a forward knot by creating a 4-shape over the 2nd color, loop it under and back through the opening. Pull up and to the right to tighten.

Now pick up the outermost color on the right side (show here in red) and make a backward knot, creating a reverse 4-shape over the 2nd color, loop it under and back through the opening. DIY Macrame Bracelet - Honestly WTF. Growing up by the beach in Southern California, the ability to knot a macrame bracelet was practically a right of passage. Although those days are long behind us, we’ve never forgotten the ever-so-simple square knot technique. This time, however, we’re replacing hemp and wooden beads for more updated elements like colorful nylon cord and glossy metal charms. Happy knotting! You’ll need: Start by cutting the knotting cord into two 30 inch, two 20 inch and one 10 inch lengths. Center the 30 inch cord under the two middle strands. Pull tightly and slide the knot up to the top. Finish the 2nd half of the square knot by folding the left cord over the middle strands and under the right cord.

Pull tightly and repeat the steps – left, right, left, right . . . To finish the knots, thread one of the cords onto a needle and sew up the center of 3-4 knots along the backside. Repeat the same step on the other cord. After sewing up both knotting cords, trim away any excess. Turn Photo Negatives Into Artsy, Personalized Lamps. How to Make Paper Pencils (tutorial)