
Coderwall. Ever happened to write something like this?
Int arr[] = {1, 2, 3, 4, 5}; some_function( arr, sizeof(arr)/sizeof(arr[0]) ); Here the size of array is detected by compiler because it has value list in its initialization. But some_function wants to know its size, so we get it by dividing size of array by the size of its elements. Quite long. If it is C++, not C, we can use the power of templates in this case: template<size_t SIZE, class T> inline size_t array_size(T (&arr)[SIZE]) { return SIZE; } Another feature of C++ is also used here: array reference. Int arr[] = ; some_function( arr, array_size(arr) ); In this case, when compiling the call to array_size, compiler guesses that T should be int and SIZE should be 5 because it is possible to pass arr only to array_size<5, int>.
Finally, you see that it is much shorter and much clearer (more important) than sizeof variant! NF-Arduino Sensor Shield Kit - PhotoCells. This is the Arduino-Compatible Sensor Shield with PhotoCell-Controlled Relay PCB Kit.
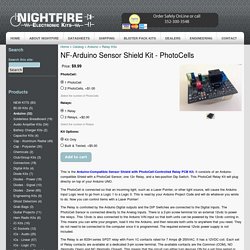
It consists of an Arduino-compatible Shield with a PhotoCell Sensor, one 12v Relay, and a two-position Dip Switch. This PhotoCell Relay Kit will plug directly on top of your Arduino UNO. The PhotoCell is connected so that an incoming light, such as a Laser Pointer, or other light source, will cause the Arduino Input Logic level to go from a Logic 1 to a Logic 0. Arduino Basics: PIR Sensor (Part 2) In this tutorial we will connect our HC-SR501 PIR (movement) Sensor to an Arduino UNO.
The PIR sensor will be powered by the Arduino and when movement is detected, the PIR sensor will send a signal to Digital Pin 2. The Arduino will respond to this signal by illuminating the LED attached to Pin 13. Arduino Basics: Simple Arduino Serial Communication. 1.
Once the code has been uploaded to the Arduino, open the Serial Monitor once again and type the following sequence of numbers: 2. While still in the serial monitor, type the following: Please note the commas between each numerical entry. You should now see a pattern like this: 3. You will notice that the commas have been replaced by line feeds, and each number should display on a new line. 4. Arduino-serial: updated! In late 2006 I wrote “arduino-serial“, mostly for myself, to help with stuff I was working on at the time.
It was a very simple & small, cross-platform tool written in basic C for reading/writing serial ports. Now nearly seven years later I still get regular questions and frustrations about it. Experiment: use an arduino as a slave to your raspberry pi. Why do this?
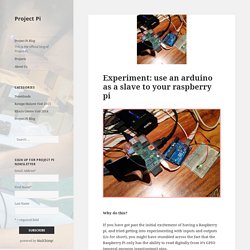
If you have got past the initial excitement of having a Raspberry pi, and tried getting into experimenting with inputs and outputs (i/o for short), you might have stumbled across the fact that the Raspberry Pi only has the ability to read digitally from it’s GPIO (general purpose input/output) pins. Google Translate. Csharp. CmdMessenger.
SerialCommsCSharp. This C# class combined with the Arduino sketch allows you to plug an Arduino into a PC's USB port and then have its com port detected by the C# application.
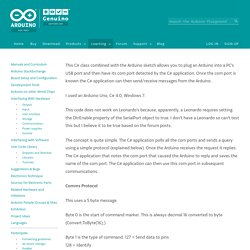
Once the com port is known the C# application can then send/receive messages from the Arduino. I used an Arduino Uno, C# 4.0, Windows 7. This code does not work on Leonardo's because, apparently, a Leonardo requires setting the DtrEnable property of the SerialPort object to true. I don't have a Leonardo so can't test this but I believe it to be true based on the forum posts.
The concept is quite simple. Comms Protocol. Interfacing your arduino with a C# program - All. Arduino Python Communication via USB - All. Sometimes when working on an Ardunio project, it is necessary to send data back and forth between a computer.
Now, you could use something like the arduino ethernet shield, which would send data over a network, but if you want something easy and free the simplest solution is USB communication. There are several ways to approach Ardunio USB communication, but in this case we will be using Python on the computer side to send and receive information. As such, this instructable expects that you have some prior knowledge of Ardunio, and of Python (or other similar scripting language). Why Python? Python is a versatile, easy to learn, and easy to use scripting language. Arduino-serial: updated!
Ruby. Ruby is an "enhanced" version of the Little Gem battery-powered amplifier.
The architecture of the Little Gem has been updated with an input buffer (as found in the Little Gem MkII) feeding the inverting input and the volume control changed from the output rheostat to the type and placement as shown in the datasheet application notes. Additionally, the 5k Gain pot of the Little Gem has been reduced to a 1k, as used in the Grace / Big Daddy circuits. Ruby has many shades of sparkly clean all the way up to a great, natural overdrive. The input buffer helps to retain treble detail going into the 386 chip. As you increase the Volume, you will start getting nice breakup. The Gain pot works like a limit for the amount of available gain. Tiny Arduino Music Visualizer. Begin by assembling the LED matrix and “backpack” board as described in the Adafruit LED Backpacks tutorial. If using the LED matrix for the first time, we very strongly recommend working through that full tutorial first.
This will let you test and confirm that the Matrix is properly assembled before moving on to this more advanced project. If working with a breadboard as we show below, solder row headers on to the microphone breakout and LED matrix backpack boards (three pins on the former, four on the latter). Arduino Controlled Motion Sensor. Materials needed: 1.
Any Arduino or a deviation of it should work perfectly fine for this. $30 for the standard Uno. As long as it can be programmed by the Arduino IDE you will be fine. 2. A PIR sensor. I am using the Parallax PIR sensor. You can get it for about $10. Simple Arduino and HC-SR04 Example. AdWords We use AdWords to deploy digital advertising on sites supported by AdWords. Ads are based on both AdWords data and behavioral data that we collect while you’re on our sites. The data we collect may include pages you’ve visited, trials you’ve initiated, videos you’ve played, purchases you’ve made, and your IP address or device ID. This information may be combined with data that AdWords has collected from you. Algorithmic noise machine. This project is a part of experiments done while doing an artist in residence at Instructables.
You can see the other projects here. You can use bit-shifting as an alternative way of creating "music". This principle enables you to squeeze as much processing power as possible out of the Arduino while creating novel and interesting effects. The challenge lies in composing through bitshifting. Send and Receive MIDI with Arduino -Use Arduino for Projects. This instructable will show you how to use an Arduino to send and receive a variety of MIDI messages so you can start building your own MIDI controllers and instruments. First I’ll talk a little bit about MIDI protocol, if you’re just looking for sample code skip ahead to steps 5-9. If you know absolutely nothing about MIDI note, velocity, and pitchbend or are confused about what MIDI does and why you would want to use it, check out my What is MIDI? Instructable. ToneLibraryDocumentation - rogue-code - Arduino Tone Generator Library. - Rogue Robotics Open Source Code. Description. Motion Tracker with PIRs, Arduino and a Servo.
How to make a polyphonic music installation triggered by capacitive touch points using an Arduino. During a project at KISD we made an interactive music installation which was playable at a public transit place. The look of it was inspired by the colourful metro plans that separate each train line with a different color. For the lines we used colourful tape, which also covered the cables.
You were able to make music using one, multiple or all of the ten touch points that we placed on the walls. One major part we wanted to achieve was polyphonic playback. Which means that you are able to play more than only one sound file at a time. Wrap Beats - Capsense Arduino Instrument. Singing plant. Make your plant sing with Arduino, touche and a gameduino -Use Arduino for Projects.
This project is a part of experiments done while doing an artist in residence at Instructables. The Arduino Synthesizer -Use Arduino for Projects. The Arduino is able to output sound through a library that has been developed called the Tone Library. The Arduino Synthesizer. The Arduino Synthesizer. Turn your Arduino into a 4 voice wavetable synth with only a few components...
Cat Repelling PIR motion sensor (covert) speaker box alarm. Multitouch Music Controller -Use Arduino for Projects. Controlling Cubase with Arduino based MIDI -Use Arduino for Projects. A friend of mine wanted to control Cubase, his audio recording software, with a push button so that he could stop and start recordings remotely without having to go over to the computer and type on the keyboard. Simple Arduino audio samples. Skill Builder: Advanced Arduino Sound Synthesis. The Arduino is an amazing platform for all kinds of projects, but when it comes to generating sound, many users struggle to get beyond simple beeps. Simple Arduino audio samples.