
How To Make Over Your Kitchen For Less Than $500. Courtesy of Rust-Oleum® The kitchen has always been the heart of the home.

It's no wonder a kitchen remodel is at the top of many homeowners' wish lists, especially when families are spending less time dining out. Unfortunately, it's also one of the most expensive and time-consuming home improvement projects, ranging from $17,000 to $20,000 for a basic kitchen remodel. "Since the kitchen occupies a highly visible space in the home, it's understandable that families want it to reflect their style and personality. But unfortunately, a traditional kitchen remodel can mean a bigger investment of time and money than many families can handle," says Rust-Oleum Senior Brand Manager Ann Gearty. DIY Pot Racks For Every Small Space Situation Roundup.
Painted Countertops. Yesterday, I mentioned that we bought some countertop paint and I am back to give my first full report.
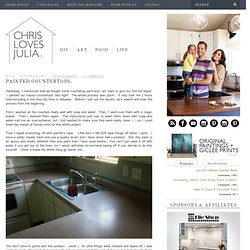
I painted our mauve countertops last night. The whole process was quick! It only took me 2 hours total including a one hour dry time in between. Before I spit out the results, let’s rewind and start the process from the beginning. First I washed all the counters really well with soap and water. Then I taped everything off with painter’s tape.
You don’t have to prime with this product. Rustoleum’s countertop paint comes in 16 colors. Really shiny, right? Should we check out some before and afters? Then I made a roman shade and painted the countertops and now the kitchen looks like this: While painting the countertops is just an intermediate step to tide us over until we do our full kitchen remodel in the next year or so, you can’t beat $20 for this transformation! The cabinet primer and paint came to $66. Overall, we are giddy. DIY Wood Countertops. In between working on my bedroom, building a porch & all the other 89 projects I have going on around here, I’m slowly working on sprucing up my kitchen a bit by adding some new DIY wood countertops.
When we first remodeled our kitchen nearly 5 years ago, it was our initial decent into major DIY. We’d always fixed things around our own home, but that project was where we cut our teeth on ripping out walls, taking out floors, and even building our own cabinets. Start small? Not us. Full throttle or nothing, baby. Fast forward to now, and we can look back and see things we wish we’d done differently. Recycle Hardwood Flooring To Counter Tops. When our house caught fire in 2008 the hardwood flooring was ruined by water damage.
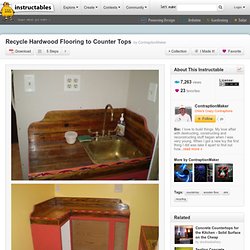
Not being the kind of person to throw something out, I saved the better of the boards. This instructable will show you how I used these boards to create some beautiful counter tops. For this project you will need the following: Flooring-This should be a hard wood and can be new but used is better Trim-for the drip edge Base for counter top-I used some old wall cabinets as my base Table saw Band saw or jig saw Circular saw Pocket-hole jig Router (optional, you can use your table saw to make the rabbit) Belt sander Square Ruler Straight edge Drill/Drill driver Clamps Glue Sandpaper Poly-urethane This is a project anyone can do. It uses a very simple joinery technique, namely pocket screws. How To Paint Kitchen Cabinets. This post is for anyone who hates their kitchen cabinets and is thinking of doing a DIY Kitchen Makeover and transforming the cabinets with paint.
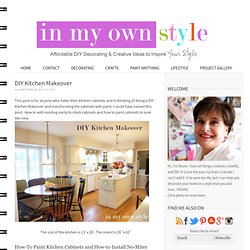
I could have named this post: How to add molding easily to stock cabinets and how to paint cabinets to look like new. The size of the kitchen is 13′ x 20′. The island is 26″ x 62″ How To Add Molding Panels To A Flat Door. When my sister brought me on to the Topsail Beach condo renovation, she had a laundry list of DIY projects she wanted me to complete.
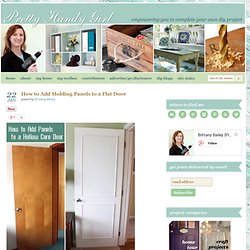
One of them was dressing up the hollow flat doors with moulding panels. She showed me a pin that led to One Life to Love’s DIY beadboard panel doors. After seeing the photo, I knew it would be a great DIY upgrade to make. But, we decided to use real beadboard (instead of beadboard wallpaper) because it had to hold up to the stress of being a rental. To begin, start by measuring and marking the doors to determine the size of your panels. Draw lines 5″ in from the top and two sides of your door. When marking your doors, use a pencil and level to draw your lines. After we had our panel measurements, Caitlin and I headed to Lowe’s. We pulled some 4′ x 8′ beadboard panels and took them to the lumber cutting area. Materials: Instructions: Assess the condition of your door.
Apply wood putty and allow it to dry. After dry, sand the putty smooth. Press Aluminum Cans Into Ceiling & Wall Tiles. Make some foam cutting tools if you feel like it, a good sharp utility knife will do OK on this step.
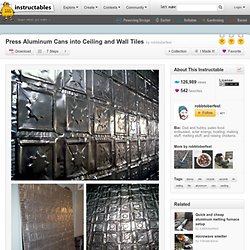
This link has a great variety of foam cutting ideas: or styrofoam of some kind is carved into the shape you want to cast aluminum into. I used egg cartons, take-out containers, and dumpster scavenged foam. These foam pieces are exactly how the aluminum cast will turn out, so put some effort into this step. First make two rectangular blocks out of the foam, about a half inch think and 8.25" by 3.75". Print out a stencil or create your own for guiding and cutting a design on the 8.25" x 3.75" foam blocks.
One foam piece should have an negative impression in it and the other should have the positive impression using egg carton foam (see picture). Now finally hot glue on a foam sprue on the center back of the block; this forms a channel for pouring the molten aluminum into the cast. $148.00 Bathroom Makeover. Here it is!

Sadly, we didn't have the before pictures we thought we had, so we had to go with the only one we could find. It's not a great shot, but you get the jist right? HID-EEEEE-OUS !!!! Keep in my that I am 110% junker by professional choice, so the decor in the shots are things I have around the house and use in re-purposing projects or for sale on my website. (sadly no I don't ship .. yet) So here is the dreadful before shot!
And Here are the after shots.