Zoom
Trash
Related: Arduino
- Arduino MBlock MBot
- Internet of things
- Fabrication numérique
- Reference
- Arduino Project Hub
- Projects
- Education
- Enterprise

Brancher et programmer un encodeur rotatif. Un encodeur rotatif est semblable à un potentiomètre sauf qu'il continue à tourner à l'infini, dans les deux sens.
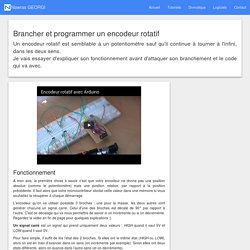
Je vais essayer d'expliquer son fonctionnement avant d'attaquer son branchement et le code qui va avec. Fonctionnement A mon avis, la première chose à savoir c'est que votre encodeur ne donne pas une position absolue (comme le potentiomètre) mais une position relative, par rapport à la position précédente. Il faut alors que votre microcontrôleur stocke cette valeur dans une mémoire si vous souhaitez la récupérer à chaque démarrage.
L'encodeur qu'on va utiliser possède 3 broches : une pour la masse, les deux autres vont générer chacune un signal carré. Un signal carré est un signal qui prend uniquement deux valeurs : HIGH quand il vaut 5V et LOW quand il vaut 0V. Pour faire simple, il suffit de lire l'état des 2 broches. DIY Muscle Sensor / EMG Circuit for a Microcontroller. Measuring muscle activation via electric potential, referred to as electromyography (EMG) , has traditionally been used for medical research and diagnosis of neuromuscular disorders.
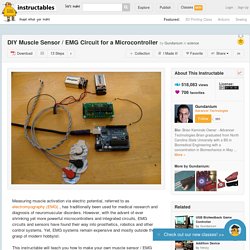
However, with the advent of ever shrinking yet more powerful microcontrollers and integrated circuits, EMG circuits and sensors have found their way into prosthetics, robotics and other control systems. Yet, EMG systems remain expensive and mostly outside the grasp of modern hobbyist. This instructable will teach you how to make your own muscle sensor / EMG circuit to incorporate into your next project. Use it to control video games, robot arms, exoskeletons, etc. Click on the video below for a demonstrations on how to hook up and use your EMG circuit board! You can now also purchase EMG sensors, kits, cables and electrodes at www.AdvancerTechnologies.com! Les interruptions (1) La façon dont un Arduino se programme a été présentée dans « La programmation, qu’est ce que c’est » et les articles suivants de la série.

Vous savez donc que le logiciel qui vient avec l’Arduino appelle une fois la fonction setup() puis appelle ensuite loop() de manière répétitive. Généralement, pour mettre en œuvre un système, on va, dans loop(), lire des entrées de l’Arduino, qu’elles soient analogiques ou numériques, exécuter un certain nombre de calculs en fonction de ces entrées puis modifier l’état du système, ce qui aboutira éventuellement à positionner des sorties.
Ces lectures se font donc de manière répétitive. KTechlab. Launchpad / Sequencer with MIDI output - All. Gizmo. Gizmo is the codename for an open source MIDI utility device which targets the Arduino Uno or Mega.
It can do at least this: There will be yet more things coming for the platform. Demos Gizmo's LED display is rock-solid, steady bright red. But in these videos it looks like flickery, junky yellow due to the camera. :-( Annoying. Obtaining Gizmo Github Repository Manual (in PDF) To assemble Gizmo, you'll need an Arduino Uno or Mega (if you want to develop, get a Mega), a SparkFun MIDI Shield, some Arduino headers (I use stackable headers), an Adafruit 16x8 LED Matrix Backpack (they come in various colors, shapes, and sizes -- I use 1.2" round amber red), and four Male/Female Jumper wires. Arduino Based MIDI Sequencer. I’ve programmed a sequencer for the Arduino microcontroller platform, designed to be used with the Sparkfun MIDI Shield.
The sequencer combines an arpeggiating sequencer like that found on the Access Virus with a transposable recording sequencer, similar to the one on the Roland SH-101. get it here. Arduino Sequencer - Sequenceur arduino - sequenino. Utilisez le pilotage infrarouge - Perfectionnez-vous dans la programmation Arduino. Raspberry Pi and Arduino Connected Using I2C - Oscar Liang. With Raspberry Pi and I2C communication, we can connect the Pi with single or multiple Arduino boards.
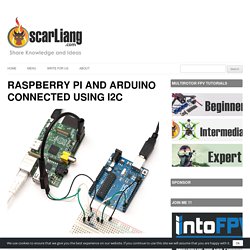
The Raspberry Pi has only 8 GPIO’s, so it would be really useful to have additional Inputs and outputs by combining the Raspberry Pi and Arduino. There are many ways of Linking them such as using USB cable and Serial Connection. Why do we choose to use I2C? One reason could be it does not use your serial, USB on the Pi. Given the fact that there are only 2 USB ports, this is definitely a big advantage. In this article I will describe how to configure the devices and setup Raspberry Pi as master and Arduino as slave for I2C communication. Multiplexage d’ADC sur Arduino. Les cartes Arduino sont idéales pour s’initier à la programmation, ou bien réaliser simplement de petits projets d’électronique.
Maximising your Arduino's I/O ports with MCP23017. This is chapter forty-one of a series originally titled “Getting Started/Moving Forward with Arduino!”
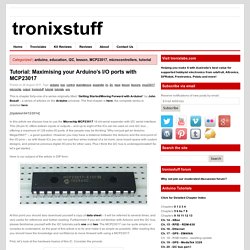
By John Boxall – a series of articles on the Arduino universe. The first chapter is here, the complete series is detailed here. [Updated 04/12/2014] In this article we discuss how to use the Microchip MCP23017 16-bit serial expander with I2C serial interface. This 28-pin IC offers sixteen inputs or outputs – and up to eight of the ICs can be used on one I2C bus… offering a maximum of 128 extra I/O ports. Here is our subject of the article in DIP form: At this point you should also download yourself a copy of data sheet – it will be referred to several times, and very useful for reference and further reading.
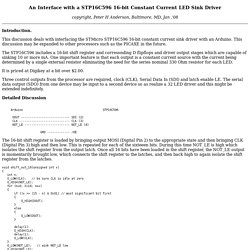
First, let’s look at the hardware basics of this IC. The sixteen I/O ports are separated into two ‘ports’ – A (on the right) and B (on the left. Stp_596. An Interface with a STP16C596 16-bit Constant Current LED Sink Driver copyright, Peter H Anderson, Baltimore, MD, Jan ,'08 Introduction.
m4l-connection-kit/Arduino at master · Ableton/m4l-connection-kit. Ableton/m4l-connection-kit: Max for Live Connection Kit. V2.3ProtocolDetails - Firmata. From Firmata This page describes version 2.3 of the Firmata protocol.
This version is an update to version 2.2. Angle was removed from servo config. Otherwise, the protocol itself has not changed since v2.2 but the Arduino Leonardo was added to boards.h and additional features such as I2C were implemented in the StandardFirmata example application. You can see a history of the changes on the ProtocolChangeLog page. The Firmata protocol is designed to be extended, the Proposals page is the place to propose new extensions. Bigfug/Fugio: An open visual programming system designed for fast development and long-term preservation of digital art and creative exploration. Resources. Scanneur i2c. Arduino-info - LCD-Blue-I2C. IMPORTANT LCD Software Library Info: ALL these displays will now use the great Library written by F Malpartida . You should download that Library HERE (Click) (Get the latest file such as NewliquidCrystal_1.3.4.zip ) If you try to Verify and you see this:error: 'LiquidCrystal_I2C' does not name a type ...this means you do not have the library installed correctly.
SerialLCD. Serial LCD tutorial by djmatic With a simple four wire connection and the code below, the Arduino can drive serial LCD displays. The main advantage of serial LCD's is that they are easier to wire up, since the Arduino talks to the LCD over a single pair of wires. SerialLCD. Libraries. Reference Language | Libraries | Comparison | Changes The Arduino environment can be extended through the use of libraries, just like most programming platforms. Libraries provide extra functionality for use in sketches, e.g. working with hardware or manipulating data.
To use a library in a sketch, select it from Sketch > Import Library. A number of libraries come installed with the IDE, but you can also download or create your own. See these instructions for details on installing libraries. Standard Libraries. Www.mon-fablab.fr. Référence Arduino français Main/Reference. Collin's Lab: MIDI. [TUT][SOFT] Recovering from a "locked out" AVR. Reference.
MidiDevice. /* This examples shows how to make a simple seven keys MIDI keyboard with volume control Created: 4/10/2015 Author: Arturo Guadalupi <a.guadalupi@arduino.cc> */ #include "MIDIUSB.h"#include "PitchToNote.h"#define NUM_BUTTONS 7 const uint8_t button1 = 2; const uint8_t button2 = 3; const uint8_t button3 = 4; const uint8_t button4 = 5; const uint8_t button5 = 6; const uint8_t button6 = 7; const uint8_t button7 = 8; const int intensityPot = 0; //A0 input const uint8_t buttons[NUM_BUTTONS] = {button1, button2, button3, button4, button5, button6, button7}; const byte notePitches[NUM_BUTTONS] = {C3, D3, E3, F3, G3, A3, B3}; Blynk. MegaJiXiang / ArduinoProjects. Floss Manuals francophone - Lire. Comment introduire le monde réel dans nos applications ?
Comment interagir avec nos créations numériques dans le monde concret qui nous entoure ? Une solution relativement facile à mettre en œuvre consiste à utiliser la plateforme de développement matériel Arduino et de l'interfacer avec Pduino ou Msg. PURE DATA forum~ WIKI. Ttymidi. MIDI for your serial devices In a nutshell ttymidi is a GPL-licensed program that allows external serial devices to interface with ALSA MIDI applications. The main motivation behind ttymidi was to make Arduino boards talk to MIDI applications without the need to use (or build) any extra hardware. Usage. MIDI Shield Hookup Guide. Favorited Favorite 1 Introduction. How to build a MIDI controller with the Arduino, Firmata and Pure Data. Time to start contributing some knowledge back to the wonderful world that is the internet; today, a step by step nice and easy tutorial on getting started to building your own MIDI controllers with the arduino.
When researching for my ableton controller project, I didn’t find much out there about using firmata on an arduino to send data to software. The standard approach just seemed to be create the code in the arduino language, upload it to your board and hack one of those MIDI to USB cables as a bodge job way of getting the MIDI out of the arduino. Code. This page contains personal projects or parts of projects that might be helpful to others.
All projects deal with Pure Data and/or Arduino Pure Data abstractionsMiscellaneous abstractionsOscillator abstractionsFilter abstractionsArray abstractionsBand-limited waveform abstractions Pure Data abstractions and Arduino sketchesArduino-Pd, Pd abstractions to facilitate the communication between the Arduino and Pd TutorialsArduino for Pd’ers, tutorial on the communication between the Arduino and PdMaking Voltage Controlled Oscillators in Pd, tutorial on waveshaping. Pure Data vs Arduino — Centre de Ressources Numériques - Labomedia. PD. Hans-Christoph Steiner's Pduino Pduino: The Firmata firmware and matching Pd object. Easy Serial on the ATtiny. Introduction The Atmel tinyAVR MCU's are great little chips for projects but can prove difficult to debug.
Some ATtiny chips do not have direct support for hardware based serial and therefore the Serial object is unavailable in your code, however, it is easy to add a SoftwareSerial object and view output in the Arduino IDE. The code in this article uses an ATtiny85 with an FTDI Serial TTL-232 USB Cable to send or receive information. A USB Serial TTL Cable can also be used since the CTR and RTS pins are not needed. NOTE: This cable is not used to program the AVR. Cs.gmu. Lathoub/Arduino-AppleMidi-Library: Use standard Ethernet network to send MIDI messages. Arduino to Pure Data. Nf.interactive.
PD. How to build a MIDI controller with the Arduino, Firmata and Pure Data. MPR121 Hookup Guide. DFUProgramming8U2. The ATmega16U2 chip on your Arduino board acts as a bridge between the computer's USB port and the main processor's serial port. Previous versions of the Uno and Mega2560 had an Atmega8U2. It runs software called firmware (so named because you couldn't change it once it had been programmed in the chip) that can be updated through a special USB protocol called DFU (Device Firmware Update). Here's how to update the firmware on your 16u2 in a few steps. Check whether you need to update the firmware. HIDUINO via DFU Method · ddiakopoulos/hiduino Wiki.
OpenTransport. Linux: 3D print, robotic, rt-kernel, and microcontroller. Arduino: Create your own touch sensitive MIDI-keyboard/-controller. DFUProgramming8U2. Raspberry Pi and realtime, low-latency audio. Arduino/hardware/arduino/avr/firmwares/atmegaxxu2 at master · arduino/Arduino. Ddiakopoulos/hiduino: Native USB-MIDI on the Arduino. USB midi controller (Theremin style) on Arduino Uno. MidiWith8U2Firmware. [solved] DFU Mode Arduino UNO without soldering. DIY MIDI Over USB using Arduino Uno - Randumb page. Ddiakopoulos/hiduino. MIDI Touch more. MIDI Projects: MIDI Shield. Makey Makey MIDI controller.
13 Note MIDI Laser Harp. How to Make a Cheap Arduino MIDI Controller - All. Arduino MIDI Bass Pedals - All. Arduino, Sensors, and MIDI. Draw MIDI. Controlling a MIDI CC in Ableton Live with an Arduino Uno. Make your own cheap USB MIDI Controller or Keyboard. Draw It Yourself - MIDI controller with conductive ink. Wiring Up a MIDI controller. Teensy MIDI USB foot controller for controlling Mobius Looper. Makey Makey MIDI controller. Arduino and MIDI out. Arduino: Create your own touch sensitive MIDI-keyboard/-controller. Arduino: Create your own touch sensitive MIDI-keyboard/-controller. Arduino Project Hub. Projects. USB MIDI contoller using Arduino UNO (Second version 2.0) - Randumb page.
DFUProgramming8U2. DIY Midi Foot Controller Using An Arduino Uno. MidiFootCode. Arduino and MIDI out. Printing DSP Shield. Projects. Knock. KnockSensor. Projects using the Teensy USB development board. Tim Thompson's Home Page. Build Your Own Custom DIY MIDI Controller with KNTRL. The Gloves Project. Flora MIDI Drum Glove. Arduino Tutorial - Lesson 1 - Let there be blink! Makey Makey. Use Makey Makey Style Touch USB Shield as a Keyboard.