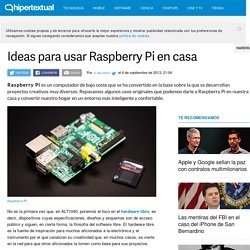

Cinco utilidades del mini-ordenador Raspberry Pi. Ideas para usar Raspberry Pi en casa. No es la primera vez que, en ALT1040, ponemos el foco en el hardware libre, es decir, dispositivos cuyas especificaciones, diseños y esquemas son de acceso público y siguen, en cierta forma, la filosofía del software libre.

El hardware libre es la fuente de inspiración para muchos aficionados a la electrónica y el instrumento por el que canalizan su creatividad que, en muchos casos, se vierte en la red para que otros aficionados la tomen como base para sus proyectos. Entre los proyectos de hardware libre más destacados encontramos a Arduino y Raspberry Pi, dos proyectos que son la base de muchos proyectos creativos y que, en el caso de Raspberry Pi, también es la base de un bello proyecto para llevar la computación a escuelas de todo el mundo.
Raspberry Pi un computador de bajo coste (apenas 30 dólares) que, además de eliminar la brecha digital en las escuelas, se ha revelado como un computador altamente versátil sobre el que se están desarrollando todo tipo de proyectos. Ambilight. RasPi.TV. Webcam transmisión en vivo con el Raspberry Pi - Blog Kopfkino. Hallo zusammen! Heute wollen wir verschiedene Möglichkeiten vorstellen, wie man einen Livestream vom Raspberry Pi aus versenden kann. Wir setzen hier eine “normale” USB-Webcam voraus, nicht die spezielle Pi-Cam. Vorneweg möchten wir noch eine Bemerkung zu mjpeg-Streams machen. Eigentlich sind sie eine relativ gute Lösung, um insbesondere mit wenig CPU-Aufwand auf dem Pi zu brauchbaren Ergebnissen zu kommen. Allerdings ist das Format scheinbar nicht wirklich standardisiert, d.h. ein mjpeg-Stream von motion (s.u.) wird von Chrome nicht angezeigt, einer von mjpg_server aber schon – so zumindest unsere Erfahrung.
Webm- und Ogg-Streams haben zwar den Vorteil von allen modernen Browsern angezeigt zu werden, ohne dass ein zusätzlicher Aufwand betrieben werden müsste, aber der kleine Pi kommt ganz schön ins Schwitzen beim Berechnen des Streams; schon wenn er nur das macht, stockt der Stream und noch irgendwas anderes gleichzeitig auf dem Pi laufen zu lassen, wird dann undenkbar. Show » Geschafft. Cómo dar vuelta a un Raspberry Pi en un dispositivo de almacenamiento de red de baja potencia.
Mix together one Raspberry Pi and a sprinkle of cheap external hard drives and you have the recipe for an ultra-low-power and always-on network storage device.

Read on as we show you how to set up your own Pi-based NAS. Why Do I Want to Do This? The benefit of having an always-on network storage device is that it’s extremely convenient to have your data (or backup destination) always accessible to the computers both inside and outside your network. The downside, in most instances, is that you’re consuming a fair amount of power for the convenience.
Our office server, for example, runs 24/7 and consumes almost $200 worth of power a year. We’ll be the first to grant you that a full fledged server is going to have more storage space and the capability to do more work (such as transcoding a multi-terabyte video collection in a reasonable span of time). What Do I Need? In addition to the gear you’ll need from the Getting Started with Raspberry Pi tutorial, you’ll only the following hardware: or.
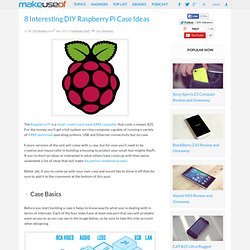
40 + Ideas frescas para su Proyecto PI Raspberry. 8 interesantes bricolaje Ideas Raspberry Pi Case. The Raspberry Pi is a small, credit-card sized ARM computer that costs a measly $25.

For the money you’ll get a full system-on-chip computer capable of running a variety of ARM-optimised operating systems, USB and Ethernet connectivity but no case. Future versions of the unit will come with a case, but for now you’ll need to be creative and resourceful in building a housing to protect your small-but-mighty RasPi. If you’re short on ideas or interested in what others have come up with then we’ve assembled a list of ideas that will make the perfect weekend project. Better yet, if you’ve come up with your own case and would like to show it off then be sure to add it to the comments at the bottom of this post. Case Basics Before you start building a case it helps to know exactly what you’re dealing with in terms of internals.
The dimensions of the unit are 85.60mm x 53.98mm x 17mm with a slight overlap for the protrusion of the SD card. Lego It’s been done to death, and for good reason. OwnCloud con Raspberry Pi - Electroensaimada DIY, Raspberry Pi, Arduino ...