
S.T.E.L.: Simple & Elegant hairdo ~ E.L. I've been doing this hairstyle ever since I caught one of my friends doing it in the exam hall, I was sitting behind her during the paper and she did the whole hairdo in 2 seconds even without anything to secure it in place!

I was so impressed! So now I'm sharing it with you here, unlike my friend's hair, it does need a hair-tie rubber band to secure it in place. It's so easy and quick to do this! And it works for hair at my length and longer, for straight or curly, thick or thin hair. My sparkle: Capelet...Sneak Peek. I know I've mentioned that my smock pattern is going to appear in the upcoming "Fabric Extravaganza: One Yard Wonders", but I thought I'd share a little sneak peek of the other pattern of mine that will also be included.

Its for a little self-lined toddler capelet, and it just screams brisk fall day to me (which is also what the newly crunchy leaves in my yard are screaming!). I just love the kind of old fashioned charm of clothes like this. I meant to make a little hat of some kind to go along with it...and maybe a hand muff, but oh-- the projects I never get around to. This book will be kind of like the first book...projects featuring one yard of fabric, but this time with a focus on slightly more advanced projects that utilize a more diverse range of fabrics. I made this one (this summer while seriously battling pregnancy nausea!) Features low budgeted lifestyle projects that are fun, QUICK, and easy: SPOOKY DIY Ghosts for Halloween... Summer pants complete! The summer pants I’ve been planning and making are finally done!
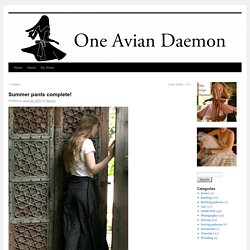
I’m pretty happy with the way they turned out. They are so wide legged they border on costumey, and I felt kind of weird wearing them to work. But they are so comfortable on a hot day, and they make me feel like the star of a black and white movie. I followed the instructions I posted last month to draft the pattern for the legs. The waist band is just a strip of fabric 4″ wide and about 50″ long, and a lining with the same dimensions.
The dark gray chambray was the perfect fabric. If you want your own and don’t want to make them, they are available in my store. Fleece Cowl Capelet - Fleece Fun. Doll Face Candles and Other Creepy Glassware. Waterslide decals make it easy to dress up cheap candleholder and other glassware for a spooky Halloween display.

I got hooked on them when I found this crazed doll face picture and thought it would look really creepy around a glowing candle. This is a really simple project, but can have a really high impact look. The only tricky parts I found were finding the waterslide paper and cutting out some of the more detailed images. Supplies: How to create your own Lifebook: A personal workbook of your life. For me, creating a lifebook is the love-child of both; my obsession with stationary and my obsession with planning and documenting my life.

How to make a Photo-Print Hair Ribbon. The Alice in Wonderland trend is just raging at the moment.

Have you hopped on board yet? If you haven’t, it’s not too late! You can try out this super duper fluper cool idea of printing your favourite film negatives onto a hair ribbon and making it yours. It’s an especially fun and sweet gift for the photography enthusiast. Along with the Canon Lens Mug, of course. Coolios, right? Images and Tutorial taken from UpCraft These are all the materials you’ll need:Violet Inkodye, foam brush, pins, silk ribbon, black and white negatives and a work surface board. Polymer Clay Pens: Marble Tutorial. Dear Chicago House, What do you know, those polymer clay covered pens have been a huge hit in blog land and I did promise a more techniques on creating them.

So it is about time I shared a tutorial on making a marble design, and in celebration of up coming valentines day they are in pink Lets kick off with the finished product. You will need A few blocks of polymer clay- contrasting colors work best and I use SculpeyCheap pens that the ink stick can be removed from. To make a Marble Pattern Start by softening the clay in your hands, some colors take a lot longer to soften than others. DIY Heart Cutout Cardigan. You can't really tell it by my current wardrobe full of glitter and skirts, but growing up, I was not one of those girls with a collection of frilly dresses.

In my elementary school years, my wardrobe staple was a pair of red cowgirl boots. In my middle school years, I was partial to my "Billy Keller Basketball Camp" basketball shorts and this furry-feeling orange tank top. (Yeah.) But through all my wardrobe transitions over the years, I've always had a thing for hearts. We've always gotten along. ;) Handcrafted Resin Picture Photo Pendants by Artyscapes. Artyscapes is not a kind of typical jewelry you have used to see.

This is the collection of handcrafted resin, picture and photo pendants. They are finished in silver, vintage brass and vintage copper. The subject matter of these items is very wide, from the theme of the autumn which is topical now, and the theme of Halloween, to the ethno style. You can find here anything you like – maps, fairytales, animals, masterpieces of different cultures and even the celebrities. The designer of this brand is always on the lookout for new designs enlarging an eclectic range of beautiful images. Fast Five ~ Ties & Whimsy. Who are you? I’m Alisa and my repurposed fashion accessory business is called Ties&Whimsy. I am inspired by vibrant colours and beautiful textures and I love unique, quirky recreations of everyday objects. DIY Transparent Boutique Soap Bridesmaid Gifts. We are sharing another teaser of what our DIY Contest is bringing to you next month.

If you’re just hearing about the contest now, let me give you a briefing on the sweet little details – such as first place price of $500, second place prize of $300 gift card to ModCloth and third place will receive a Silhouette Machine, a $299 value. I made these boutique soaps with vintage illustrations that would make great bridal shower gifts or an addition to your bridesmaid gift totes. What girl doesn’t like being pampered with nifty handmade soap?
It literally takes you 5 minutes to do it all. What you’ll need: - Clear glycerin - Transparency sheets (can be purchased by the sheet at stores such as Kinko’s) or water soluble paper (can be found at Amazon) - Soap molds - Essential Oil Instructions: To make the designs shown in the soap, print anything of your choosing (monograms, illustrations, etc) on transparency sheets. 1. DIY Monogramed Bag. Coveting monogramed bags? Whether it's for your professional day job, or a cute weekend bag, you can monogram your favorites with that old-school crafter tool...the wood burner. First, BE CAREFUL! Good golly, these things get hot! Eddie Borgo Pyramid Stud Choker. DIY Sweat-sacoche diy-laptop-sweat – the Trendy Girl. DIY: Tuxedo Jacket with Tails. I've always found fashion inspiration in non-traditional places — I rarely buy anything I see in a magazine because I prefer the look and feel of street style or the quirky taste of fashion bloggers.
For some reason, I also am a huge fan of airport fashion. (Minus all the velour sweatpants.) About a month ago, I was in the airport, exhausted, and I looked up to see this über chic girl standing in front of me wearing a tuxedo blazer with tails. I had to figure out where to find one. Lovely Washi Eggs. Inkblot Nails DIY Rorschach Manicure. I’m in love with this Rorschach Inkblot manicure. It spawned simply from wanting black and white nails without using polka dots or stripes. That was it really. DIY speech bubble hair pin. For the things you might not say out loud...:3 Mine is a quote from Lorelai Gilmore which perfectly do justice for all the gibberish in my head, too. For this project you need your own design of a speech bubble, transfer paper, some fabric (cotton), a hair pin and some stuffing fluff (or whatever it's called). And here's an additional pic, you can see more of this here. And now something completely different.... Rules to this award: 1. 2. 3. 4.
Through My Looking Glass - Christy Buonomo Photography: Witch's Spell Book. ✄ Concours D.I.Y avec Etsy. Avant de revenir avec pleins de surprises, voici d’abord un concours qui me tient à coeur, non seulement parce que je suis jury (- oué je suis SUPER fière :D -), mais surtout parce que le thème est très inspirant ! Etsy organise un concours Do It Yourself spécial kids. L’idée est d’imaginer et de créer pour les enfants un tutoriel simple et ludique. Celui-ci peut prendre la forme que vous souhaitez : une recette, un rangement pratique et amusant, un jeu… Laissez libre cours à votre imagination ! Vintage Rag Curlers Pattern and Tutorial. How to Do a Sock French Twist. Diy: reclaimed book cardholder. Bohemian Chain Headpiece. ☩DIY☩ Miu Miu Sequin Bird Dress. Red Riding Hood Cape Pattern - Fleece Fun. DIY Feather Hair Extensions. Gift Ideas for Any Event: Photo Bracelet from Wristpix. Wristpix are comprised of the most precious gems of all… your photos. Page 37. DIY Magazine Envelopes.
Feather Extensions. So the long awaited post is here! Beyond Beyond - UK & International Wedding blog // Photography, Style, Design & Inspiration. Welcome to hump day you lovely fashionistas, you gorgeous lot – it is outfit time and do you know who is killing if for the second time in best of the guest we have to doff our caps to H&M who are thrilling us with their new range – The Glamorous Conscious Collection.
How to Make Hot Air Balloon Ornament Tutorial. DIY – Map Wallet. Bridget Hair Tutorial. Diy. DIY Silk Stacking Rings. Bohemian Lampshade: DIY Tutorial. Cornflower Blue: How to ReStyle a Men's Shirt (for a Lady) Design, Life and Happy Accidents. Celtic Mommy: How to make custom oval necklaces. DIY Houses by Night. DIY Zipper Headband. Perfect Summer Bangle. Bohemian Chic Hair Pin. How to make my Chalk Lines Skirt. Minimeg: Handmade Books. Old Hollywood Glamour ~ Lace Halter Bustier DIY.
DIY Dollhouse Jewelry. Does PINTEREST KNOW EVERYTHING? Longstitch Bookbinding Tutorial for a Leather Journal. Carrie’s Messy Beehive Tutorial « WishWishWish. Ducks in a Row - All Things Parties + DIY: Hair Tutorial: Get Curly Hair Using an Old Pillowcase. Rae Gun Ramblings: Guest Post: Resin Bottle Cap Pins Tutorial and Printable with Heidi of Digknity. Feather pen pal stationery kit. How to Make Clothing Buttons from Shrink Plastic… DIY Lace Chandelier!!