
Paperweight Granny African Flower. Join-As-You-Go Method for Crochet Motifs « Speckless Blog. There are many ways to join your motifs, but I think that the join-as-you-go method is the easiest and quickest way.
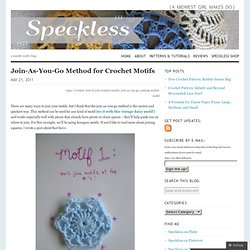
This method can be used for any kind of motif (try it with this vintage daisy motif!) And works especially well with pieces that already have picots or chain spaces – they’ll help guide you on where to join. For this example, we’ll be using hexagon motifs. If you’d like to read more about joining squares, I wrote a post about that here. First, plan out how you are going to arrange your motifs (based on color and shape). For the second motif, only work part of the final round. Here’s what a slip stitch join looks like: As you can see, the hexes will be joined at two points for the entirety of the first row of motifs.
Next, we’ll try a single crochet join. Insert your hook into the corner as you did for the slip stitch join, but this time make a single crochet in the corner. Pretty easy, right? Plan ahead, especially if you have a specific color pattern in mind. Crochet in the Round: Magic Circle Start « Speckless Blog. Hi, everyone!

I will be posting some techniques here and there, and I thought this was a good place to start. THE FLOWER BED. Lanas&Hilos: FILL THE GAP in the HEX. One of the reasons many people shy away from hexagon motifs is because of the gaps that the pattern leaves on the border.
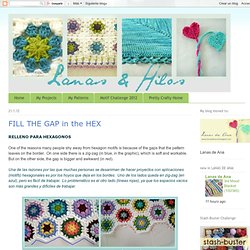
On one side there is a zig-zag (in blue, in the graphic), which is soft and workable. But on the other side, the gap is bigger and awkward (in red). Una de las razones por las que muchas personas se desaniman de hacer proyectos con aplicaciones (motifs) hexagonales es por los hoyos que deja en los bordes. Uno de los lados queda en zig-zag (en azul), pero es fácil de trabajar. Lo problemático es el otro lado (líneas rojas), ya que los espacios vacíos son más grandes y difíciles de trabajar. What to do about those gaps? CHICKPEA SEWING STUDIO: The Little Crochet Basket Pattern is Ready! Free irish rose pattern. I am making a blouse using this Irish rose pattern here is the pattern for you use.

You can use it to make afghans or any thing else you can work your mind around. I am using sewing thread and a size 14 steel hook but you are welcome to use any hook that corresponds to your yarn size... I will add other details to the blouse. My thread is vintage sewing. I plan on there being this pattern down the center of both sleeves, across the top of the yoke front/back and a few stripes down the front of the bodice.
Natural crochet bag. Fanciful Flower Potholders. Introduction: These Fanciful Flower Potholders are made of 100 percent dk weight cottons in bright and bold colors.
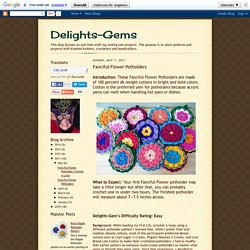
Cotton is the preferred yarn for potholders because acrylic yarns can melt when handling hot pans or dishes. What to Expect: Your first Fanciful Flower potholder may take a little longer but after that, you can probably crochet one in under two hours. The finished potholder will measure about 7—7.5 inches across. Fleece cushion cover for crochet. Hello lovelies , Here's a little tutorial on how to make a crochet cushion cover using fleece material .... an old blanket in my case.....to make an envelope style cover and a button closure .
I've also added a pretty crochet trim to finish it off the back. I've chosen fleece fabric for this project as it is nice and soft but also because it doesn't fray and so the amount of sewing required is kept to a minimum. Crocheted Rose Pillow Tutorial. Sometimes Sharon and I are surprised by how much we're on the same page.
Rose hip : Eureka!... ...the crochet pattern for the flower squares is finally written out for you to try out...To those of you who have been waiting for it -- thanks for your patience!
So, here goes: With the color of yarn you wish to use for the center of the flower, ch 4 and join with a sl st into the first ch to form a ring. Continue working in the round as follows: Round 1: Ch 4 (counts as 1 dc, ch 1), * 1 dc into ring, ch 1 **; repeat from * to ** 6 times. Join with a sl st into 3rd ch of the ch-4 made at the beginning of this round. Round 2: Join the color you wish to use for the petals into any of the ch-1 spaces, ch 1 and * 1 sc, 3 dc, 1 sc ** into the same ch-1 space; repeat from * to ** into the next 7 ch-1 spaces. Crochet. This cushion has been such a happy project to work on, a quick and spontaneous make which I used to test out my new Raindrops stitch pattern.
I also wanted to try using chunky yarn for the first time, so the combination of the new stitch and the new yarn was a whole new experience for me. Teeny Tiny Flowers. This is a very simple little crochet pattern for small five-petalled flowers and leaves.I love making crochet flowers.
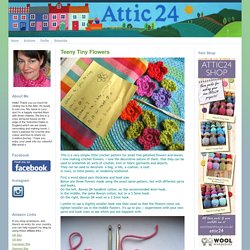
I love the decorative nature of them, that they can be used to embellish all sorts of crochet, knit or fabric garments and objects. They can be used to decorate a bag, a hat, a cushion, a coat. In rows, in little posies, or randomly scattered. First a word about yarn thickness and hook size.Below are three flowers made using the exact same pattern, but with different yarns and hooks.On the left, Rowan DK handknit cotton, on the recommended 4mm hook.In the middle, the same Rowan cotton, but on a 3.5mm hook.On the right, Rowan DK wool on a 3.5mm hook. I prefer to use a slightly smaller hook size than usual so that the flowers come out tighter/smaller (as in the middle flower). The pattern is written in UK terms, the stitches as follows :: sl st :: insert hook, yarn over, pull the loop back through the stitch, then through the loop on your hook.
Blocking granny squares. Joining Squares as-you-go. I've been making granny squares for eighteen months now and in that time I've made a great many for blankets and cushions, all of which have been joined together after the squares themselves have been made. Then a few weeks ago when I had an idea to make a throw out of small three-round granny squares, I decided to test out a join-as-you go method. Quite honestly, the thought of sitting down with a huuuuuuuuge stack of small squares and attempting to crochet them all together actually filled me with alarm.
So I was really THRILLED when this joining-on-the-go method did indeed work out. It has really made a big difference to the way I feel about tackling a project composed of many small parts, because lets face it, the joining procedure is the least favourite part of blanket-making, and if that can be eliminated, well then, thats what I would call a REsUlt.
Big time. Kata pattern by Penny Davidson. Granny Square 92 pattern by Judy Bolin. Granny wheel square. Blushing Bride Square. I'd like to introduce you to something I've been working on for the past several days... Blushing Bride Square I'm thinking it would look nice made up in a solid off-white blanket with a picot or shell border.....but that's just me. I did make this square numerous times trying to work out the kinks and trying to find any errors I may have made in writing it out. That being said, if you come across something that doesn't make sense, or if you happen to find a mistake, please leave me a comment or send me an e-mail. So, roll out the white runner, put on Cannon in D and all rise for... Google Translate. Mary Go Round crochet flower ring tutorial. Well, here we are, my first crochet tutorial!
This is ever so exciting. I keep finding new ways to use these 'Mary Go Rounds'. I've just discovered they make the most whimsical little picture frames. And of course they can be worn as bracelets for the daring and discerning fashion forward among us. Attic24 Blanket Fest. Well hello my lovely Peeps, and welcome to the Attic24 Blanket Fest. No particular reason for this little celebration of blankety, hooky goodness today, I'm doing it Just Because.
Just because when I was photographing my sweet flower granny blanket back in January it was a glorious bright sunny day and I got carried away with wanting to photograph things. And a heap of blankets seemed as good a thing as any to point my camera at. You can tell by the above picture that Little B and I had a lot of fun that morning.
We both literally dived in to the pile and rolled around in it. I didn't even know off the top of my head how many blankets there were altogether, I had to line them up and count them. I was lucky at the time in that although I wasn't blogging about the experience, I did have some fabulous friends to share it with (Sarah, Donna, Fiona ♥ forever my hooky buddies). How many pot holders is too many? Hellooooooo!!! I hope you’ve all had a fantastic week! It’s a grey and windy Friday night here and I’m feeling relief that it’s the weekend… almost… one more day of work for me tomorrow, then a day of freedom! I am so completely thrilled at the joyful response to the granny tea cozy over the last few days!
It’s just great…. has anyone started to make one yet! Tell me! Today’s post is not about tea pots, but the next one will be, and I can’t wait to do THAT post! Rose hip : Rose hip : my September blur.... How To Make Fabric Covered Beads. Louis Vuitton "Knock Off" Fabric Bead Necklace. Yesterday was cotMC...code name for Craft of the Month Club...trust me... "this ain't your Mama's" craft club...this is a group of highly creative and talented artists that don't take things too seriously..there is no "Martha Stewart threat of perfection" we just like to get into the creative "flow" together and we always have lots of laughs while we are at it. Yesterday was my turn to show up with a project and all the supplies. Bags. Sewing. Japanese Flower Scarf. Looking at the above picture I suddenly feel quite sad!
Free Vintage Crochet Patterns. Printer-friendly version Send by email PDF version. Our creative spaces. The Woodstock Blanket. Sunburst Granny Square Blanket. Sunburst Granny Square. MoCrochet: Crazy Granny Square. Joining granny squares. Granny Heart Tutorial. Cozy Things: March 2011. Over 100 Free Crocheted Flowers Patterns at AllCrafts! Carina's Craftblog: Granny square joining tutorial. Conundrum. September 2010. December 2010. The baby blanket: more progress. ★ HOW TO Make PURSES. Project bags and devon completed. BOLSAS. Make Alpaca Wool Sweater into Felted handmade Bag tutorial - The Inadvertent Farmer. 25+ Makeup Bags & Rolls To Make: {Free Tutorials.
Slouchy Make-Up Bag Pattern PDF. Scrappy make-up pouch tutorial. How to Sew a Small Drawstring Pouch from 2 Squares. Box Bag Tutorial. Little boxy pouch tutorial « three bears. Tiny knitted acorn pattern. Knitted Pumpkin Pattern. Kitty Cat Tutorial/Pattern .....Part 1. Tutorial. DIY Friendship Necklace.