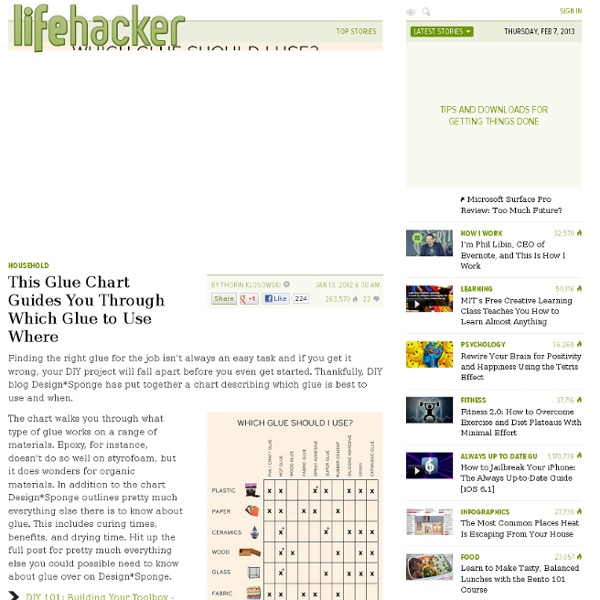
This Glue Chart Guides You Through Which Glue to Use Where - StumbleUpon
You know it's funny that most people often think super glue is a type of permanent adhesive, I believe part of the fault is how super glue manufacturer advertise their products. In fact, super glue can only be used for small (I meant VERY small) surfaces, such as cracks or small parts. Therefore it's often favor by hobbyist (Gundam models building :P), it cannot be used in industrial practices or metal works, although carpenters use it a lot. It could work wonder as temporal holding or dressing for fixed parts like bolts. Here's to answer your question: Super glue made mostly of Cyanoacrylate ( [en.wikipedia.org] ), a quick bonding acrylic resin (read: brittle) chemical that start to form when come in contact with water or just moisture. There are many brands of super glue, each with different compound to make the glue stay liquid and gel-like or to strengthen it, but they doesn't last well in the long run.
http://lifehacker.com/5875781/this-glue-chart-guides-you-through-which-glue-to-use-where
The Designer Pad - Straight To The&HeART
I consider myself a very crafty person and love everything handmade. I'm always delighted to see how others use their creativity to transform everyday materials into something unexpected and beautiful. When I stumbled upon these lovely heart pieces in Bloesem I was immediately seduced by them, especially by their sculptural vive. These personalized handmade Hearts are the creation of Brit artist Veronika, founder of the design studio Sarah & Bendrix. The funny thing is that it all started with a piece she made for a friend as a wedding present and everyone started asking about the artist...and the rest is history. You can tell she puts a lot of love, care and attention in each one of her creations.
Tutorial: Homemade Sidewalk Chalk
by Michelle Vackar, Modern Handmade Child One of our favorite outside activities at our home is drawing with chalk on the driveway. You can play hopscotch, four-square, and of course draw and create silly stories. My daughters and I were talking one day as we played hopscotch about how to make chalk and I thought to myself, let’s try it! It ended up being quite a lot of fun. What you will need: • Toilet paper or paper towel tubes • Scissors • Duct tape • Wax paper • Small bucket or disposable container to make the recipe • ¾ cup of warm water • 1 ½ cups Plaster of Paris • 2-3 tablespoons of tempera paint • Paper bag or a “mess mat”
How to Make Cold Porcelain
July 11th, 2008 Email 193 users recommend This pendant is made with cold porcelain, an air-drying modeling clay you can make in your kitchen. Cold porcelain is made from simple ingredients: white glue, cold cream, glycerin, cornstarch, and water. When the mixture forms one clump and has pulled away from the sides of the pan, it's done.
delightful country cookin: homemade air freshener - StumbleUpon
"Don't you get fresh with me, ya hear!" Oh, I love it when adults (especially grandparents) say that to little kids. What does it mean exactly?
Before & After: Crazy Beautiful Toy Kitchen
23.2K Flares23.2K Flares × LOOKING for more DIY play kitchens? Click here for a roundup with lots more projects, photos and ideas, including a DIY toy workbench for a little boy! And if you like this post, Subscribe to Green Your Decor for more DIY projects and green ideas! I like to think of myself as pretty crafty. I often see items in a store and think of a way (or find a tutorial) so I can make it myself.
How To Mix Chalkboard Paint in Any Color
We love using chalkboards as backdrops for displays and parties (like this one here!). So we were super excited to learn that you can create your own custom colors-and it's really easy! We first learned how from Martha Stewart whose tutorial you can read here.
DIY envelope clutch - StumbleUpon
(vintage romper, river island feather headband) I’ve been wanting an oversized clutch for a while now, especially since I laid eyes on that Celine clutch shot by Tommy Ton for style.com. Its minimalism is so beautiful.
100 Ideas by Keri Smith & Cats and Chocolate
This list is from Keri Smith’s Website – here. She’s a brilliant illustrator and has inspired me a lot recently. 1. Go for a walk.
10 Chalkboard Paint Ideas and Recipe
Posted by: Cathy on Jun 18, 2011 Tagged in: Untagged I've been seeing some gorgeous ideas with chalkboard paint so I decided to go out and buy some. I was quite surprised at the cost of it so perhaps you would like to make your own.
DIY TUTORIAL and a giveaway! - StumbleUpon
Happy Monday everyone! Today I am going to show you how to make this necklace and introduce my first giveaway! Below are the steps to make this tulle necklace. And to win this necklace, just leave me a comment below!
Related:
Related: