
Map Hearts. I Love You Cards. This year I made this adorable gift for my boyfriend.
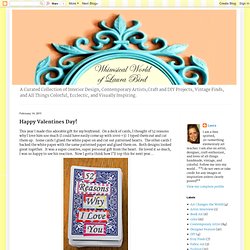
On a deck of cards, I thought of 52 reasons why I love him soo much (I could have easily come up with 1000 <3) I typed them out and cut them up. Some cards I glued the white paper on and cut out patterned hearts. The other cards I backed the white paper with the same patterned paper and glued them on. Both designs looked great together.
It was a super creative, super personal gift from the heart. Stash Books. There are lots of different jewelry storages ideas.

One of the interesting solutions is stash book. It doesn’t take much space, does not attract attention and looks very stylish and elegant. The most interesting feature of this idea is that you can do it yourself from any book without using a lot of effort. To do this you just need book, blade or sharp knife and some glue. Yarn Balls. Jessica of Wednesday Inc shows us how to make those gorgeous twine chandeliers from the inspiration shoot she shared with us this morning.

Using balloons, glue and twine, you can also make these lanterns for your wedding – and then bring it home and use it as your very own mid century lampshade. What you will need are: balloons, glue, yarn, tray for glue, corn starch 1/2 cup of Corn starch, 1/4 cup of Warm water, clear fast drying spray paint, hanging lamp cord or fishing line (depending on your desired final product), and a lighting kit if you’re looking for a fully functional lantern. Jessica recommends using a sharpie to mark on the inflated balloon how much room you need to leave for the lighting cord.
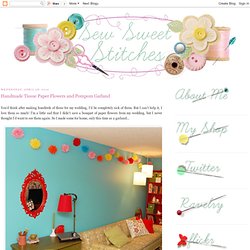
She also recommends coating the balloon with vaseline prior to wrapping the yarn coated with glue so it doesn’t stick on the balloon once it’s dry. You can see all the details on Jessica’s blog. Are you getting excited to try to do this at home as much I am? Instructions: 1. Button Pictures. This is a really COLORFUL & creative way to display your child’s initial.
Super easy for sewers & crafters who have lots of extra buttons laying around. Gosh I LOVE buttons… Supplies needed: - Printer (to print out your letter) or a large letter stencil - Scissors - Cardstock (large enough to fit your frame) - Pen or Pencil - Adhesive, Scotch Tape Runner allows you to reposition buttons - Paper Piercer - Buttons and Brads - Frame without glass or shadowbox (this one is from IKEA) Click here for step-by-step directions to the entire project. Framed Thread Holder Tutorial. Necklace Holder. I'm so excited about this tutorial! I've gotten into the habit of collecting old picture frames from thrift stores and estate sales and I never know what to do with them. On top of that, my current jewelry storage situation is, simply put, a hot mess.
Toilet Paper Owls. Fabric Circles. Tissue Pom-poms. You'd think after making hundreds of these for my wedding, I'd be completely sick of them.
But I can't help it, I love them so much! I'm a little sad that I didn't save a bouquet of paper flowers from my wedding, but I never thought I'd want to see them again. So I made some for home, only this time as a garland... ...And as bedroom decor... ...And maybe I couldn't resist making just a few little blossoms... Want to make some? Materials: Tissue paper Heavy-duty scissors Floral wire Make sure you use a pair of scissors that you don't mind ruining, because they're going to take a serious beating here.
For a package of 20" x 25" tissue paper, 8 sheets: Large flowers (Peonies): 16 per pack Small flowers (Carnations): 32 per pack Mini pompoms (Garland): 8 per pack Small pompoms: 2 per pack Medium pompoms: 1 per pack* Large pompoms: 1 per pack *There will be enough paper leftover from a medium pompom to make flowers or mini pompoms The flowers are easiest, so lets start there. And here's completed! Summer bracelets DIY. When M. came home from her camp with school, she showed me this yellow bracelet she made with 'scoubidoo' strings.

One of her friends taught her how to make these and of course I wanted to have a go at it too. Instead of scoubidou string I used strips of fabric for one and leather - what did you think?! - shoelaces in offsetting colors for another one. I believe both resulting bracelets look really nice. The possibilities in terms of material to braid with are endless. Sewing 101: making a pouf.
Add a burst of color to your room with this crafty pouf!

At 17” wide and 10” deep, it’s large enough to serve as floor seating or a foot stool. (And if you have pets, I have a feeling they may want to make this their new favorite spot!) This project is a little challenging to sew, but it’s not too difficult, so if you’re comfortable with the basics of sewing, give it a try.