
Super Easy Typographic Portrait in Photoshop. Last year we posted on Abduzeedo a very cool post about typographic portraits, the 45 Amazing Type Faces - Typographic Portraits became one of the most popular posts on Abduzeedo, and a lot of people asked me how to create that effect in Photoshop.
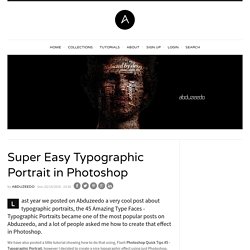
We have also posted a little tutorial showing how to do that using, Flash Photoshop Quick Tips #5 - Typographic Portrait, however I decided to create a nice typographic effect using just Photoshop. So in this tutorial I will show you how to create a really cool and super easy typographic portrait in Photoshop. We will use the Displace filter and some Blend Modes to achieve the effect. The whole process is quite simple but it might take you some time to add the texts and elements, but once you do that the rest is very straight forward. Step 1 Open Photoshop and create a new document. Step 2 Duplicate the layer and go to Image>Adjustment>Desaturate. Step 3 With the Horizontal Type Tool (T) create text boxes and start adding texts.
Step 4. How To Give Your Photos a Cool Retro Analog Effect. Back in the days of analog photography imperfections were part of the job.

Colour washes, light leaks, vignettes and blurs were all common problems that appeared during the processing of your film, particularly from cheap cameras such as the Holga, or simply down to human error. While these problems don’t affect digital cameras, we can recreate the cool effects in Photoshop to give our shots that cool lo-fi retro effect. View large scale photograph You don’t have to look far before finding quality examples of old style analog photography. Characteristics include inaccurate colour washes of warm tones, dark vignettes surrounding the shots, blurred focus and light leaks where the film has been excessively exposed.
Once you have your photograph of choice, fire up Adobe Photoshop. Add a Curves adjustment layer to begin altering the tones of the image. Change the drop down menu to the Red channel and begin manipulating the curves. Playing with Displace Filter in Photoshop. I have been playing a lot with the Displace filter in Photoshop and I still get impressed with how powerful it is.
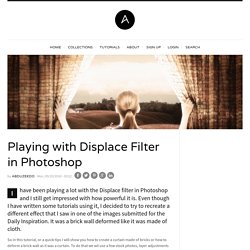
Even though I have written some tutorials using it, I decided to try to recreate a different effect that I saw in one of the images submitted for the Daily Inspiration. It was a brick wall deformed like it was made of cloth. So in this tutorial, or a quick-tips I will show you how to create a curtain made of bricks or how to deform a brick wall as it was a curtain. To do that we wil use a few stock photos, layer adjustments and the Displace filter in Photoshop CS5. The technique is pretty simple and the tutorial won't take you more than 30 minutes to go through it. Step 1. Realistic Smoke Effect Photoshop Tutorials. Adobe Photoshop, as we all know is rightfully regarded as the Swiss knife of designers all around the world.
With Photoshop, you can literally create all kinds of illustrations that you previously only dream about! With this fantastic tool, you can virtually create any effect you want. It’s like an infinite canvas of your dreams. If you have the imagination, sky is the limit. So today, we are going to tell you how to stretch this tool to maximize its limits! Pin it Smoking is damaging to health they say, indeed, but with Photoshop who needs real smoke? 11 Great Photoshop Photo Effects Tutorials. 60 Advanced Adobe Photoshop Tutorials.
These are advanced techniques that require more than just technical knowledge of Photoshop, they require talent, Photoshop training, knowledge of design, layout, balance, color theory, etc.
I hope you find these techniques inspiring and helpful. UPDATE: If you like these tutorials, you might love this:60+ (more) Advanced Photoshop & GIMP Tutorials UPDATE: (8/28/13) I just updated any broken links and replaced unreachable tutorials with new ones. I also just realized today is the 6 year anniversary of creating this post! Text-effects: Movie techniques: Vector effects: Photo Retouching: Photo Manipulation: Web Buttons / Interface Elements: Digital Coloring: Digital Painting:
20 PSD Tuts That Will Turn You Into A Photoshop Guru. Many people can use Photoshop, but only a select few can call themselves gurus.

Learn all the methods in the 20 tutorials below and you’ll be well on your way to joining this elite. Rather than focus on tuts for beginners, intermediates or advanced users, we’ve simply chosen ones which produce jaw-dropping effects. All of them are easy to follow, although most do require at least some prior knowledge and experience. 1. Colorful Plexi Text Effect Follow this tutorial to create dazzling, multi-layered, semi-transparent lettering, with a Perspex-like quality. 2. 3D Pixel Stretch Effect File this tutorial under “simple but effective”. 3. Turn a simple cityscape into a torrentially flooded wasteland. 4. Become the master of light and glow on Photoshop with this brief, easy-to-follow guide. 5.
Use masking tools, layers, gradients and lines to turn your favorite piece of 3D text into something more colorful and commercial.