
MaryM's Original Daisy Bullion Edging, tatting with crochet hook, crochet tatting, cro-tat, Cro-Tat, cro tat, edging, trim, tutorial. If you like the reocities.com project you can donate bitcoins to: 1E8rQq9cmv95CrdrLmqaoD6TErUFKok3bF MaryM's Original Daisy Bullion Edging©2001 - tatting with crochet hook, crochet tatting, cro-tat, tutorial, how to - Copyrighted.

Please copy, reproduce, collect or redistribute with permission only. Finding little to not-much on the internet for tatting with crochet hook, I dreamed up this little design. (Of course, Crochet Tatting is quite an old art, recently come into vogue again - It is described and pictured in "The Godey's Lady's Book" in the 1850's!)
I used No. 10 cotton, and a cro-tat hook for that size thread. For the "crochet" functions, you will use the hook. Begin with a normal first crochet loop. Begin the Ring (R) on the shaft of the hook: A tatting stitch is a two-part double hitch stitch (ds). Make another double hitch stitch (ds). Now make a picot (p). Now to use the hook! Snug the ring stitches closer to the shaft, to form a half-closed ring. Chain 5 (ch 5). Joining Granny Squares. When I join my Granny Squares together I always choose to crochet them rather than stitch them.
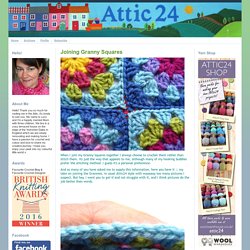
Its just the way that appeals to me, although many of my hooking buddies prefer the stitching method. I guess it's a personal preference. And as many of you have asked me to supply this information, here you have it :: my take on joining the Grannies, in usual Attic24 style with waaaaay too many pictures I suspect. But hey, I want you to get it and not struggle with it, and I think pictures do the job better than words. Ok, firstly put your two squares together, Right Sides together. So your hook goes through the outside loop of the square nearest to you.... ...then through the outside loop of the square farthest away. Start at the right hand corner, you are working right to left. Put hook through OUTSIDE LOOPS of the corner stitches, and hook your yarn through both loops. Non-sew Methods for Joining Squares and Ways of Sewing Motifs Together. Joining Crochet Pieces Ways to Join Crocheted Squares or Motifs Using a yarn needle ...
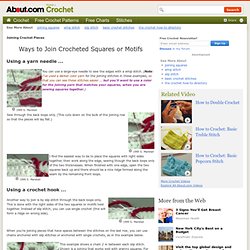
Using a crochet hook ... When you're joining pieces that have spaces between the stitches on the last row, you can use chains anchored with slip stitches or anchored with single crochets, as in the example below. Join as you go, on the last round ... Feature and photos copyright 1999 by Sandi Marshall. Photography by Sandi Marshall, licensed to About.com. Bookmark for this feature is. How to Make a Crochet Slip Knot / Slip Loop.
Joining Squares as-you-go. I've been making granny squares for eighteen months now and in that time I've made a great many for blankets and cushions, all of which have been joined together after the squares themselves have been made.
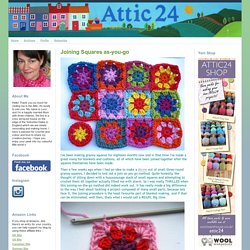
Then a few weeks ago when I had an idea to make a throw out of small three-round granny squares, I decided to test out a join-as-you go method. Quite honestly, the thought of sitting down with a huuuuuuuuge stack of small squares and attempting to crochet them all together actually filled me with alarm. So I was really THRILLED when this joining-on-the-go method did indeed work out. It has really made a big difference to the way I feel about tackling a project composed of many small parts, because lets face it, the joining procedure is the least favourite part of blanket-making, and if that can be eliminated, well then, thats what I would call a REsUlt.
Big time. So if you'd like to learn how to do it (and it's eeeaaaasy!) The first stage is to complete one side of the round first. Links To Learn Crochet Stitches Techniques Step By Step With Photos Or Diagrams. Broomstick Lace (Jiffy Lace) Broomstick Lace (Jiffy Lace)© 2006 Sandra Petit, Broomstick Lace is normally listed under crochet, although the needle used looks like a very large knitting needle.
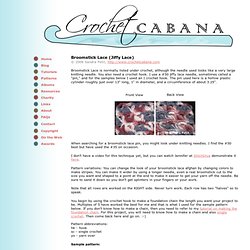
You also need a crochet hook. I use a #50 jiffy lace needle, sometimes called a "pin," and for the samples below I used an I crochet hook. The pin used here is a hollow plastic cylinder roughly just over 13" long, 1" in diameter, and a circumference of about 3.25". When searching for a broomstick lace pin, you might look under knitting needles. I don’t have a video for this technique yet, but you can watch Jennifer at StitchDiva demonstrate it here. Pattern variations: You can change the look of your broomstick lace afghan by changing colors to make stripes.
Note that all rows are worked on the RIGHT side. You begin by using the crochet hook to make a foundation chain the length you want your project to be. Pattern abbreviations:hk - hooksc - single crochetyo - yarn over Sample pattern: Loop and Nub Stitch Tutorial.