
Joining Crochet Squares … Cluster Burst Afghan. How to Crochet: Invisible Join vs Slip Stitch Join ⋆ Look At What I Made. The invisible join is amazing when working in the round and changing colours at the end of each round.

It takes a few seconds longer, but the upside is that it places a needle in your hand, so you might as well work away your tails as you go. Not so nice while you are busy crocheting, but SUPER nice once you have finished and there are no tails mocking you. Joining Granny Squares With the Join As You Go (JAYGO) Method. Joining Crochet Squares … Cluster Burst Afghan. We Are Knitters - How to join Granny Squares with an invisible seam. Joining Granny Squares With the Join As You Go (JAYGO) Method.
Where possible I include links to the products and resources I mention.

Some of these links may be affiliate links, which means I may receive a small commission on purchases at absolutely no additional cost to my readers. These affiliate relationships help offset the costs of running this website to keep the free patterns coming. You can read my full Disclosure Statement here. We Are Knitters - How to join Granny Squares with an invisible seam. Pardon me, but your Slip Stitch is Showing ~ An Invisible Join Tutorial. "Join with sl st.
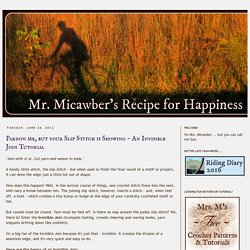
Cut yarn and weave in ends. " A handy little stitch, the slip stitch - but when used to finish the final round of a motif or project, it can skew the edge just a little bit out of shape. How does this happen? Well, in the normal course of things, one crochet stitch flows into the next, with nary a break between 'em. Mr. Micawber's Recipe for Happiness: Mrs. M's Mock Invisible Join ~ A New Crochet Technique, with Callida Sampler Pattern.
In my last post, "The Problem of the Telltale Seam in Crochet", we looked at several ways of joining and starting crochet rounds, ending with a glimpse of a brand-new method I call the Mock Invisible Join.
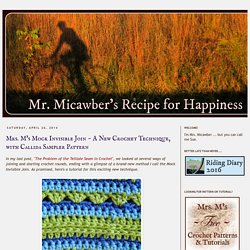
As promised, here's a tutorial for this exciting new technique.All crochet terminology is American.The Mock Invisible Join - How It Works The Mock Invisible Join mimics the technique of the Invisible Join, using a tall loop drawn up from the final stitch of a round to weave it together with the first stitch. The tail of the tall loop then becomes the working loop for starting the next round. Because the loop tail ends up behind the work, it allows for a standing-stitch type round start, thus eliminating the starting chain.
When to Use It The Mock Invisible Join is suitable for non-reversible, joined-round projects worked Right Side facing at all times, including: Whenever possible, do not place increases in the first stitch of the round, as this will make the join more noticeable. 1. Crochet Joins: How to Crochet Two Pieces Together. [ Close Privacy Policy ] Privacy Policy / Your California Privacy RightsRevised and posted as of October 28, 2016 Prime Publishing, LLC ("Company," "we" or "us") reserves the right to revise this Privacy Policy at any time simply by posting such revision, so we encourage you to review it periodically.

In order to track any changes to this Privacy Policy, we will include a historical reference at the top of this document. This Privacy Policy will tell you, among other things: Your California privacy rights.How we collect information and what information we collect.How we may use information.How we may share information.Your choices regarding the sharing of information. ACKNOWLEDGEMENT/YOUR AGREEMENTCompany websites are not intended for use by individuals under the age of 18 or those who are not legal residents of the United States. HOW DO WE COLLECT INFORMATION AND WHAT INFORMATION DO WE COLLECT? 10. Different Ways To Join Granny Squares. This post contains affiliate links Since eventually we will want to be joining our granny squares to create a blanket or other item I thought we could do a roundup of all the different techniques so you can plan your blanket.
Some of these methods allow you to join as you go which is pretty handy if you are making a large blanket like me. Note: if any of these tutorials are yours and you would like them removed please let me know :) 1. Joining Squares as-you-go. I've been making granny squares for eighteen months now and in that time I've made a great many for blankets and cushions, all of which have been joined together after the squares themselves have been made.
Then a few weeks ago when I had an idea to make a throw out of small three-round granny squares, I decided to test out a join-as-you go method. Quite honestly, the thought of sitting down with a huuuuuuuuge stack of small squares and attempting to crochet them all together actually filled me with alarm. So I was really THRILLED when this joining-on-the-go method did indeed work out. It has really made a big difference to the way I feel about tackling a project composed of many small parts, because lets face it, the joining procedure is the least favourite part of blanket-making, and if that can be eliminated, well then, thats what I would call a REsUlt. Big time. Crochet is the Way: Join Crochet Motifs with One Seam.
This is such a great method to make beautiful joins, save yarn, and have less tails to weave in!

Chain & Stitch Join Tutorial. The chain & stitch combination join is probably the most-used technique in my yarny bag of tricks; it’s also the subject of many of the questions I get about my patterns!

I use this end-of-the-round joining technique in the majority of my designs, since it is ideal for openwork circular crochet (my favorite) in which you want to begin the next round in the middle of a chain space. Say we are creating several rounds of ch-4 mesh loops, like in my free market bag pattern. Stitchopedia ~ Techniques: Join~as~You~go for joining Grannies. This is a great way to join your granny motifs while you work them, eliminating the extra time of joining them at the end, and cutting down on the number of ends you need to weave in!
I have used hexagons in this tutorial, but you can use this method with any of your grannies that fit together! Here is a video showing this method, using my Flower to Hexagon Granny and Lion Brand Heartland yarn (which is made in the USA), and a 6.o0 mm/US J crochet hook. Written instructions: First: It is important that all your corners are made with a chain 2. 5 Ways to Join Crochet Motifs. 5 Ways to Join It’s easier to show you how the ways to join your granny squares and motifs together through a tutorial. Today, let me demonstrate that for you. In this tutorial, you will learn the following: [Photo Tutorial] This Technique May Become Your Absolute Favorite Way To Join Blanket Squares! - Knit And Crochet Daily. Happily Ever Afghan - Crochet a Flat Braid Join - Crochet 365 Knit Too. Joining Tutorial – Tight Join – Scrappy Blanket Love. Admin Mary here! Hello! I chose to do a tight join for my Bear’s Blanket. This is my first tutorial, so hopefully it makes sense… Let me know if there is anything I can improve on.
I’m here to make it as clear as I can. First, I did not join the two DCs in the corner, but I DC into the next DC, then I took my hook off, and inserted it into the matching DC on the other block, like so: (My hook is losing it’s color… from so much use!) Then I picked up that lonely, little loop and pulled it through: Then, I DC into the original block: Then repeat the process over and over until you want to stop. Lacy Blanket Join. How to make a Lacy Join for Blanket Squares The aim of this tutorial is to show you how I made the lacy join on my Vintage Sampler Blanket.
The squares, although the same size, ended with different stitch numbers, and so this was my solution to join them all together.What you'll need: