
Itoo Software. The first thing you need is a root folder.
This is the path that Forest Pack or RailClone's library browser will search in for library configuration files. As mentioned above, there's already a User folder set up, but for the purposes of this tutorial we'll add a new directory. In this example the path is created locally, but there's no reason why this can't be shared network location so that assets can be easily accessed by multiple artists in a studio environment. To add a new library location: With the library editor still open go to File > Preferences… or click from the top toolbar. Now that we have a new folder created, we can add a library, but it's worth mentioning that it's also possible to add additional sub-directories to this folder directly within the Library Browser. In the tree navigator, right click on the new location name and select Create Folder. Finally let's add the library itself. Add the preview renders to the /thumbnails folder. Revert meshsmooth in 3ds max.
Using Cloth modifier to create curtains in 3Ds MAX - Preciux. Create a couch with Cloth simulation (pt 1 of 4) - fast and natural looking - Tip of the Week. Viz-People WeekTips Episode 3. 3D Modeling How to / The Bohemian Sofa with Marvelous Designer. Following up on Eduard Caliman‘s recent Mills 3D Chair Modeling How to, he now showcases how he made the Bohemian Sofa.

Eduard actually did this stunning sofa designed by Patricia Urquiola for Moroso in 3ds max fully, but then went on exploring making the capitonné with Marvelous Designer and here he shares his process as well as the resulting model and textures. Enjoy! Author: Eduard Caliman Eduard Caliman is a graphic freelancer and enthusiast from Pisa, Italy. Hi, I’m pleased to share with you the process of making the Bohemian Sofa which you can also download here by sharing… Get the Files! Use one of the buttons below to get the files ;) Designed by Patricia Urquiola for Moroso, the stunning Bohemian Sofa, is an example of a contemporary mixture between modern and classic design.
Reference Images and Sofa Plans I tried to gather as many reference images as possible to cover sofa from many different angles. Modeling of the basic Sofa Structure Modeling of the Capitonné Cheers! Roof modeling with batzal roof designer. Modeling stitching in 3Ds Max. Forest Pack - Parametric Areas. Моделирование болта с гайкой в 3ds Max 2012. Ngons in 3ds Max. Marvelous Designer 2 to quads using ZBrush 4 R4.
Assign Random Material ID to Selection in 3dsMax. Hey all, I’ve put together the following short MaxScript to allow you to assign a random material ID to a selection in 3dsMax.

I’ll update it into a full tool if I get enough comments asking for it. Select an edit_poly object,Select the polygons you’d like to assign random IDs to,Copy this script into a maxscript file (MaxScript > New Script…),Hit Ctrl + E to run the script. numberOfSubMaterials = 3 -- Set the number of sub-materials here!! OriginalSelection = polyop.getFaceSelection $ countOriginalSelection = originalSelection.count for i=1 to numberOfSubMaterials do ( antiArray = #{1..countOriginalSelection} for i=1 to antiArray.count do antiArray[i] = (random 0 1) >= 1 mergedArray = originalSelection * antiArray polyop.setFaceMatID $ mergedArray (random 1 numberOfSubMaterials) ) Modeling Carpet Using Hair and Fur 3DsMax 2012.
Fashion Design: Marvelous Designer - The Tangled Bed Clothes (www.marvelousdesigner.com) Tutorial #02 Creating a bed "cloth" (Marvelous Designer) [1080p] Array along a path. How to make stitches in 3dsmax. Speedtree and 3dsmax Basic Tutorial. Week Tips episode - 2 Roads on uneven terrain. Week Tips episode - 3 Triangulation removal. Creating Stained Glass Windows in 3DS Max. By Stealth Snake | 3D Studio Max | Intermediate This tutorial is going to teach you how to convert a vector image into a 3D stained glass window model using 3D Studio Max.
In order to complete this project we will be using splines shapes and the extrude modifier. You will need an image saved in Illustrator vector format (AI) to follow this tutorial, such an image can be created using any vector graphics application such as Illustrator or Freehand, or even image editors that can export in vector format such as Photoshop and Fireworks. If you do not have an image ready now you can use our image to follow this tutorial. Download it here. Our tutorial will be divided into two parts, in the first we will create the frame of our stained glass, and then we will create the stained glass itself. Creating the stained window frame Start off by creating a new 3DS file , then go through File>Import and browse to the AI file to import it. We now have one copy of the path on the scene. . - End of Tutorial. Make a clear blueprint in max. Posted: Feb 28, 2010 Published by: z900624 Homepage: none Software: Autodesk 3ds Max Skill: Beginner 1.
Make sure your max runs in direct x mode. 2. Creat a plane. 3. Image Description: DirectX Shader 5. 6. 7. 8. Sofa Modeling in 3ds max. This video tutorial is created by artist Mahmoud Keshta in 3ds max 2009.
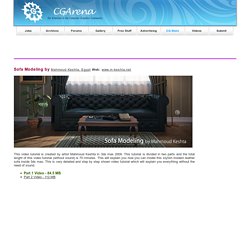
This tutorial is divided in two parts and the total lenght of this video tutorial (without sound) is 70 minutes. This will explain you how you can model this stylish modern leather sofa inside 3ds max. This is very detailed and step by step shown video tutorial which will explain you everything without the need of sound.