
MQTT Tutorial for Raspberry Pi, Arduino, and ESP8266 - Bald Engineer. This week’s MQTT Tutorial connects a Raspberry Pi, ESP8266 (or Arduino), and a PC together.
Remember last week’s post provided an overview of message brokers and MQTT. We learned that MQTT is a hub and spoke protocol for sending messages between IoT devices. Clients can subscribe or publish messages to a central server, called a broker. Now it’s time to connect our IoT devices together! For this MQTT tutorial, I have three main elements: • My Computer, which will act as the broker. • Raspberry Pi running Python • ESP8266 controlling an LED The idea is that the Pi (via Python) will send messages to the PC broker to tell the ESP8266’s LED what to do.
Esp8266 mqtt tutorial. ESP8266 and Arduino IDE - blink example. Home. ESP8266.net — The Internet of Things with ESP8266. Paho - Open Source messaging for M2M. IoT Manager: Android app for DIY devices (ESP8266 and other) MQTT API, WebSockets - Application Development - The Things Network. Thanks to the expertise of many community members and the effort of our core development team (@KtorZ, @htdvisser, @Thomas and myself), I'm proud to announce the staging environment of TTN back-end 1.0.
Features. Visualize (and push) your IOT data - Application Development - The Things Network. Thanks to the expertise of many community members and the effort of our core development team (@KtorZ, @htdvisser, @Thomas and myself), I'm proud to announce the staging environment of TTN back-end 1.0.
Features Support for over-the-air-activation (OTAA) with custom security key per deviceSupport for activation-by-personalization (ABP) with custom security key pair per deviceSupport for confirmed uplink messagesSupport for unconfirmed downlink messages for Class A devicesDeduplication of uplink messagesCommand line interface for managing users, applications, devices and testing connectivityDuty cycle calculations and best gateway selection for downlinkMQTT authentication and authorizationSupport for EU 863-870 MHz frequency planDesigned for public community networking, private connected networking and private offline networking See more information about the new back-end Getting Started Known Issues This is a staging environment which is much like a public beta that we update continuously.
Carriots - Internet of Things Platform. How to integrate Carriots with Freeboard 0.
Introduction. Freeboard channels Internet of Things data into one simple dashboard. According to Gartner, the number of devices connected to the Internet of Things will reach 26 billion by 2020, marking substantial growth from the 0.9 billion in 2009.
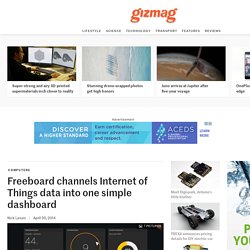
With this amount of data streaming from our fridges, phones and things that don't even exist yet, it is little wonder many are looking at ways to organize and make sense of this impending tsunami of information. New York-based Bug Labs has focused its attention on this problem, last week launching Freeboard, a simple Web-based dashboard that tracks different Web-connected devices in real time. In creating Freeboard, Bug Labs is hoping to provide a platform for developers to easily build applications for the Internet of Things. Its creators liken Freeboard's function to the impact of Dropbox on the world of cloud storage, in that it is designed to bridge the gap between well-versed programmers and those with little to no coding expertise.
It all begins with a software module Bug Labs calls "dweet.io. " Source: Bug Labs. Create Your Internet of Things Dashboard. In this article, you are going to build a weather measurement station that will automatically send data to an online cloud service.
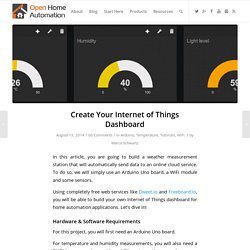
To do so, we will simply use an Arduino Uno board, a WiFi module and some sensors. Using completely free web services like Dweet.io and Freeboard.io, you will be able to build your own Internet of Things dashboard for home automation applications. Let’s dive in! Hardware & Software Requirements For this project, you will first need an Arduino Uno board. For temperature and humidity measurements, you will also need a DHT11 sensor, along with a 4.7K resistor. For light levels measurements, I used a photocell with a 10K Ohm resistor.
Then, you need the CC3000 chip for WiFi connectivity. Finally, you need a breadboard and some jumper wires to make the connections between the different parts. This a list of all required components for the project: On the software side, you will need the library for the DHT sensor: You will also need a library for the CC3000 WiFi chip: Temperature/humidity monitor with Dweet & Freeboard. **This project is similar to Temperature/humidity monitor with Blynk, however, I think using dweet and freeboard makes the dashboard far more accessible. none the less, credit goes to that author for inspiration and wiring.
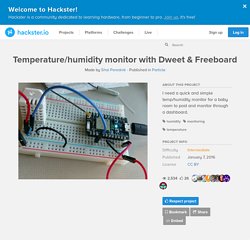
I needed a quick and simple temp/humidity monitor for a baby's room. I grabbed some parts and put it together. I also wanted a simple dashboard I could use to monitor from my laptop and mobile devices. While there are plenty of services for posting data to, I think none are simpler to use than dweet.io and freeboard.io. One key point was I wanted the dashboard to be able to add other sources such as other sensors, arbitrary info, and weather. Dweet.io allows for posting a simple web request. From there, freeboard can import the "thing" and you proceed to creating the dashboard. You can see mine in the screenshots. Note that depending on how you lay out the breadboard, it may be best to move the wires behind the DHT22 sensor.
And here's the back view of the sensor: