
Reducing Caustic Noise w/ Cycles. Learn how to reduce noise and fireflies with caustics in Cycles In this quick tip learn how to use the Light Paths node in Blender’s Cycles render engine to drastically reduce noise and fireflies when rendering with caustics.

Normally caustics cause a lot of noise, and thus require a high number of samples to get a clean image. Because of this we commonly disable caustics to speed up the render times and get cleaner images. However, caustics also contribute a lot to the realism of a render as they are responsible for color bleed from bounce lighting. By using Blender’s Light Path node to mix a glossy and diffuse shader we can drastically reduce the noise, keep caustics enabled, and produce a nicer image. 500 Samples, no caustics, glossy floor.
Using the Light Path Node in Cycles. Learn how to use the Light Path node for Cycles We will be taking a look at how to control the influence of created materials on other objects in our scene.

This includes changing the color of an object inside a reflection, in the shadow, through refraction, or any number of other ways. It also covers how to hide objects from specific light paths, such that it appears invisible in reflections, doesn’t cast shadows, etc. Trick to light Interior Scenes. Sorry for the delay, here is the shader setup to help interiors**it's a heavy trick, works really nice for withe/bright interiors where bouncing light is main contribution, but can't work well for dark/big-shadowed scenes, since it involves AO shader.

*The logic is basically to add the shader to walls/ceiling (and optionally floor too), to affect the interior light, without using AO world which darken edges unnaturally and is a lot slower, and affect all object in scene, while this setup only affects the room.The light path->Ray depth is telling the shader to use Diffuse BSDF (or your mixed diffuse+glossy, whatever..) for direct ray AND the first bounce, after that, for the remaning diffuse bounces that you setup in Cycles Properties, it will use AO BSDF, much faster since it is a sort of emission shader. ***why not using Light Path -> is Diffuse Ray instead of Ray Depth? 7 Ways to Get Rid of Fireflies Once and For All. Fireflies are those tiny burnt out pixels, that ruin an otherwise great render.

But how to get rid of them? Here’s several tricks that I’ve picked up over the years… 1. Use Bigger Light Sources This is probably the #1 cause of fireflies. With a tiny light source, Cycles has to work super hard to project light and shadows out of it. So this one is simple: increase the size of the lamp! 2. ^The only thing changed in this comparison is the spot lamp size This is especially important for rendering refractions, like glass or liquid. Sharp shadows can cause huge issues in refractions. Found here: 3. HDRIs are becoming more and more common for lighting scenes. Smart Sampling. Hi everyone, some of you may already tried the “Non Progressive” integrator, which has been added in Blender 2.64.
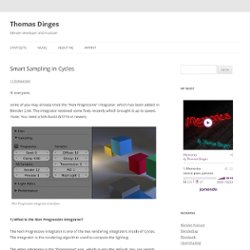
The integrator received some fixes recently which brought it up to speed. Note: You need a SVN build (53719 or newer). Speed Boost w/ bumpy materials. Curvy Curves. German version As promised in the previous Blender-Tip I want to provide some unusual things to do with the Curves in the compositor.
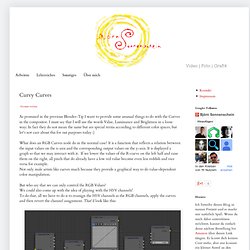
I must say that I will use the words Value, Luminance and Brightness in a loose way; In fact they do not mean the same but are special terms according to different color spaces, but let's not care about this for out purposes today ;) What does an RGB Curves node do in the normal case? It is a function that reflects a relation between the input values on the x-axis and the corresponding output values on the y-axis. It is displayed a graph so that we may interact with it. But who say that we can only control the RGB Values?
Make Materials Work with both BI & Cycles. Making Shadeless Materials for Cycles in Blender. CYCLES / Object Info Node. CUSTOM FRESNEL CURVE in CYCLES - Tip of the Week. Blender 2.71 - Cycles Baking using Cages. Get rid of Texture Interpolation - yay for blocky, no for blurry! HiToday in IRC someone asked about how to disable the texture interpolation in Cycles.

But the thing is, texture interpolation settings are currently not exposed in the UI. I came up with a Node Setup which scales the UV coordinates accordingly, so that it appears as if there was no interpolation happening.The usage of this Node Group is realy simple, just add the Group to your existing material and connect it to your UV inputs on the Textures.Here's my results: whitout/with my node group The used image textures were 3x3, 4x4, 5x5, 6x6 pixel big.
Rendering Wireframes. Introduction In the past, rendering wireframes typically meant duplicating your mesh, scaling it up a tiny bit, and then adding a wire material to the new mesh before rendering in the internal renderer.
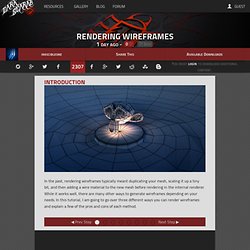
While it works well, there are many other ways to generate wireframes depending on your needs. In this tutorial, I am going to go over three different ways you can render wireframes and explain a few of the pros and cons of each method. Wireframe Modifier The first method is the wireframe modifier method. Start by removing the default cube and add the monkey (Add->Mesh->Monkey). In my scene, I added a platform, but this is not necessary. Each method has its pros and cons.