
Camera Exposure: Aperture, ISO & Shutter Speed. A photograph's exposure determines how light or dark an image will appear when it's been captured by your camera.

Believe it or not, this is determined by just three camera settings: aperture, ISO and shutter speed (the "exposure triangle"). Mastering their use is an essential part of developing an intuition for photography. Achieving the correct exposure is a lot like collecting rain in a bucket. While the rate of rainfall is uncontrollable, three factors remain under your control: the bucket's width, the duration you leave it in the rain, and the quantity of rain you want to collect. You just need to ensure you don't collect too little ("underexposed"), but that you also don't collect too much ("overexposed"). In photography, the exposure settings of aperture, shutter speed and ISO speed are analogous to the width, time and quantity discussed above.
Each setting controls exposure differently: By the Numbers. How it Appears. Slow Shutter Speed Fast Shutter Speed By the Numbers. Understanding Digital Camera Histograms: Tones and Contrast. Understanding image histograms is probably the single most important concept to become familiar with when working with pictures from a digital camera.

A histogram can tell you whether or not your image has been properly exposed, whether the lighting is harsh or flat, and what adjustments will work best. It will not only improve your skills on the computer, but as a photographer as well. Each pixel in an image has a color which has been produced by some combination of the primary colors red, green, and blue (RGB). Each of these colors can have a brightness value ranging from 0 to 255 for a digital image with a bit depth of 8-bits. A RGB histogram results when the computer scans through each of these RGB brightness values and counts how many are at each level from 0 through 255. Understanding Camera Lenses. Understanding camera lenses can help add more creative control to digital photography.

Choosing the right lens for the task can become a complex trade-off between cost, size, weight, lens speed and image quality. This tutorial aims to improve understanding by providing an introductory overview of concepts relating to image quality, focal length, perspective, prime vs. zoom lenses and aperture or f-number. All but the simplest cameras contain lenses which are actually comprised of several "lens elements. " Each of these elements directs the path of light rays to recreate the image as accurately as possible on the digital sensor. The goal is to minimize aberrations, while still utilizing the fewest and least expensive elements. Optical aberrations occur when points in the image do not translate back onto single points after passing through the lens — causing image blurring, reduced contrast or misalignment of colors (chromatic aberration). Original Image ZOOM LENSES vs. Making the Most of Natural Light in Photography. Paying more attention to light is perhaps the single most important step you can take to improve your photography.
With many landscapes, having good natural lighting can even be more important than the choice of subject itself. Different types of natural light can also produce a wide variety of subject appearances — even though these all have the same light source. Learn how to achieve the right light for your subject by utilizing the unique qualities of your particular time of day and weather.
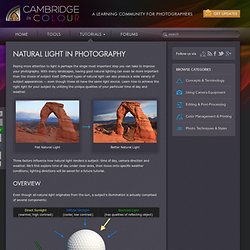
Flat Natural Light Better Natural Light Three factors influence how natural light renders a subject: time of day, camera direction and weather. Even though all natural light originates from the sun, a subject's illumination is actually comprised of several components: Move your mouse over each lighting component above to isolate its effect.
Depending on the time of day, the relative amount of each component changes — resulting in an overall illumination with a different white balance or contrast. Understanding Depth of Field in Photography. Depth of field refers to the range of distance that appears acceptably sharp.
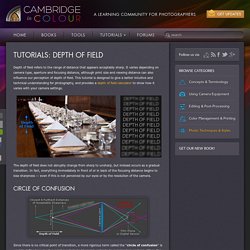
It varies depending on camera type, aperture and focusing distance, although print size and viewing distance can also influence our perception of depth of field. This tutorial is designed to give a better intuitive and technical understanding for photography, and provides a depth of field calculator to show how it varies with your camera settings. The depth of field does not abruptly change from sharp to unsharp, but instead occurs as a gradual transition. In fact, everything immediately in front of or in back of the focusing distance begins to lose sharpness — even if this is not perceived by our eyes or by the resolution of the camera. Since there is no critical point of transition, a more rigorous term called the "circle of confusion" is used to define how much a point needs to be blurred in order to be perceived as unsharp.