
Interfacing for bags.
Zippers in bags. Nicole Mallalieu - Tips & Tutorials. Tips & Tutorials Back to top VIDEO TUTORIAL - How to set in eyelets with a setting tool VIDEO TUTORIAL - Simple method for inserting purse feet.
VIDEO TUTORIAL - How to Use a Clover Quick Yo Yo Maker This is an absolute must-read for anyone embarking on bag-making! ALWAYS use interfacing on any bag piece where the pattern reads "cut [specified number] i/f". Interfacing creates structure if it is used on the body of the bag - but is entirely optional here, and using it depends on the weight of the fabric and the finished look that you require. By fusing interfacing to every piece of the outside of the bag you'll add a lot more structure and "OOMPH" to the fabric. You can interface the lining if you want a stiff lining, but it shouldn't be the main support in the bag. It's important to remember that by adding an extra layer of interfacing to a bag piece, you are also increasing the bulk of the fabric. Click here to see the range of interfacings at Nicole Mallalieu Design 1. 2. 3. 4.
How To Sew a Circular Bottom Neatly. Round bottom is a nice feature not only for bag bottom but also for a cylindrical pouches and bags. Here is how! Step 1. Make a card board template for a half circle. Make sure that you do this very neatly. Fold the fabric in half, secure it with pins. Step 2. Step 3. Step 4. Step 5. Step 6. Vinyl or pleather trim (top of bag) Hello all you lovely sewists that follow Andrea and The Train to Crazy!!
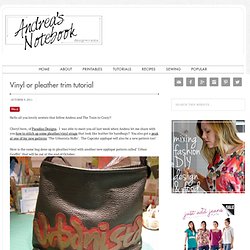
Cheryl here, of Paradiso Designs. I was able to meet you all last week when Andrea let me share with you how to stitch up some pleather/vinyl straps that look like leather for handbags!! You also got a peak at one of my new patterns "The Urbanista HoBo". The Cupcake appliqué will also be a new pattern too! Here is the same bag done up in pleather/vinyl with another new appliqué pattern called" Urban Graffiti" that will be out at the end of October. This week I am going to show you how to put pleather/vinyl (p/v) as a trim on the upper edge of the HoBo. When I design my handbags, it combines 2 bags always in one. I start with a 2" wide piece of p/v. Next, tack the 2 bags together at the top edge of the bags (exterior and lining), so that they will not slip apart while being sewn, use a 4.0 stitch, and ¼" seam allowance (sa).
Roomy 3D pockets. I make loads of purses & one thing that is essential for a purse/bag is pockets!!!!!!!
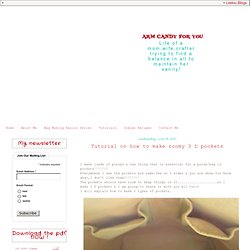
Everywhere I see the pockets are same.Sew on 3 sides & you are done.You know what,I don't like them!!!!!!!! The pockets should have room to keep things in it....................so I make 3 D pockets & I am going to share it with you all too:) I will explain how to make 2 types of pockets. Now we all carry gadgets right?????? What would a girl do without her i-phone,blackberry,kindle etc etc .................. Sewing Great Darts. Darts are a nice way to give bags depth so I use them a lot.
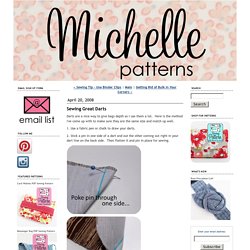
Here is the method I've come up with to make sure they are the same size and match up well. 1. Use a fabric pen or chalk to draw your darts. 2. Stick a pin in one side of a dart and out the other coming out right in your dart line on the back side. Apply magnetic snaps. As you probably already know magnetic snaps come in different sizes and are available in different metal finishes.

They are not recommended for use on anything which will come into contact with computers, laptops or audio equipment because of the possibility of upsetting or even scrambling/destroying hard disks and other delicate computer electronics. On non-techy items though they provide a secure, unobstrusive closure which are relatively straightforward to apply and add a professional finish to bags and purses, particularly when combined with other matching metal hardware. Not an easy photo - they kept 'snapping' together! A magnetic snap set comprises four parts; one half of the snap is magnetic, the other part of the snap is metal and is 'attracted' to the other. They click together to make a closure. There are also two backing discs or ' washers', with holes in which are fixed on the other side of the fabric to the snap parts. Requirements. Leather Bound Buttonhole (to attach straps) Hey everyone and fans of the Train To Crazy!
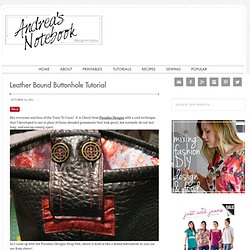
It is Cheryl from Paradiso Designs with a cool technique that I developed to use in place of those dreaded gromments that look great, but normally do not last long, and end up coming apart. So I came up with the Paradiso Designs Strap Slot, which is kind of like a bound buttonhole as you can see from above! The red pleather piece started out as a 1.75" x around 3" piece. I used measurements to make the strap slot fit the strap exactly and not be too loose. I would recommend using a 2" wide or wider measurement for this, as it was not the easiest to sew down. The beauty of the using pleather/vinyl is that you can just sew that down as it, and it will look like leather, as it wrinkles like leather!!