
Paper Bag Floors – A Tutorial. I did this project in my home (over concrete, no stain) and I am BEEEEEEEE-YOND excited with the outcome.
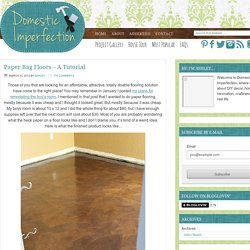
I can’t say THANK YOU enough to all of the people before me who did this and took the time to share what they learned. They were my supporters and encouragers and didn’t even know it. This has changed my whole outlook on my home, and yeah…carpet! If you ever have to pull up your own carpet, you’ll never put down more again. I join Jami on that carpet soap-box. Where to begin? Paper Bag Floor - DIY Instructions. Photo/Art by Andrew Wellman Photo/Art by Andrew Wellman Homeowners Gwynne Gardner and Michael Seitz.

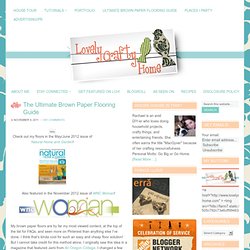
Photo/Art by Andrew Wellman A stool top finished in the same technique, using paper scraps in a variety of earth tones. Directions for Paper Bag Stool Project Project: Paper Bag Floor When Gwynne Gardner and her husband, Michael Seitz, decided to turn a back room of their 1793 “honeymoon” Cape in Wilmington, Vermont, into a small guest area, they knew they had their work cut out for them. It was damp. Much of the problem lay with the pine-plank floor, whose cracks and gaps offered a perfect air channel from the stone-and-earth basement below. To address both the aesthetics problem and the lack of insulation, Gwynne turned to a technique she’d seen decades ago in a book: using torn pieces of paper bag as a floor finish.
What Do You Like Most? There’s the look and easy care (just mopping), but also the feel. The Ultimate Brown Paper Flooring Guide. Check out my floors in the May/June 2012 issue of Natural Home and Garden!
Also featured in the November 2012 issue of WNC Woman! My brown paper floors are by far my most viewed content, at the top of the list for FAQs, and seen more on Pinterest than anything else I’ve done. I think that’s kinda cool for such an easy and cheap floor solution! But I cannot take credit for this method alone, I originally saw this idea in a magazine that featured Jami from An Oregon Cottage. I changed a few things about the process to suit my tastes, but her site is also a great resource. I wanted to put all the details in one place (instead of scattered over several posts) to make it easier for you to start your project.
I also HIGHLY recommend getting a piece of scrap wood and testing the technique with your stain and poly of choice. But remember you will be working in a larger area than your sample. With that said, if you’re ready to make a change, let’s get started! Next, mix up your glue. Brown Paper Bag Floor Over Concrete Subfloor. Step 1: Rip up the carpet.
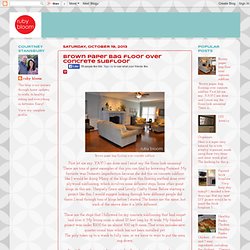
I just started pulling it up at a corner and rolling up the carpet and pad as I went. I later realized that cutting it into sections first would have been easier. I ripped up the carpet without really knowing what I was doing. I hadn't even bought any supplies yet and my husband was out of town for 6 days, which left me at home with my 1, 6 and 8 year olds. Probably not the brightest idea to start this then, but I couldn't wait to get rid of that dirty carpet! Step 2: Remove carpet tack strips and repair any holes. Step 3: Clean the concrete floor. Step 4: Tear up and crinkle the paper. Step 5: Glue the paper down. How To Do Brown Bag Flooring On Concrete. Concrete Floor + Paper Bags + Polyurethane + RIT Dye = Another Fabulous Floor. Isn't the web an amazing place for inspiration?

One of the blogs I follow is Lovely Crafty Home. Rachael shares tons of great ideas on how she makes her home truly beautiful. It was her Ultimate Brown Paper Bag Flooring Guide that inspired me to create this awesome floor in my woman cave. Now at the bottom of Lovely Crafty Home's flooring guide, Rachael tells us that her technique won't work on concrete floors. However, she says others have had success using polyurethane only, no elmer's glue. I'm doing my bathroom remodel (down stairs half bath) and the floor is HIDEOUS! So the first thing I have to do is remove the old tile. Here's what's below the tile. You need to make sure that all your boards are securely fastened down. Next, you need to brush on a barrier product to make sure that any gaps in your floor while also providing a water barrier (since this is in the bathroom).
Once your floor is sealed (and dry) it's time to apply some floor leveler. Let's see how far we've come. Paper Bag Flooring Tips, Tools & Supplies for Concrete Subfloors. Create A Faux Leather Finish Using Brown Paper.