
Pulsante accensione e spegnimento - RaspberryItaly. Buongiorno,

How to Setup an I2C LCD on the Raspberry Pi - Circuit Basics. Connecting an LCD to your Raspberry Pi will spice up almost any project, but what if your pins are tied up with connections to other modules?
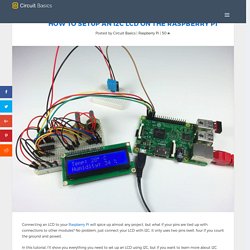
No problem, just connect your LCD with I2C, it only uses two pins (well, four if you count the ground and power). In this tutorial, I’ll show you everything you need to set up an LCD using I2C, but if you want to learn more about I2C and the details of how it works, check out our article Basics of the I2C Communication Protocol. BONUS: I made a quick start guide for this tutorial that you can download and go back to later if you can’t set this up right now. It covers all of the steps, diagrams, and code you need to get started. How To Install OpenCPN on a Raspberry Pi.
EDIT 24 MAY 2016: I've also gone and updating this post to reflect the guide at OpenCPN, instead of just winging it on my own.

Recommended Gear Easy Step-By-Step OpenCPN Install/Compile on a Raspberry Pi for Total Noobs If you follow the OpenCPN documentation, there are two options. The first option says you can install it without compiling it from Launchpad, but I'll be totally honest--I tried going that route, and I couldn't get it to work because, as I've mentioned in multiple places, I'm not exactly a very computer literate person. I'm very good at copying and pasting into a Terminal window, and that's what we're going to do here. DHT22 Tutorial for Raspberry Pi. After I posted my Raspberry Pi server room rack temperature monitor project, I received a request to make a tutorial on how to measure humidity in addition to temperature with a Raspberry Pi.

The following video demonstrates 2 methods for controlling a DHT22 sensor: The 4 pin DHT22 sensor has 2.54mm spacing so it works with a standard breadboard. Raspberry PI DHT22 humidity sensor with a LCD 16×2 display – Weather station. For a workshop I’m going to give about Raspberry PI and how to interact with the outside world, I thought for a start, why not something simple like some kind of a Weather Station.
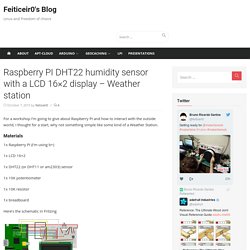
Materials 1x Raspberry PI (I’m using b+) 1x LCD 16×2 1x DHT22 (or DHT11 or am2303) sensor 1x 10K potentiometer 1x 10K resistor 1x breadboard. USB-Port-GPS Module SKU:EZ-0048 - 52Pi Wiki. Description Support Raspberry Pi model A, B, A+, B+, Zero, 2, 3 with its' L80-39 GPS chip inside.Communicates satellite with UART or USB.CP2102 as USB to UART Bridge chip, stable and faster.

The L80-39 with 66 search channels and 22 simultaneous tracking channels,it acquires and tracks satellites in the shortest time at Outdoor. Attention This module is fit for outdoor operation. please put the Antana in the open air. Feature Document Download: File:Quectel L80-R GPS Specification V1.0.pdf Parameters Presentation Package includes: Raspberry Pi 2/3 [OpenCPN Books]
Installing Raspbian.
![Raspberry Pi 2/3 [OpenCPN Books]](http://cdn.pearltrees.com/s/pic/th/raspberry-pi-2-3-opencpn-books-153820792)
Tutorials & Technicalities: Measuring Humidity and Temperature Using a Raspberry Pi. I have a collection of old books and a basement to store them in.
But in fact, I don't do that yet, because I had a suspicion that storing them there would not be healthy to the books. Old books and too much humidity don't go well together, especially if you want to keep the books in a pristine condition. I could, of course, just go to the nearest builders merchant and get a cheap hygrometer for something like €7-15. But I wanted to track the humidity level over a period of at least a week, to see if factors like day/night conditions and changing weather (not to mention the tumble dryer in the next room) have any measurable effect on the level of humidity in the basement room. Therefore I decided to build a humidity and temperature meter with logging capability from a Raspberry Pi and a few bits of electronics. The Parts and Pieces I Used Most of the electronic parts I found on Ebay, but your local electronics store should also have most, if not all of them. Temperature and Humidity using the DHT22 sensor - PrivateEyePi Project.
Updated to now support Raspberry Pi 2 This tutorial you will build one or more digital temperature gauges linked to your Raspberry Pi that can be viewed on the WWW or your smart phone.
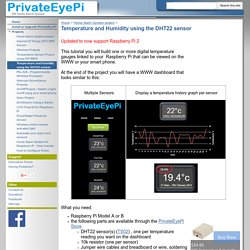
At the end of the project you will have a WWW dashboard that looks similar to this: What you need: Raspberry Pi Model A or Bthe following parts are available through the PrivateEyePi StoreDHT22 sensor(s) (TS02) , one per temperature reading you want on the dashboard10k resistor (one per sensor) Jumper wire cables and breadboard or wire, soldering iron and solder (JW01, BB01) Step 1: Build and test the Electronics: Purchase a DHT22 digital thermometer and humidity sensorPurchase a 4.7k Ω (ohm) resistorAs per Figure 1 put the resistor between pins 1 and 2 as in the diagramConnect Pin 1 of the sensor to 5V GPIO (Pin 2)Connect Pin 2 of the sensor to and free GPIO pin e.g.
Figure 1. Figure 2. Multiple sensors Configure the dashboard Step 1: Register user and password. SSH warning - WARNING: REMOTE HOST IDENTIFICATION HAS CHANGE. Because I frequently use a variety of different SD cards with my RPi B & a DHCP reservation for it based on its hardware MAC address, I kept running into the 'remote host ID has changed' warning whenever I changed cards & tried to access it from my Mac with ssh.
Clearing the SSH key for that MAC address in ~/.ssh/known_hosts on the Mac every time I changed cards would have been annoying so I decided to do (I think) what the warning text suggested by adding a 'correct' host key to that file for each SD card I use. There are different ways to do this but the simplest one I found was as follows: 1. On the Mac, navigate to the ~/.ssh/ folder in Finder. Because files & folders starting with a dot are normally hidden, do this by using the Finder's Go > Go to folder... option (shortcut: Shift + Command + G) & entering "~/.ssh/" (without the quotes) & clicking the "Go" button.
IO Pi Zero - Assegnazione pin GPIO del Raspberry Pi. This page needs translating, can you help? The IO Pi Zero is a 16 channel digital expansion board designed for use on the Raspberry Pi Zero. The board is based around the MCP23017 16-bit I/O expander from Microchip Technology Inc. The IO Pi Zero Expander is powered through the host Raspberry Pi using the GPIO port and extended pins on the GPIO connector allow you to stack the IO Pi Zero along with other expansion boards.
Features Arduino, C, Node.js, Windows 10 IOT, Python 2 and Python 3 libraries are available on GitHub. Hackster. Overview There are a number of earthquake detector projects for the raspberry pi. These are good for anyone living in an area prone to earthquakes or for those that want to try to detect distant quakes themselves. This project is not focused on detecting quakes, but uses USGS earthquake data to make an interesting little alerting system. Sure, you can always go to your PC and browse the USGS maps for the latest data, but you are a Maker and you like to make things because you can! How to Set Up the DHT11 Humidity Sensor on the Raspberry Pi - Circuit Basics. The DHT11 temperature and humidity sensor is a nice little module that provides digital temperature and humidity readings. It’s really easy to set up, and only requires one wire for the data signal. These sensors are popular for use in remote weather stations, soil monitors, and home automation systems.
How to Write and Run a Python Program on the Raspberry Pi. In this post, I’ll give you a quick overview of what a Python program is, what Python programs can be used for, and how to write and run a simple Python program on the Raspberry Pi. What is a Python Program? Python is a very useful programming language that has an easy to read syntax, and allows programmers to use fewer lines of code than would be possible in languages such as assembly, C, or Java. The Python programming language actually started as a scripting language for Linux. Python programs are similar to shell scripts in that the files contain a series of commands that the computer executes from top to bottom. Compare a “hello world” program written in C to the same program written in Python: Unlike C programs, Python programs don’t need to be compiled before running them.
It is possible to run Python programs without the Python interpreter installed though. How to Setup an I2C LCD on the Raspberry Pi - Circuit Basics. Remote Connect Raspberry Pi with SSH VNC HTTP. The menu selections for SSH, http, and VNC are provided as shortcuts to quickly install Weaved Service connections for the 3 most popular network applications. You can also create Weaved connections for any TCP based host by selecting option 4, “Custom (TCP)” from the Protocol Selection Menu. You’ll need to answer 3 questions: Does this protocol use a web browser (e.g.
HTTP on port 8080 vs. 80) [y/n]Please enter the protocol name (e.g., ssh, http, nfs):Please enter your desired port number (1-65536): Controllo da rete globale con Weaved - RaspberryItaly. Avete mai pensato di “aprire le porte sul router” per accedere al RaspberryPi da qualsiasi luogo e rete? Permessi Linux - Questi sconosciuti! - RaspberryItaly. Stasera vi proponiamo, in maniera il più semplice possibile, un argomento che è particolarmente ostico: i permessi Linux!
Personalmente, mi ha fatto rinunciare ad usare Linux almeno 3 volte prima di intestardirmi e capirli! Prima di iniziare facciamo una piccola digressione. Mikilinux - La distro per scaricatori - RaspberryItaly. Se stavate cercando un modo per rendere il vostro Raspberry un centro di download automatizzato, non potete non dare un’occhiata a questa distribuzione. Comandi 'sudo' senza password - RaspberryItaly. Eccoci qui, dopo un bel po di tempo… Oggi vedremo come eseguire i comandi come “amministratore”, quindi col comando sudo senza dover inserire la password. Corso raspberry picam - Lezione 1 - Utilizzo base e configurazioni. Ho deciso di scrivere un corso riguardante l’uso della PiCam. Per chi non lo sapesse, la PiCam è un “modulo” hardware ufficiale prodotto dalla Fondazione Raspberry Pi che permette di aggiungere interessanti capacità fotografiche al nostro piccolo lampone. La prima versione di questo modulo risale al 2012 mentre la v2 è stata lanciata nell’aprile del 2016.
Corso raspberry picam - Lezione 2 - Interfaccia grafica web. Ebbene si, dopo una settimana dalla prima lezione, ecco qui la lezione 2 del corso. Oggi tratterò, assieme a voi, l’installazione, la configurazione e l’utilizzo dell’interfaccia grafica web per la nostra camera. GPS Module for Arduino and Raspberry Pi.
Difficulty Level: Beginner - Introduction Go to index The GPS module for Arduino and Raspbery Pi is a small electronic circuit that allows to connect to your Arduino/Raspberry Pi board to get position and altitude, as well as speed, date and time on UTC (Universal Time Coordinated). It uses the standard NMEA protocol ( ) to transmit the position data via serial port. Make a GPS Navigation System for a Boat with a Raspberry Pi. If you are a boat owner, I'll guess you've seen some of the prices on the chart plotters and navigation tools.
Some of them are pretty expensive. How to install / use the Raspberry Pi Camera – The Pi Hut. Raspberry Pi 7" touch screen assembly guide – The Pi Hut.