
How to print maps, terrains and landscapes on a 3D printer. From time to time, every 3D printer owner is asked the same question: “Why is the printer really good and useful?

I cannot imagine what would I use it for.” I did not find a satisfactory answer to this simple question at first, because I don’t consider printing figures and statues as the right example. That’s why every time the 3D printing technology is applied in practical use, I’m excited! Today, I’ll show you how to print a 3D map, that can serve in a number of situations not only using our Original Prusa i3 MK3 printer. How about a plastic model of terrain for school education, a small-scale version of a national park, a model that shows the overview of a real-world race track, or perhaps a tiny version of a mountain you climbed in the past.
Models based on maps can be divided into two groups: Printing a terrain model – ideal for mountain ranges, volcanoes or abysses. How to get a model? Terrain models Find a place on the map. Model Shape How to do it: City model with terrain.
Products - MonkMakes. ServoSix - MonkMakes. The Servo Six board simplifies the process of connecting up to six servo motors to a Raspberry Pi or Arduino.
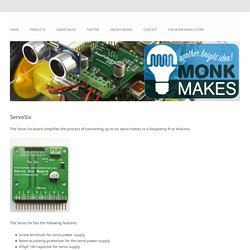
The Servo Six has the following features: Screw terminals for servo power supplyReverse-polarity protection for the servo power supply470µF 16V capacitor for servo supply470Ω current limiting resistors for servo control lines (to protect GPIO pins)Power indicator LED For use with Raspberry Pi, we have created a Python library based on Richard Hurst’s ServoBlaster code. You can download the Servo Six Python library from Gitub.
This allows accurate servo positioning with a nice easy to use Python interface: from servosix import ServoSix ss = ServoSix() try: while True: servo = input("servo:") angle = input("angle:") ss.set_servo(servo, angle) finally: ss.cleanup() You will find full documentation for the library in the Github repository. When using the Servo Six with an Arduino, you can just use the standard Arduino Servo library. Setting up your Pi Cap on the Raspberry Pi 1, 2 or 3 - Bare ConductiveBare Conductive. Step 19 Configure the picap package To configure the picap package, you need to run “picap-setup” at the terminal.
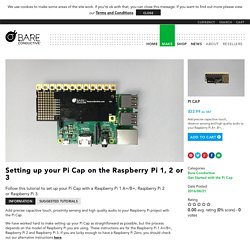
Firstly we ask whether you want to enable high quality audio on the Pi. We strongly recommend that you do this – it will enable the new, higher-quality audio driver that the Raspberry Pi team have worked hard on, which is a huge improvement on the previous version. Eventually this will be enabled as standard in Raspbian, but for now you have to do it manually. Next we ask whether or not to install examples into your home folder. Once this is complete, we ask whether you would like to reboot the Pi in order to complete installation. Raspberry Pi - Caméra 5M & Streaming. Avec un capteur d'une résolution native de 5 mégapixels (5M) et, au niveau optique, d'une lentille de focalisation fixe, la caméra peut servir d'appareil photo (résolution maximale de 2592 x 1944 pixels) ou de caméra vidéo (format HD jusqu'à 1080p).
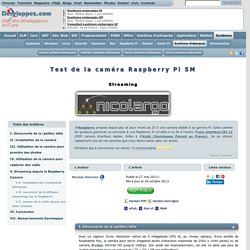
Son poids est impressionnant, car elle ne pèse pas plus de quatre grammes pour un volume de L25 x l20 x H9 (en millimètres). On commence par brancher la caméra sur l'interface CSI. Il faut y aller doucement et sans trop forcer. Je vous conseille de visualiser la vidéo suivante : Cliquez pour lire la vidéo Flash n'est pas installé, Flash n'est pas à jour 7.0.0, cliquez sur l'image ci-dessous. 3DViewer Features. OSH Park ~ Shared projects. 3DViewer Features. Gestion du port GPIO du Raspberry Pi avec Python. Thereafter, we'll go on the assumption that we are developing on the latest model namely a Raspberry Pi B2.
There are many libraries dedicated to the Raspberry Pi. They are stored, for the most part, on Pypi. We will study here is the historical library: RPi.GPIO. To install it, so just a simple install PIP: If you do not yet have pip, you just load get - pip.py, and then run it through the following command. Wget python get-pip.py Of course, don't forget to use a 'sudo' if necessary. Reminder: Python is case sensitive. The GPIO port is accessible in root mode. Sudo python mon_script.py Regarding the status of the input-output (I/O), the RPi.GPIO module accepts dedicated variables, integers or booleans. So, the high State may be worth to choose GPIO. III-B-1. The Raspberry Pi allows two sets of numbers: the silkscreen of the connector on the Board (GPIO.) Black numbering GPIO. Apprendre l Electronique en Partant de Zero - Niveau 1. Transformer une Alimentation PC en Alim de Laboratoire - Vlog Bricolage #8.