
How to make glitter shoes! Last week I posted a pic on Instagram of some shoes I was glittering for my friend, Stacy.

She wanted a pair of glitter booties like this pair but since they were no longer for sale I decided to make her a pair. I recieved tons of questions about the process and supplies. I thought I'd post a quick how-to for those of you wanting to DIY your very own pair of glittery shoes. There are many ways to get this look but here's what I did... You'll need: A pair of shoes that you want to glitter. All you have to do is use a small paint brush to apply a heavy layer of glue to a section of your shoes, cover them in glitter (pour it on over a piece of paper).
Tips: It can be difficult to get the details perfect, like going around laces, getting the tounge of the shoes and creating clean edges. DIY Friendship Bracelet. For several months now, we’ve been receiving emails requesting a friendship bracelet DIY.
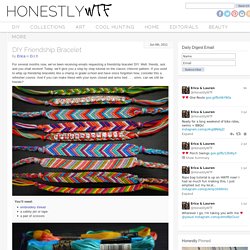
Well, friends, ask and you shall receive! Today, we’ll give you a step by step tutorial on the classic chevron pattern. If you used to whip up friendship bracelets like a champ in grade school and have since forgotten how, consider this a refresher course. And if you can make these with your eyes closed and arms tied . . . umm, can we still be friends? You’ll need:embroidery threada safety pin or tapea pair of scissors Start by cutting several strands of embroidery thread at about 24 inches each. Start on the left side with the outermost color (shown here in red) and make a forward knot by creating a 4-shape over the 2nd color, loop it under and back through the opening.
Pull up and to the right to tighten. Tutorial: stab binding « Sarah Nielsen. Three cheers for Tuesday! Today’s tutorial is a traditional bookbinding stitch that is used for sewing together single sheets of paper (as opposed to signatures). So before I get started, let me assure you that this is a very handy stitch to know. Think of all the school projects you can now start sewing together instead of stapling! Way better. This is simple enough you can teach your kiddos how to do it with yarn. Ok. Sweet Salvation: Upcycled Denim Placemat - Today's Nest.
Every year we have one yard sale. Our annual spring cleaning for this year yielded more stuff than ever before. It seems impossible, but there is never a shortage of stuff we have outgrown or that has outlived its usefulness in our home. I guess part of that is the result of growing chilldren. Our yard sale is just around the corner.
If you have one on the horizon, be sure to check out our yard sale tips from last summer. Dresses that make you look pregnant. DIY Mock Moccasins...In Felt! Jealous?

Don't be! These mock moccasins are not difficult to whip up yourself. Maak je eigen Kerststal/Make your own nativity set! A while ago I had this idea.
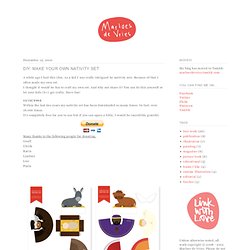
As a kid I was really intrigued by nativity sets. Because of that I often made my own set. Look to inspire. Reindeer Appliquéd Pillow. As I promised yesterday here is the tutorial for my reindeer pillow.

It’s a clean, modern looking pillow that comes together quickly and easily. Nothing more than a steady hand for cutting and some basic sewing skills are needed. Reindeer Appliquéd Pillow This pattern makes a 16 x 16″ pillow. Of course you can make it any size you want, you’ll just need a little more or less fabric. Supplies: 8 1/2 x 11 piece of brown felt (or color of choice)Scissors – I used paper, fabric and embroidery scissorsGlue Stick (optional)Ruler or yard stick1/2 yard green felt (or color of choice)Fabric GluePaintbrush (optional)Brown Embroidery Floss (or color to match reindeer)Sewing NeedleGreen Thread (or color to match pillowcase)Red Bead or Small Red Button(optional)16″ x 16″ pillow insert Open the reindeer pattern and save it to your computer.
Cut the pattern out. Leather envelope phone case. As you may know, I have a weakness for tech accessories — especially ones that you can DIY — so it should come as no surprise that when Aimee of SwellMayde offered to share this tutorial, I immediately said yes.

Aimee was even kind of enough to make a leather case in the signature D*S color — bright coral! This DIY is super easy; the combination of basic materials and a printable template means even a novice crafter can produce this chic, simple phone case for themselves or as a gift in no time. Thanks for sharing, Aimee! — Kate. DIY infinity scarf. School has just started - about what?

Three weeks ago - and we all went through our first colds and/ or first sore throats. The weather has been up and down, lately - more up than down, to be honest - but the mornings are definitely cooler. TUBULAR BRACELET {make it monday} « greeneyed.com. My line-up of DIY projects was put on hold last week when a friend’s grandfather passed away.

She asked if I could make her and her family a series of red, tubular embroidery thread bracelets to wear during the mourning period. And so back into the friendship-making mindset I went! Given that this woman not only threw me a whale of a baby shower, sewed the cover for the girls’ loveseat, knit Sunny the most adorable sock monkey stuffed animal, and hemmed fabric for a project I will unveil in the coming weeks, I dove right in. Sunday Linky Party #26 + Goodies. Well, I don't have much going on today.

My husband is annoying me with his indecision about whether he wants to eat at home or not. How to make boxes from paint swatches. If you've got paint chips sitting around begging to be made into something, try folding them into boxes for paperclips, thumbtacks, party favor candies, or tiny gifts.
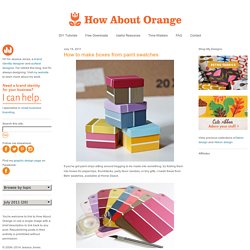
I made these from Behr swatches, available at Home Depot. You'll need paint swatches, double-stick tape, an X-acto knife, ruler, and cutting mat. For the box bottom, cut a 1/2" strip off each of the two rounded ends of the swatch. Snack Bag Tutorial!!! DIY+Pregnant Brain. Without getting into too many details-the baby is going to be a little longer than we thought. We were afraid that she was going to be early, and now that she isn't, I sort of feel like I'm living life in limbo.I don't know if it's just me, or women in general, who find the strangest tasks to pass time until a baby arrives.
Suddenly, the weirdest things pop on to our 'to do' lists, and become oddly important. And the tasks seem to grow weirder and weirder with each baby. Super cute sewing tutorials. Have you visited Anna Graham's blog Noodlehead yet? If you like to sew things that are so cute you can't stand it, rush right over there. Valentine's Day Wall Art.
Project 21 Week 23 – Crayon Alphabet. Two Zip Hipster bag. My mum just tried out Erin Erickson's Two Zip Hipster sewing pattern and sent over the result. My So Called Green Life...: How to Sew a Credit Card Wallet, Business, or Gift Card holder. Love Cartography: Heart Maps.
Holder for Charging Cell Phone (made from lotion bottle) My husband and I both have cell phones. And both of us have phone chargers. And that means lots of obnoxious cords. DIY Wrap Bracelet. You should all know by now that we are all about stacking bracelets on our wrists. The more, the better. In fact . . . the most, the best! DIY Moleskine Scrapbook. T-Shirt Refashion: Jersey Necklace.
Light Up the Night. I'm one of those people that loves Christmas lights year-round. Always Chrysti - Always Chrysti - 100+ Ways to Creatively Reuse Old Magazines. The BEST Play-Dough Recipe. Have you ever made play dough and it just fell apart?? Well… not this time.