background preloader

How to/diy

Facebook Twitter

How to make gift bags from newspaper. When I bought something at a store recently, the clerk handed me my purchase in a bag made from a newspaper. I liked it very much and had to make some more—thus today's DIY recycled newspaper project: gift bags made from the Wall Street Journal. You can vary the dimensions, of course, but here's what I used to create a bag that's 5" tall, 4.5" wide, and 3" deep. Stack two sheets of newspaper on top of each other. This will be a two-ply bag for extra sturdiness. Cut out a rectangle that's 15.5" wide and 8.25" tall.
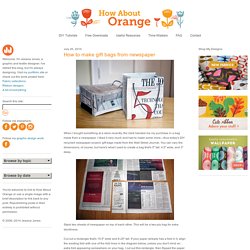
If your paper already has a fold in it, align the existing fold with one of the fold lines in the diagram below, unless you don't mind an extra fold appearing somewhere on your bag. Fold a flap 1.25" down from the top. Cut two pieces of cardstock or chipboard to 4.25" x 1", then glue them on the widest two panels just under the top fold. Upend the bag so the 2" flap is now up.

Put glue on both flaps and fold them inward to form the bottom of the bag. Card making. Make a Bouncing Polymer Ball - Experiment with Polymers. Introduction Balls have been toys practically forever, but the bouncing ball is a more recent innovation. Bouncing balls were originally made of natural rubber, though now bouncing balls can be made of plastics and other polymers or even treated leather. You can use chemistry to make your own bouncing ball.
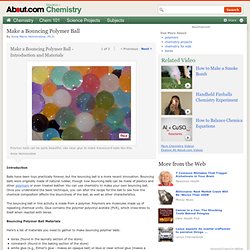
Once you understand the basic technique, you can alter the recipe for the ball to see how the chemical composition affects the bounciness of the ball, as well as other characteristics. The bouncing ball in this activity is made from a polymer. Bouncing Polymer Ball Materials Here's a list of materials you need to gather to make bouncing polymer balls: Let's make bouncing polymers balls... Polymer Projects Make Gelatin PlasticMake Plastic from MilkSlime RecipesMake Plastic Sulfur Plastics and Polymers Plastics and Polymers Science ProjectsExamples of PolymersWhat Is Plastic? How to make gift bags from newspaper.

Jewelry smashed pennies. DIY: Ottoman; Build your own from scratch. **All images are property of Do It Yourself Divas. Please do not use without permission. You are welcome to pin. ** My hubby and I built this ottoman from scratch! You can build a storage ottoman too! You see, there was once an old ugly couch. ...down feather cushions. You Need: You can use any cushion you want, just keep in mind that measurements for your ottoman will be completely different than mine. We placed a board onto the cushion so that it would be able to support weight. We wrapped the cushion and board tightly with some cheap fabric and stapled the fabric to the board. Here's what it looks like flipped over This picture frame looking wood will be attached to ottoman lid to keep it in place, or in other words, to keep it from sliding off the base of the ottoman.

This wood is used to make the box, or the base of the ottoman. Here is the base of the ottoman. Here is the good fabric being stapled onto the cushion part of the ottoman. This is what it looks like flipped over. Stephanie. Repurposing / Old action figures spray painted gold-----attached to a lamp base. <3. Convert Old Mason Jars. I buy my yeast in bulk because I make a lot of bread. It is so much cheaper than buying the tiny jars or individual packets. The yeast pictured below is a 1 pound brick and it cost $2 or $3. That is a huge savings. The only bummer about bulk yeast is how to store it easily. Well, listen up, friends, because I have the solution: Tah-dah!

Just chop the top off an empty cardboard salt container, cut it to the size of a canning lid and use the canning ring to screw it in place. Then you can put the whole thing in the back of the fridge and the next time you bake, you can easily pour the yeast into your measuring spoons. This would also be great for storing spices, baking ingredients, or powder laundry detergent bought in bulk. So the only question left is,what are you going to put in your pour-spout jar? The Painted Hive: MAGIC Decal Transfer Tutorial with Free Printables!

Some of you may remember, a little while back I posted a tutorial for DIY waterslide decals. Among other things, I mentioned how awesome they are for creating custom embellishments without the need for any fancy-pants equipment. Yep, waterslide decal paper is a truly fab product, though as great as it is, there is one drawback – although it’s somewhat tough it’s not especially durable. So, whilst it’s perfect for ornamental purposes, it’s not ideal for more practical applications…until now that is! Magic decal coating paper is a product designed to be used in conjunction with standard decal paper to make the finished transfers super durable – yes, even dishwasher resistant!
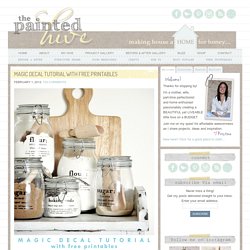
If you’re already familiar with magic decal coating paper then please excuse my tardy excitement, though for everyone else who is just getting to the party now too, feel free to start throwing the streamers! 1 Image to transfer. Use anything you like. 2 Printer. You can use either a laser or an inkjet printer. 6 Scissors. 50 Ways to Re-purpose and Reuse Glass Jars {Saturday Inspiration & Ideas} Erik’s recycled wine bottle torch. This clever outdoor diy idea comes from erik anderson of gerardot & co.- a creative branding and design agency in indianapolis. erik was kind enough to share a fantastic project that turns an everyday bottle into a modern backyard tiki torch. i love the way these torches look and am dying to find a backyard to use these in- too bad the closest thing we have is a 2×2 foot fire escape. but for those of you with yards, i hope you’ll enjoy this project from erik. click here for more info on the project and click here to check out erik’s work at gerardot & co. thanks, erik!

CLICK HERE for the full project instructions after the jump! [****Safety Note: This is for outdoor use only. Tiki brand recommends that the wick never be set higher than 1-inch, and I recommend that you exercise the same discretion and common sense that you would with any small open flame.*****] Recycled Wind Bottle Torch 1. Helpful Tools: Channellocks, adjustable wrench, hacksaw, power screwdriver, and a funnel The Hanger 1.

Tinted Mason Jars in Rainbow. I love using mason jars for decorating and a seemingly endless supply of craft projects. But rainbow tinted mason jars, just like the vintage ones you can never find anymore? This one might be my favorite project with mason jars yet! Mason Jars Mod Podge in Gloss (buy it here) Food coloring Ramekins to mix colors Newspaper or paper bag Mix food coloring with a T or so of water into individual ramekins. You can do any color combination you like. Add a couple T of mod podge into your mason jar Add one ramekin of color into the jar and stir to incorporate it all together With a bowl underneath, carefully twist the jar around coating the whole inside with the mod podge/food coloring mixture.

Let dry upside down on the paper Do the same with the other colors. Place the jars face down on top of wax paper and a cookie sheet into an oven, set on warm. When they're ready, they'll look clear and the mixture should lose most of its streaks. DIY Projects & Crafts / Mason Jar Oil Lamp for my patio. A green afternoon and a tree frog tutorial. I spent a snuggly afternoon crocheting another tree frog and writing up the pattern. I used the same new tutorial format to update some of the other tutorials too, and I will hopefully write up the pomeranian, kitten and hippo patterns soon, in the same way. I hope that they are easy to use, please let me know if there are any problems.

So voila, enjoy! Download treefrog.pdf Download owleyemask.pdf Download the_amelia_bag.pdf I am really struggling to find something decent to read after finishing all the Amelia Peabody's... I read the House at Riverton and it was a beautiful book but somehow slightly forced. It's Sunday tomorrow and, in Edinburgh, that means hordes of people will be rushing all over the city to visit flats from 2-4 during open viewings, and tomorrow I will be joining them. Portfolio Book-Cut Sculpture. Picture limbs leaves. Hello my blog friends! I'm so pumped to share a project I finished today! It's simple, cheap, quick, and fall-y (yes, that is a word).
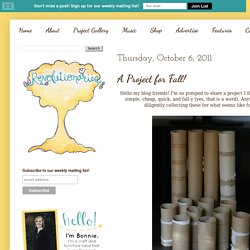
Anyway... I've been diligently collecting these for what seems like forever: Why? So I could do projects like these: [Side note: please pin from the original source so the credit goes to the right person! But I also love projects involving trees/branches like these: Then, I saw this yesterday and even though it's not made from toilet paper rolls, I thought, hmm.... color behind the toilet paper rolls? So basically... What you need: 1. 3. How to do it: 1. 2. 3. 4. 4. 5. 6. It's so.. fall. And I love that I used things I already had in my craft stuff and I recycled toilet paper rolls! Would it be bad to keep it up all year? Update: here are some more pictures that I took in better lighting! Looking for more toilet paper projects? Make-It / Grab an old suitcase, a stool, spray paint and tada! Got yourself a new side table. Seven Cheap Ways To Crisp Up A Room. Seven Cheap Ways To Crisp Up A Room Is it weird that John read my headline in passing and used it as an opportunity for a comedic performance?

A few “room-crisping” suggestions from him? 1) Flambé it. 2) Put crunchy noodles on the floor. 3) Starch it. Funny guy. Anyway, here are seven super affordable and easy ways to freshen up any space. They might seem simple and straightforward, but it’s amazing what a difference these little tweaks can really make. So if you don’t have the energy (or the money) for a full scale room makeover, these might be just the thing to give you a new look in a snap. 1. 2. 3. 4. 5. 6. 7. So there you have seven quick and easy ways that you can make a room feel current and fresh (for everyone from potential home buyers to yourself).

All images (except for the curtain pic) from fun and fabulous House Crashings of yore. Key color. Quiet book. I started working on this quiet book for my son on January 1st. Finally, 4 months later, the quiet book is ready to rock n' roll. I will be posting patterns and step-by-step instructions for the individual pages, so keep checking back. I'm so delighted with this book, I love how it turned out. I do have to confess that I have several more pages in various stages of completion, but I really wanted to get the majority in the book. I sewed binder rings into my cover so that the pages can go in and out. The back cover has a little pocket for treats or extras. Feel free to leave a comment with any questions, and I'll work on getting my directions and patterns posted. For details on page size and fabric, see this post.
Inside Cover: This book belongs to our familyPeek-a-boo mittens with family picture underneath (Click here for printable pattern) Building blocks for the Idaho Falls Temple (Click here for a free pattern printable)Noah's Ark with animals inside Tic Tac ToeTying a shoe. Vitreosity: The Bottle Wall. The Bottle Wall Introducing the Bottle Wall, a peculiar form of stained glass. You won't see any mention of bottle walls or bottle houses in the stately and academic tomes of stained glass history. But stained glass it is, and it deserves recognition. anonymous bottle wall - posted on Flickr be prepared for lots of pictures...

I became interested in the bottle wall phenomenon most recently through a TV show. Early History I don't claim to be an historian, so this will be brief. Bottle houses began as a practical necessity. The Tom Kelly House - Rhyolite, Nevada - circa 1906 The look of these early bottle houses tended to be more mundane, owing to their utilitarian origins. By the middle of the 20th century there was a little more 'art' put into the structures and the motivations were more eccentric and personal, such as in this house built as a playhouse. The Doc Hope House - Hillsville, Virginia, 1941 Grandma Prisbrey's Bottle Village Exterior interior of the round house Tinkertown Lightning Ridge. Make-It / Shipping Pallet Shelves. Pallet/wheels. What can you do with an old pallet? So many things! If you ever come across the opportunity to pick up a few pallets take a look at some of the ideas I have come across for recycling old pallets into furniture and other practical and decorative pieces.

I would like to mention that the designs below were found at various sources on the Internet. Where possible I have mentioned the original source, but unfortunately too many do not. If you are the original designer for any of the furniture below, please let me know so that I can add your details. Make furniture for your home ABOVE: Mobius Living take pallets to a new level, offering clients the opportunity to buy ready-made coffee tables. ABOVE and BELOW: Who would have thought that a humble pallet could be transformed into so many practical pieces. ABOVE: All it takes is a few reclaimed timber pallets to make up your own living room furniture In the kitchen ABOVE and BELOW: Don't stop there... In the bedroom A word of caution... In the garden. How to Reupholster a Chair, Part 3: Stapling. Here are the other parts of this series: Part 1, Part 2, Part 4, Part 5 Also, I have been getting a lot of emails this week asking for advice on how to upholster different pieces.

In all sincerity, I wish I had the time to help with all of your projects, but unfortunately, there is just not enough time in the day. I hope you're able to figure out the projects on your own. Otherwise, I suggest consulting a professional or a friend with upholstery experience. Alright! I forgot to say earlier that when you're pulling apart the chair, be careful to not rip any of the old fabric. When you're cutting your new fabric, pay special attention to the pattern. Like I mentioned earlier, if the insides of a piece are still in good shape, I like to save the money and hassle and just reuse. There were so many layers of fabric to staple down to a very small lip on the frame, that I was starting to completely destroy the integrity of the wood (not good). 1. 2. 3. 4. 5. 6. . . The arms are easy. Pillow old spreads. Make a gift bow from a magazine page.

In gift wrap emergencies when you've got the present but need some wrapping, here's an idea for turning a magazine page into a bow. There may be better ways to stick this thing together, but I used what I had on hand: staples and adhesive glue dots. Double stick tape or brads should work, too. Cut a magazine page lengthwise into 9 strips, 3/4" wide. Leave 3 of the strips full length. Cut one inch off 3 of the strips. Cut two inches off 2 of the strips. Cut the last strip down to 3 1/2" long. If you're using a magazine that's 10 1/2" tall, you'll end up with: 3 strips, 10 1/2" x 3/4" 3 strips, 9 1/2" x 3/4" 2 strips, 8 1/2" x 3/4" 1 strip, 3 1/2" x 3/4" Twist each strip to form a loop at both ends and staple it in the center.

Layer the three longest pieces on top of each other, spacing them evenly and securing each with a glue dot. Use other papers, like a map of your city. Craft Of The Day: Tin Can Pencil Holders. Hula hoop lights. Wine/picnic table.