
Flashback: Woven Map Basket. Maps can be amazing design elements, with all their intricately drawn lines and minute details.
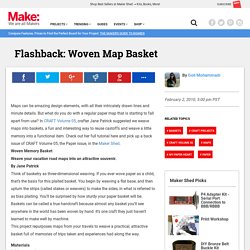
But what do you do with a regular paper map that is starting to fall apart from use? In CRAFT Volume 05, crafter Jane Patrick suggested we weave maps into baskets, a fun and interesting way to reuse castoffs and weave a little memory into a functional item. Check out her full tutorial here and pick up a back issue of CRAFT Volume 05, the Paper issue, in the Maker Shed.Woven Memory Basket Weave your vacation road maps into an attractive souvenir.
By Jane Patrick Think of basketry as three-dimensional weaving. If you ever wove paper as a child, that’s the basis for this plaited basket. Materials 2-3 large road maps Contrasting string or thread Clothespins Cutting mat Rotary cutter Awl or tapestry needle Scissors Small tweezers White glue (optional) to further stiffen the basket Directions Step 1: Prepare the strips. Búhos y un gato / Owls and a cat / Eulen und eine Katze. V and Co how to: jersey knit bracelet. I don't know what it is about this time of year that makes me just want to have my bare feet in the sand, be watching the sun setting into the ocean, and breathing in the warm salty air of the beach...as i get older, more and more i find myself missing that place i used to go to almost every.single.day. as a teen.

(my skin doesn't miss it. as a matter of fact, i now wish i listened more and DID put SPF on my face...hindsight is 20/20). my mom calls me from her walk on the beach almost every morning... *sigh*yeah, i get a little homesick around this time of the year. heck on my pinterest my "dreaming of summer" has the most pictures in it. ah yes. i miss my ocean. case in point. this bracelet, brought a flood of memories, not because i used to have one like it but because i can totally see me wearing it by the beach, not caring that it's gotten salty and wet, because i can totally make another one in like less than 5 minutes flat when i get home. *sigh* Sweetheart Ballet Tee Tutorial.
Here’s yet another way to spice up your t-shirts when you get a little bored with the plainness of them all.
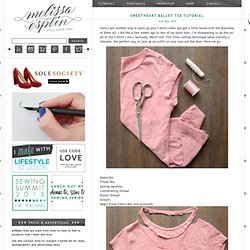
I did this a few weeks ago to two of my plain tees. I’m threatening to do this on all of the t-shirts I own. Seriously. Watch out! This little ruching technique takes literally 2 minutes; the perfect way to jazz up an outfit on your way out the door. Materials: Fitted Tee Sewing Machine Coordinating thread Elastic thread Scissors Magic Erase Fabric Pen (not pictured) Cut the collar off: only cut a little around the back & cut more around the front to make a deeper neckline. Mini DIY Round-up. How To Make An Easy Dress (For Cheap!) Soap Queen TV: Holiday Candle Travel Tins. Grab some hot cocoa, get comfortable and prepare yourself for some candle making fun!

In the final episode of my Holiday Series I show you how to make cute little travel candles perfect for the gift giving season. When filming this episode I tried to include as much helpful information as possible, which resulted in a nearly 13 minute long video (hence the get comfy recommendation). I demonstrate how to use our liquid candle dyes and wax dye blocks as well as show many common candle problems and how to fix them. Although I mention it in the video, I really want to emphasize how important it is to use heat safe containers both for your mixing container and for the final candle container.
I love keeping a few of these travel candles on hand for last minute hostess gifts or ‘just because’ gifts to give through out the Holidays. Download the free PDF label template here to print out and make labels just like the ones in the video. Found. Designed. Made. For the last installment of Sugar & Cloth’s Handmade Holiday, here are a few favorites for DIY gifts.

After all, even if they have everything, it still isn’t the same if it’s made by you! 1 Felt Animal Kit | Purl Soho 2 Woolen Pouches | Martha Stewart 3 Tiny Polaroid Magnets | Ambrosia Creative 4 Canvas Leaf Boxes | One Perfect Day 5 Solid Perfume Locket | Design Sponge 6 Wool Camera Wrap | Design Sponge 7 Pom Pom Cowl | The Purl Bee. Charlotte - Temporary Tattoos Tutorial. D.I.Y: Recycled T-Shirt Scarf // Gettin' Crafty!
D.I.Y: Recycled T-Shirt Scarf 1} Gather a few old t-shirts you don't wear anymore; thrift them or buy new -- but choose thin, soft (preferably worn out) t-shirts.
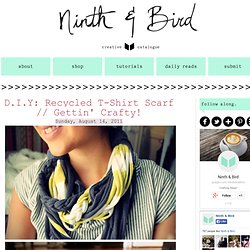
Find two t-shirts of different colors that go well together. 2} Lay the shirt flat on the table or floor. 3} Cut 1 1/2 inch strips, remove the hemmed edges. Cut them as long as possible; I went from the bottom of the front of the shirt all the way to the end of the back on some pieces. 4} Cut off the sleeves of the shirt and save them for the end. 5} Organize the strips by length and gently pull on them. 6} NOW GET CREATIVE! 7} Tie together, trim ends, and wrap with the excess sleeve fabric you saved.