
Metallics. Over the past months, I’ve been putting just a few finishing touches on my stepdaughter’s bedroom, and one of the last things I wanted to do for her was inject the space with a dash of big girl glam.
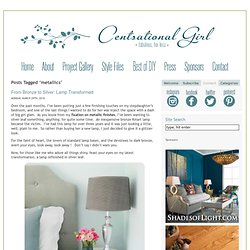
As you know from my fixation on metallic finishes, I’ve been wanting to silver leaf something, anything, for quite some time. An inexpensive bronze Kmart lamp became the victim. I’ve had this lamp for over three years and it was just looking a little, well, plain to me. So rather than buying her a new lamp, I just decided to give it a glitzier look. Crafts &DIY. Say YES! to hoboken: DIY: Tinted Mason Jars in Rainbow. I’ve been experimenting with tinting mason jars to create a look like those old vintage ones that are difficult to find anymore in second hand stores.
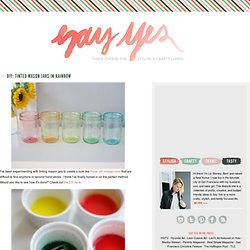
I think I’ve finally honed in on the perfect method. Would you like to see how it’s done? Check out the DIY here. Fill them with flowers, or illuminate an outdoor party filling them with battery operated tea lights or a strand of twinkle lights. I promise it’s easier than you think. Most favorited all-time - page 16. Top 100 Tutorials of 2010 - StumbleUpon. 52 Weeks Project. Best DIY Projects - Homemade Do it Yourself How To Projects - The Daily Green. Craftgawker - StumbleUpon. Craft DIY Projects, Patterns, How-tos, Fashion, Recipes @ Craftzine.com - Felting, Sewing, Knitting, Crocheting, Home & More.
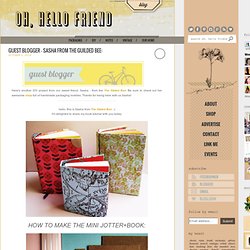
Plastic Cup Lamp - StumbleUpon. Now that my university is closed for winter holidays, I finally have more free time to do all the crafty things I’ve been wanting to.

One of these is a lamp made from plastic cups I’ve seen at taf, the art foundation, in the Monastiraki region in the center of Athens. When I first saw it at taf, I was amazed; I looked closely and I couldn’t believe my eyes! The object itself is so peculiar, modern and alien-like it could be in any design exhibition. With my best friend’s birthday coming up, I decided to make it myself and give it to her as a gift. It turns out it was the easiest craft I’ve even done, the epitome of DIY objects!
Disclaimer: There have been some concerns about the safety of this construction (see the comment of user “when” below for example). I only needed a couple of things: 200-250 large plastic cups (recyclable, at least )600-700 staplesa staplera lamp socket, lamp cord and plug – mine came from a broken IKEA lamp! That’s all you will need. …to this! You might also like: Guest blogger - Sasha from The Guilded Bee: - StumbleUpon. Here's another DIY project from our sweet friend, Sasha - from the The Gilded Bee.
Be sure to check out her awesome shop full of handmade packaging lovelies. Thanks for being here with us Sasha! I'm delighted to share my book tutorial with you today: Supplies you’ll need to make this project: • One—8.5 x 5.5 sheet of cardstock • One---1/2 x 3 inch piece of cardstock or paper • Two---2 5/8 x 3 1/8 inch pieces of cardboard, chipboard or matboard (not corrugated) • Hot glue gun and glue sticks • 25---3 x 5 inch ruled or blank index cards • Two---3 x 5 inch sheets cardstock • 2 rubber bands • Pencil • ¼ inch wide Ribbon: One-6 inch piece, plus two-1 inch pieces To make the page block: * 1. . * 2. . * 3. . * 4. . * 5. . * 6. To make the cover: