
WiFi for Arduino via dd-wrt Router (Serial/TCP/USB) I love Arduino but its lack of wireless bugs me.
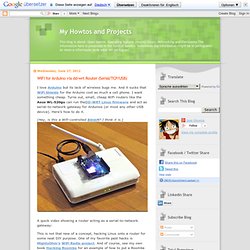
And it sucks that WiFi Shields for the Arduino cost as much a cell phone. I want something cheap. Turns out, small, cheap WiFi routers like the Asus WL-520gu can run theDD-WRT Linux firmware and act as serial-to-network gateway for Arduinos (or most any other USB device). Here’s how to do it. Arduino meets Processing via Wifi DD-WRT. WRT54GL MAX232 Serial. From DD-WRT Wiki [edit] Serial port on a Linksys WRT54G/GL router using a MAX232 interface IC This brief tutorial describes how to add two standard RS-232 serial ports to a Linksys WRT54GL router; the same is applicable to several other models based on the same hardware (WRT54G line et all).
The MAX232 is a level converter IC for serial communications which is cheap and available pretty much anywhere. An alternative is connecting the TTL-level signals directly to a serial-to-USB converter. [edit] Technical overview Most routers of the WRT54G line include two serial ports, complete with pinholes on the circuit board. A solution proposed in several sites is to use a compatible device which allows operation at 3.3v (MAX3232, MAX233), but this are normally more expensive and (most important) difficult to find in several parts of the world. [EDIT - Bib 7 nov 2008]: Max233 only works with 5V supply, but doesn't require the 4 C3-C6 capacitors as they are built in. [edit] Details [edit] Disclaimer. Hacking the Asus WL-520GU w/ OpenWRT. Arduino and Asus wl520gu « TakenApart. I’ve been wanting to make my Arduino network accessible for awhile, now, and the idea of hacking a wireless-G router and loading some custom firmware like DDWRT was appealing.
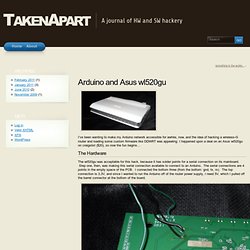
I happened upon a deal on an Asus wl520gu on craigslist ($20), so now the fun begins… The Hardware The wl520gu was acceptable for this hack, because it has solder points for a serial connection on its mainboard. Step one, then, was making this serial connection available to connect to an Arduino. The serial connections are 4 points in the empty space of the PCB.
After making all of the connections, I routed the wires out an opening in the bottom of the case and put it all back together. … and connected 5V / GND from the wl520 to Vcc / GND on the Arduino and TX / RX from the wl520 to RX / TX on the Arduino. The “Software” Decided against DDWRT, since I can’t determine from the website whether or not I could make changes to the source if I needed to. Route add 192.168.24.49 mask 255.255.255.255 192.168.24.10 From PC: How to use the serial ports on a Linksys WRT54GS with DD-WRT v24. DL5NEG - A add-on AVR microproecessor electonics for the WRT54GL wireless router. An add-on AVR microprocessor for the WRT54GL wireless router 1.
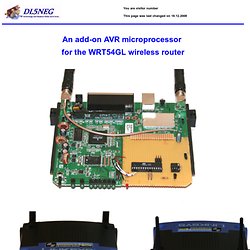
Motivation The Linksys WRT54GL wireless router is a very nice device for us hobbyists. Not only is the firmware open-source, so that the community has come up with several different new and fancy firmwares. The Linksys engineers have also made two serial ports available internally, which are free for the user to use, at least if you are using the DD-WRT firmware that I am working with. As you can log into this router via SSH (secure shell, a telnet like remote console but completely encrypted) from your local network as well es via the Internet, I found it too tempting to use the router for remote controlling parts of my IT landscape at home. 2.
The simplest and most flexible way of converting a serial (RS232-like) signal to parallel inputs/outputs is via an Atmel AVR microprocessor with some software in it. Remote LCD Using Arduino and DD-WRT « proprietarded. I have been working on modifying a Linksys router (WRT54G) that I picked up at Goodwill into a controller for an electric wifi controlled wheelchair robot.
Along the way I found a cheap way to control an LCD remotely. Enjoy! My parts list is: (1) Blue, 4×20 LCD w/ LCD117 from Modern Device (1) RBBB Arduino Clone from Modern Device (1) Linksys WRT54G V2 from Goodwill running DD-WRT *This tutorial will include the use of a Linux machine running Ubuntu 10.10. If you’re using a non Linux machine you’re on your own…. Sorry. Why don’t you see a level shifter in the mix? So let’s begin…… The LCD wiring is as follows - *This will work with the liquid crystal library as well if you don’t have an LCD117 board.
The WRT54G wiring is as follows - *You’ll have to verify the pin out of your specific router. ** I added an external 2.1mm power jack to my router so I can connect my clone to the router’s 12VDC supply.