background preloader

Fashion

Facebook Twitter

Make your OWN eyeshadow primer! I have been using Urban Decay Primer Potion for years. I love the stuff. It is awesome. The problem is when I go to Sephora to get it, I get lost in a sea of sparkling new glosses and shadows and treasures I NEED to try, suddenly eyeshadow primer doesn’t seem very exciting. I start trying to rationalize. “I don’t REALLY need primer right? Together we set out to make our own! After much trial and error we finally found a potion that WORKS! Admittedly, Urban Decay is still the best, but as you can see, the difference is minimal. Get a clean container. Recipe/Formula (you can double or triple this based on the size of your container) 1/2 Teaspoon All Natural Chapstick 1 Teaspoon Cornstarch 1 1/2 Teaspoon Liquid Foundation (whatever you have on hand) Run the chapstick under warm water for a minute before you add it so it mixes easier.

And you should look like this: Hallelujah! Tools of the Trade: Eight Must-Have Makeup Brushes. 1940s Hair Tutorial. Hello again, it’s Jessie from Sweet Thing! 40s hairstyles have been all over the fall runways and filling the pages of magazines, so I thought I would share an easy updated version of the 1940′s classic–the victory roll. I have bangs which makes this style a little tricky. I decided to do a side part and comb my bangs to one side, but this style can easily be done with a middle part if you prefer. 1. Start by wrapping your hair around a 1.5 inch curling iron, holding the ends of your hair out of the iron. I like to curl larger sections of hair to get a more wavy Veronica Lake type look. Continue around your head until all of your hair is wavy. 2. It’s as easy as that!

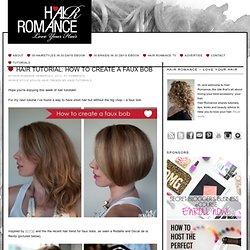
Hair tutorial: How to create a faux bob. Hope you’re enjoying this week of hair tutorials! For my next tutorial I’ve found a way to have short hair but without the big chop – a faux bob. Inspired by NYFW and the the recent hair trend for faux bobs, as seen a Rodarte and Oscar de la Renta (pictured below). What you need: Hair elasticComb / BrushBobby pinsHairspray How to create a faux bob Step by step 1 – Section your hair. 2-3 – Braid the bottom section. 4 – Pin the plait up. 5 – Tease for volume. 6 – Smooth the top. 7-8 – Make a low ponytail. 9 – Tuck the ponytail underneath. 10 – You’re done! This faux bob hairstyle also looks great with curls. This is new style for me as my hair is only just long enough to make this work, but I think it will become a regular favourite.
Related posts: 25 More Totally Pretty 10-Minute Hairstyles. By Jaime Morrison Curtis | I tend to get bored with my hair pretty easily and therefore am always looking for new hairstyles to try out. These 25 Totally Pretty 10-Minute Hairstyles were keeping me pretty busy there for a while now, but I’m ready to explore some new options. Since it’s all about braids this year I’m jumping at the chance to try out the Rainbow Fish braid. I’m usually a bit hesitant to go for a vintage look because it seems so complicated, but the adorable 40′s style makes it look like a cinch. Try new hairstyles out this summer with me, starting with these 25 More Totally Pretty 10-Minute Hairstyles… nggallery id=’122976′ Gibson Tuck Learn how to master this easy style to wear on your next date. Rainbow Fish Dress up the fishtail braid by adding colorful yarn to the mix.

For Hiding Greasy Bangs Now you have an excuse to roll out of bed with a cute hairstyle like this. Like Jaime on Facebook Follow Jaime on Twitter 25 totally clever storage tips to keep your organized. The Simple Gibson Tuck @ Sara Lynn Paige PhotographySara Lynn Paige Photography. I’ve received a lot of compliments on this easy rendition of the once popular Edwardian hairstyle, and I keep thinking to myself that Victorian is in right now and I should share this simple style. But it wasn’t until a make up artist stopped me in a coffee shop in Traverse City asking me how that I finally put my foot down.

As soon as I get back from Ireland, I thought. Well today it’s snowing up a storm outside and I don’t have everything I need to bake the muffins I wanted, so here we are! These photos aren’t the greatest display of the Simple Gibson because I didn’t have a mirror and I’m SO picky that I wanted the photos of the hair to match the video, so I took them right after the video. The look is a lot cleaner when you have a mirror. What You Need ★ comb ★ hair tie (it doesn’t really matter what color) ★ bobby pins ★ roller (optional) What You Do Pull your hair into a ponytail. Using A Roller Using a roller instead of your finger is also an option. The Nailasaurus: Gradient Nails Picture Tutorial. Exciting news today!
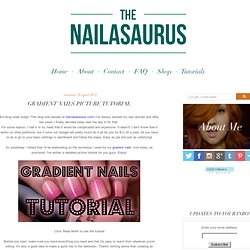
This blog now resides at thenailasaurus.com! I've always wanted my own domain and after two years I finally decided today was the day to fix that. For some reason, I had it in my head that it would be complicated and expensive. It wasn't! So yesterday I hinted that I'd be elaborating on the technique I used for my gradient nails. Click 'Read More' to see the tutorial Before you start, make sure you have everything you need and that it's easy to reach from wherever you're sitting. The Stuff... Two colour polishes and a top coat You can choose colours that compliment or go bold and pick two that clash. A sponge, a plastic sheet and toothpicks I bought a big bathroom sponge and I just cut sections off when I need them. If you don't have any of these plastic wallets in the house, raid the kitchen cupboards for some foil or baking paper. The Fun Part... Step 1 Using the lightest of the two colours, paint your nails and wait for it to dry completely.

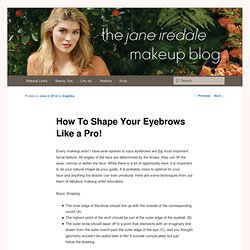
Step 2 Step 3 Step 4 Step 5. How To Shape Your Eyebrows Like a Pro! Every makeup artist I have ever spoken to says eyebrows are the most important facial feature. All angles of the face are determined by the brows: they can lift the eyes; narrow or widen the face. While there is a lot of opportunity here, it is important to let your natural shape be your guide. It is probably close to optimal for your face and anything too drastic can look unnatural. Here are some techniques from our team of fabulous makeup artist educators. Basic Shaping: The inner edge of the brow should line up with the outside of the corresponding nostril (A).The highest point of the arch should be just at the outer edge of the eyeball. (B)The outer brow should taper off to a point that intersects with an imaginary line drawn from the outer nostril past the outer edge of the eye (C), and you thought geometry wouldn’t be useful later in life! Advanced techniques: You can lift an experienced eye with strategic eyebrow shaping!
Eyebrow makeup At the very least groom them. Tips: Egg White Blackhead Mask. Egg whites are good for facials because they can temporarily tighten your skin and pores and leave your skin feeling soft and supple. But did you know that egg whites can also be used to remove your blackheads? I have horrible blackheads all over my nose. I sometimes use the Biore Pore Strip, which works, but not very well. One strip won't do it for me and many strips just seem abrasive and unnecessary.
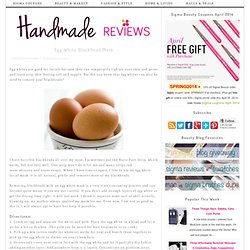
When I have time to spare, I like to use an egg white facial mask. It is all natural, gentle and removes most of my blackheads. Removing blackheads with an egg white mask is a very time consuming process and can become quite messy if you are not careful. Directions: 1. When trying to make this mask, remember that patience is your best friend. I just peeled off my mask and feel really good right now.

College Girls Plait hairstyles | College Hairstyle | Snegidhi.com. [ 26 images ] College Girls Plait hairstyles | College Hairstyle : College girls usually after their late night sleep after spending time in library and having less sleep, don't have time in the morning to dress their hair. No way to go college with unruly hairs. Below are some quick hairstyles which doesnt need much complication to dress. Next » Love, Life, Family... and then some: Things I Love: Awesome Nail Designs part 2.

Love Life Family...and then some Houston Texas Mom Blogger Never Miss a Single Post Not Found, Error 404 The page you are looking for no longer exists. Perhaps you can return back to the site's homepage and see if you can find what you are looking for. Or, you can try finding it with the information below. Pages: Categories: Authors: Haley (1360) Monthly: Recent Posts: Well, Hello there! Haley Shivers is the Author and Mom behind Love, Life, Family...and then some. Sponsors Archives Coupons tweet tweet recent comments tags autism back to school beauty birthday book review breakfast charity Christmas cleaning Dewberry Farm dinner Disney Fall family fashion food giveaway Halloween Holiday Season home housekeeping Jackson jewelry kids meme menu planning movies nails organizing parenting photography pictures pregnancy product review Quaker recipes review reviews running saving money scrapbooking shopping texas things I love travel Copyright 2013 Love Life Family...and then some.

Simple 3 Twists Hairstyle. First, a little back story: I was on Pinterest (I know, big surprise) awhile back and Ms. Ez from Creature Comforts pinned a fun messy hair-do, and mentioned she needed to learn how to do it. So I piped in that I should show her how. I have been wanting to do a hair tutorial for ages now, so this was the perfect reason to get it done. I was a hairstylist in my first life, and I am not too shy to say I was a pretty good one – I can’t say that about everything, so I will take it where I can ;).

So here it is, my first hair tutorial, wahoo! It is best to start with 1-2 (even 3) day old hair that has a little wave to it. Next you will want a little lift through the roots. So now we have the hair looking a little fuller, and the front styled the way we want it to look in the end. Split your hair into three sections, pulling the sides in front of your shoulders, leaving just one section in the back. Lift the back section up and backcomb at the base. Take the section and twist once like shown.

DIY - MAKE YOUR OWN WAX FOR HAIR REMOVAL | Fashion. I was chatting with someone on my flight back from my vacation. She lived in another country where salons are hard to come by or if they are around, they aren't very good. So, sometimes a girl has got to depend on herself. You can make one on your own so easily. So when I described it to her, she loved it and she said I just have to put it up online. Wax recipe Ingredients 2 cups sugar ¼ cup water ¼ cup lemon juice Method Pour the sugar, water and lemon juice in a saucepan, and heat it over a low flame.

How do you know it is done? Take a glass of water and put a drop of wax into it. Benefits of making your own WAX: 1. Waxing strips: We used to do this in college all the time. NOTE: The inner facing fabric of the jeans should be the one touching your skin otherwise if you use the opposite side, your skin will probably get blue with the denim color. Waxing technique Test the temperature before applying the wax to your skin. Benefits of Waxing 1. MANI MONDAY: DIY GLITTER POLISH. Photos/post/graphic design by Kristin Ess A lot of you have mentioned that some of the polishes that we’ve posted in the past are too expensive when you’re living on a budget. Well, this sparkly DIY glitter polish tutorial should help you out. Here we go: Roll a post it into a cone shape and tape the side to create your funnel.You’ll need 3 kinds of sparkle.
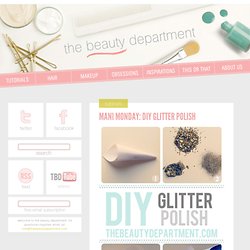
I used thick chunky craft glitter from the craft store, a fine craft glitter by Martha Stewart, and a gold pigment powder. You can either use a gold pigmented loose-powder eye shadow or you can get gold pigment powder from the art store.Get a bottle of clear top coat. This makes a great gift when you’re a little tight on money– just personalize it by re-labeling the bottle with love. Related posts: MacGyver Homemade Beauty Products: 13 DIY Ideas. Possibly The Sexiest Ponytail Ever--And How To Copy It For Your Date Tonight: Girls in the Beauty Department: Beauty.

Happy Valentine's Day, dear readers of ours. For those of you who will be going out on dates and are still in need of a little hairstyle inspiration, allow me to present what might just be one of the most romantic ponytails ever, as seen on the Tracy Reese runway. Megan was just predicting that wrapped ponytails are going to be a huge trend for Fall 2012, if the runways are any indication, and this look from the Tracy Reese show takes the concept and makes it a little less polished and a lot sexy and romantic.

Want to wear this sexy pony for a certain Valentine tonight? Here are tips from Tresemme hairstylist Jeanie Syfu, who crafted these ponies for the runway (see the below shopping box for the specific products she used on the models). 1. Apply a root-boost spray and mousse, then rough-dry hair for tons of texture. 2. 3. 4. 5. 6. What do you think of this Valentine's Day hairstyle idea? Photos: Getty Images. New York Fashion Week Runway Hair Trends Video. Yahoo! How To Style a Fishtail Braid. We love the look of fishtail braids!

This trend is incredibly easy to style, even on your own hair. Kinsey and I photographed the steps so you can try it out for yourself... Here's how to style a fishtail braid... 1. Part your hair into two even sections. 2. Next, we had a crazy idea... weave pieces of yarn into the braid? 1. We thought it was pretty cute! The Can-Do Updo | Spark. Sidewalk Ready – Everyday Fashion Blog – Kayley Heeringa. Makijaż 257 - Victoria s Secret. High school fashions, 1969. 25 HairStyle TUTORIALS & EXTRAS!