
Gifts to Make for Your Man. Gift Ideas for Poor Creative Souls (17) CWTS reveal - the book clutch + how-to. Did you see this week’s Crafting with the Stars?
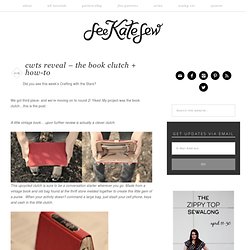
We got third place- and we’re moving on to round 2! Yikes! My project was the book clutch…this is the post:A little vintage book… upon further review is actually a clever clutch. This upcycled clutch is sure to be a conversation starter wherever you go. Made from a vintage book and old bag found at the thrift store melded together to create this little gem of a purse. Pair it with a ruffley blouse and some skinny jeans and you’re rockin’ the librarian chic look. (Plus you’re husband won’t feel too awkward when you ask him to hold it!) Smart and fashionable. Make This - Stab Bound Journal - Luxe DIY - How Did You Make This? Make a hand bound journal with elaborate side stitching for yourself or as a gift.
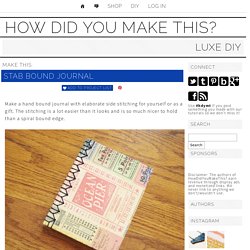
The stitching is a lot easier than it looks and is so much nicer to hold than a spiral bound edge. Supplies and Equipment – sharp utility knife and cutting surface BE VERY CAREFUL WITH THE SHARP BLADE – rulers – drill with 1/16th inch bit OR a small paper punch BE VERY CAREFUL WITH POWER TOOLS – fancy cover paper – I used Cavallini Vintage Tickets Wrapping Paper – 20″ x 28″ – 1 sheet of 8.5×11 for endpapers (this can be fancy or the same paper as your pages) – 10 sheets of 8.5×11 paper for pages – 3 yards of embroidery floss – mat board – I used Crescent No. 33 White & Cream Smooth Mat Board – Yes Stikflat Glue.
DIY Sharpie Tie Die. How to make wrapped leather bracelets « Rings and Things. Triple-wrap leather bracelet with blue tigereye beads Let me begin by stating the obvious – this style of wrapped leather bracelet is EVERYWHERE this season.

How to make wrapped leather bracelets « Rings and Things. Triple-wrap leather bracelet with blue tigereye beads Let me begin by stating the obvious – this style of wrapped leather bracelet is EVERYWHERE this season.

Everywhere! Even my athletic clothing catalogs – which only have maybe three pieces of jewelry – are featuring this style. Why? Because it is casual yet chic and infinitely customizable! Five different leather wrapped gemstone bracelets designs: green opal, mookaite, African turquoise, hematite and rhodonite The supply list is pretty short: 4-6mm round beads We used gemstone beads, but glass, crystal beads or pearls would also be lovely. Wrapped bracelet made with green opal gemstone beads and natural Greek leather. The technique: Choose your bracelet length and cut your leather. If your button has a small loop, you might need to miter (angle) the leather end and pull it through with pliers.
Minis. Dannijo Friendship Bracelet. Cardboard Stampede « ann wood. Or: How to make a cardboard horse. In 2006 I started making cardboard horses. They were a self imposed assignment, a daily creative task intended to motivate and loosen me up, little experiments, paralysis prevention. My plan was to make a cardboard horse everyday, Monday through Friday until I had 100. I did and exhibited the group at Tinlark in Los Angeles in 2007. Utility Cord Bangle. ANNOUNCEMENT: A select number of these bracelets are available for sale here.
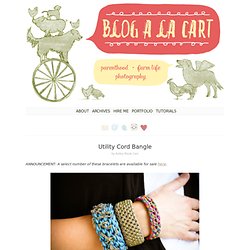
I know, I know. ENOUGH ALREADY WITH THE UTILITY CORD AND BRACELETS! I couldn’t resist! I had extra utility cord lying around from last week’s project, and was highly inspired by these Orly Genger bangles. Thus, today’s latest DIY accessory. Materials: Utility cord Crochet hook (sized according to utility cord thickness) Metal chain (optional) Directions: 1. 2. 3. 4. 5. 6. 7. Tutorial: Homemade Sidewalk Chalk. By Michelle Vackar, Modern Handmade Child One of our favorite outside activities at our home is drawing with chalk on the driveway.

You can play hopscotch, four-square, and of course draw and create silly stories. My daughters and I were talking one day as we played hopscotch about how to make chalk and I thought to myself, let’s try it! It ended up being quite a lot of fun. What you will need: • Toilet paper or paper towel tubes • Scissors • Duct tape • Wax paper • Small bucket or disposable container to make the recipe • ¾ cup of warm water • 1 ½ cups Plaster of Paris • 2-3 tablespoons of tempera paint • Paper bag or a “mess mat” ** we made six tubes of chalk – we simply doubled the above recipe Step 1: If you are using paper towel tubes, cut each tube in half, so it is roughly the length of a toilet paper roll tube.
Step 2: Cover one end of each tube with duct table to hold the contents within. Step 3: Cut as many pieces of wax paper as you have tubes. On the Cheap: Scrapbook Paper iPhone Covers. I found this clever trick on Pinterest the other week from Oops I Craft My Pants and had to try it for myself: iPhone covers using scrapbook paper!
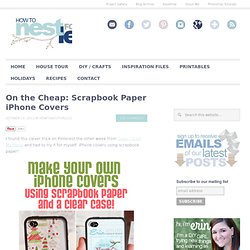
Now when I had my first cell phone in high school (the old Nokia), I probably had about 15 different cell phone covers that I would switch out to match my clothes everyday! I figure this scrapbook paper iPhone phone cover is an easy way to update my phone without spending all the cash! First thing I did was purchase a couple sheets of scrapbook paper from Michael’s. I also purchased a clear iPhone 4 cover from Best Buy. You could really purchase any cheap clear phone cover, but I wanted one with protective rubber sides since I’m a klutz and always drop my phone! First thing I did was trace the scrapbook paper around the iPhone cover to get the basic shape.
I cut out the main section just using a pair of scissors. Stylish custom designs for life. Welcome to flower week – five days of simple and delightful flower projects.

I could probably do three weeks of flowers because there are so many different ways to create them, but I’ve limited it to five of my current favorites. Before we get started, let me make a few disclaimers: 1. I find inspiration for projects all over the place {online, in shops, in magazines}, then figure out how to re-create them on my own. Each of these projects are my adaptation of something I’ve seen elsewhere. 2. 3. 31 Insanely Easy And Clever DIY Projects.
Build a Thumb Piano - Step-by-Step Guides for Offbeat DIY Projects. Pete Plumley's Cat Trees Are Functional Works of Art. I recently moved my cat tree from the living room to the patio so the cats could sit on it to watch the birds in the morning –- at least, that’s what I told myself.
The real reason? The so-called “tree” looks like a cardboard tube covered in old rec-room carpeting. Hanging String Balls. Whattya need?
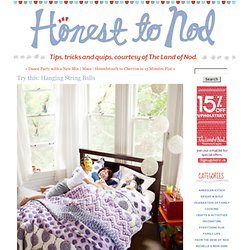
BalloonStringScissorsGlueJar How do I make glue string balls? Step 1: Hang inflated balloon from ceiling. Step 2: Put string and glue in the jar with a hole in the lid. Next, pull string from hole while wrapping around the balloon. Step 3: Wait until dry (try to contain yourself). How to Make Leaf Skeletons. I wanted to share with you a project from one of my readers who shares with us how to make leaf skeletons. I LOVE this!
I have several leafs in various forms displayed in my home and knew I needed to make some of her leaf skeletons to add to my decor. I love how a pattern of leaves can enhance the beauty in your home. So I asked Heather if she would mind sharing her project with you. You can find more great projects from Heather at her blog The Other White House. I have spent hours and tried various ways of making these. Ingenious. This to That (Glue Advice)
Judah Method - Bleaching Experemnet on the Behance Network. How To Make Paper. Making Handmade Paper in 10 Easy Steps Ancient Egyptians invented the first substance like the paper we know today called Papyrus. Papyrus scrolls were made by taking slices of the inner part of the papyrus stem, flattening then pounded into a hard, thin sheet. The word “paper” comes from the word “papyrus”.
The Paper that we know today was invented by Ts’ai Lun in A.D. 105, It is believed that he mixed hemp, mulberry bark, and rags with water, mashed it into a pulp, pressed out the liquid and hung it to dry in the sun. Paper was born and this humble mixture would set off one of mankind’s greatest communication revolutions. Today there is a revival in homemade paper making crafts. Below you will find a simple paper making recipe to get you started. Print Hula Hoop Rug Page.