AsktheBuilder.com - Do it Right Not Over
DIY: Papperslyktan Södermalm * Paper lantern Stockholm
Jag kan aldrig få nog av ljuslyktor som ni kanske märkt av mina Halloweenprojekt. Denna årstid behöver man ju dessutom alla ljus i mörkret man kan få, både bokstavligen och på det kreativa planet. I morse vaknade jag alldeles för tidigt med en idé i huvudet som gjorde att jag inte kunde somna om. Resultatet blev en vy av Södermalm tecknad med svart penna på crèmefärgad tapet. Big news: I can never get enough when it comes to lights and lanterns. Jag tecknade bilden på fri hand, inspirerad av den här bilden. I was inspired by this picture. Ljuskällan är en batteridriven ljusslinga i en glasburk. I used battery powered lights on a string and put it in a glass jar.
Soap Making Instructions | Soap Making Recipes and Tutorials | Teach Soap
Duo Fiberworks - Duo Fiberworks - Tutorial: Rustic Leather Sketchbook
We're going to be posting tutorials for stocking stuffer gifts for children every day this week. I loved opening stocking gifts when I was a kid but now I am a mom responsible for filling that stocking up and I don't enjoy the process as much. Filling the stocking always seems to be a last-minute chore where I spend too much money and buy too much plastic junk and candy. This first tutorial is the most complicated, but also makes a nice gift for almost anyone- it's a little rustic leather sketchbook. Now I am not a book maker by any means, but I managed to make a sturdy little journal and you can make one too. Four pieces of paper, 8.5"x11"Leather or suede scraps, one 5x7" and one 3x4" Embroidery flossBeeswaxScissorsXacto knifeStraight edgeCutting matLarge sturdy needleSewing machine Begin by cutting your paper- fold all four pieces in half horizontally, open up and cut along the fold. You will have four little booklets. Run about two feet of embroidery floss lightly over beeswax.
Craft DIY Projects, Patterns, How-tos, Fashion, Recipes @ Craftzine.com - Felting, Sewing, Knitting, Crocheting, Home & More
Quilling, the coiling and shaping of narrow paper strips to create a design, has been around for years — hundreds, in fact. During the Renaissance, nuns and monks would roll gold-gilded paper remnants trimmed during the bookmaking process, and use them to decorate religious objects as an alternative to costly gold filigree. Quilling later became a pastime of 18th and 19th century young ladies in England, who would decorate tea caddies and pieces of furniture with paper filigree. The practice crossed the Atlantic with colonists, who added quilling to candle sconces and trays as home decorations. In all of that time, the process has remained very much the same, but quilling designs and specialty supplies have definitely caught up to the 21st century. The short list of necessities includes strips of lightweight paper, glue, and a tool with which to roll the paper — that’s it! Many arts and crafts stores sell basic tools and packages of multicolor paper strips. Materials Directions Ann Martin
Lid Magnets
I've been collecting metal frozen juice can lids for months now and I gotta tell ya, my husband was starting to think I was becoming a hoarder, so I had to put them to use. This little lids have some possibilities. I thought about making some kind of sculpture or painting them. So here's a little tutorial on how I made them: Materials: Frozen juice can lids Cardstock/ scrapbook paper Little magnet circles Tacky Glue/ craft glue Stamps & ink (optional) 1. 2. 3. 4. 5. Alright!
Slideshow: Money Graffiti
To be perfectly upfront, what we’re about to show you is not something we endorse. The legality of writing on U.S. currency isn’t clear-cut: according to Title 18 of the United States Code, Section 333 (18 U.S.C. §333), “whoever mutilates, cuts, defaces, disfigures, or perforates, or unites or cements together, or does any other thing to any bank bill… with intent to render such bank bill, draft, note, or other evidence of debt unfit to be reissued, shall be fined under this title or imprisoned not more than six months, or both.” The key term here is “intent to render” that bill to be reissued, which implies that it has to be taken out of circulation, and the bills we have included in this slideshow may very well be still exchanging hands. That said, money graffiti is at the very least fun to look at. Mint.com the best FREE way to manage your money.
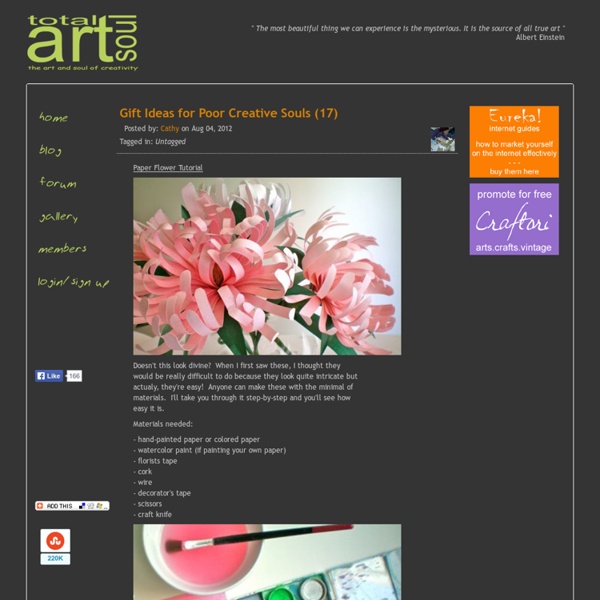
Gift Ideas for poor creative souls (6)
You know how it goes, a friend calls you and invites you to dinner at the last minute. OMG! What gift can you take?! I thought this was a wonderful idea. Supplies : Patterned paper-one 12 x 12" sheet. These directions will give you one flower. 1. 4. 5. Tip: For single sided paper. 6. Note: Florist tape is stretchy, just play with it and pull gently but firmly as you move down the stem. 7. Note, you will have to play around with the height of the petals, and where on the petal you start your tape. 8. 9. 10. 11. 12. For tutorials on how to market yourself online, go here.
DIY: Mod Podge
Don't you guys love Pinterest? That's where I found this idea. Here's a great way to save some money on your craft addictions; make you own Decoupage! You need.... A jar Elmers Glue Water Empty the glue into a jar. Add Water. Shake shake shake And you are done!! I know it works because i used it to paste this paper label onto the jar :) It could make a great gift for your crafting buddies Do you have QUESTIONS about this?