
Question : Le #Maroc a-t-il acheté un #Eagle d’#Amesys. Si l’on en croit 24hinfo, un journal marocain, le ministère de l’Intérieur de ce pays aurait porté plainte contre des personnes l’ayant accusé d’avoir acheté des outils de surveillance.

Un rapport de Privacy International (organisateur par ailleurs des Big Brother Awards) accuse le Maroc d’avoir acquis des outils de piratage (Hacking Team et Amesys/Bull). Si l’information de 24hinfo est juste, le ministère de l’Intérieur va avoir du mal à expliquer ce qui va suivre. Notez qu’à ce jour, Philippe Vannier, ancien patron d’Amesys, puis de Bull et d’Amesys, et enfin, aujourd’hui, responsable chez Atos, n’a jamais été inquiété pour la vente d’un Eagle à la Libye, au Qatar, à l’Arabie Saoudite, au Gabon, aux Emirats arabes unis, on en passe.
Pas plus que Stéphane Salies, désormais patron de Advanced Systems, l’entité qui a servi à mettre à l’abri à l’étranger l’activité Eagle de Bull/Amesys. Mais revenons au Maroc et au rapport de Privacy International. Hackaday sur Twitter : ".@philip_freidin has OSHChip at #hackadayBAMF... Hack the Arduino Robot: the results are impressive! (And you can vote them) Tutorial: Arduino timing methods with millis() - Birds on the Wire. Welcome back fellow arduidans! In this article we introduce the millis(); function and put it to use to create various timing examples. Modifier la fréquence d'un PWM. Un signal PWM est défini par son rapport cyclique (le temps au niveau haut par rapport à la période totale) mais aussi par sa fréquence.
C’est cette fréquence qui nous intéresse aujourd’hui : il faut l’adapter à l’usage qu’on va faire, de quelques centaines de Hertz à plusieurs kHz. Pour un usage courant en électronique ludique, 500 ou 1000 Hz sont suffisant pour modifier l’intensité d’une led, notamment pour obtenir des couleurs variées sur un éclairage RGB, ou pour commander un dispositif externe en faisant varier une tension. Mais ces fréquences sont audibles et si un résonateur est connecté au signal PWM, vous devriez être rapidement gêné. C’est ce qui se passe en robotique quand le PWM est utilisé pour piloter un moteur : on utilise le PWM pour modifier la vitesse à travers un composant de puissance qui démarre et arrête les moteurs. Ce problème est notamment important avec le robot à chenilles RP5 qu’utilise le club pour ses ateliers. Débogage d’un arduino écrivant sur le port série.
ShiftOut. Learning Examples | Foundations | Hacking | Links Started by Carlyn Maw and Tom Igoe Nov, 06 Shifting Out & the 595 chip At sometime or another you may run out of pins on your Arduino board and need to extend it with shift registers.
This example is based on the 74HC595. The datasheet refers to the 74HC595 as an "8-bit serial-in, serial or parallel-out shift register with output latches; 3-state. " Arduino BitBang. Sources Tuto qu'on a suivi Pourquoi ?
Si vous achetez un atmel, qui ne coute qu'environ 3€, vous pouvez le programmer aussi bien qu'un arduino, et c'est plus facile a integrer dans un montage Seul problème: le programmeur coute une fortune, pas besoin de depenser d'argent si vous avez déja un arduino! Materiel Necessaire: Arduino 1 Atmel, peu importe lequel (atmega8, atmega 16, atmega 32 ou atmega 168) Des "pins" secables (4) Quelques cables et si possibles une plaquette d'essai. Rh_count. Relative Humidity Measurement using the Humirel HS1101 Sensor Arduino, BasicX BX24 and PICAXE-18X copyright, Peter H.

Anderson, Baltimore, MD, Nov, '07 (Nov, '07). Ressources pour l'interactivité. Arduino est distribué avec la logithèque Wire qui permet une communication I2C et Two Wire.
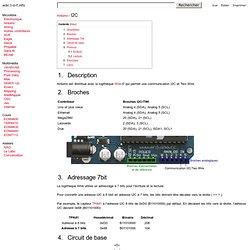
La logithèque Wire utilise un adressage à 7 bits pour l'écriture et la lecture. Pour convertir une adresse I2C à 8 bist en adresse I2C à 7 bits, les bits doivent être décalés vers la droite ( >> 1 ). Par exemple, le capteur TPA81 à l'adresse I2C 8 bits de 0xD0 (B11010000) par défaut. En décalant les bits vers la droite, l'adresse I2C devient 0x68 (B01101000): Rp=1.8k 5.1 Écriture. Arduino to Twitter over USB - wellsb.com. There are many reasons to want a project with the ability to provide status feedback.
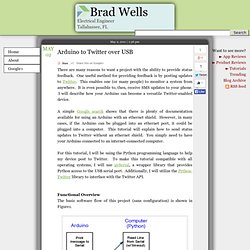
One useful method for providing feedback is by posting updates to Twitter. This enables one (or many people) to monitor a system from anywhere. It is even possible to, then, receive SMS updates to your phone. I will describe how your Arduino can become a versatile Twitter-enabled device. A simple Google search shows that there is plenty of documentation available for using an Arduino with an ethernet shield.
For this tutorial, I will be using the Python programming language to help my device post to Twitter. Functional Overview The basic software flow of this project (sans configuration) is shown in Figure1. The World Famous Index of Arduino & Freeduino Knowledge. Arduino at leech me. Teague Labs-Mozilla Firefox. RESTduino - Arduino hacking for the REST of us - jjg's posterous. Enregistrer données port série dans un fichier ?
Top 40 Arduino Projects of the Web. Arduino hacks.