
DIY Dry Erase Board Tutorial. Set Sail With a Gadanke Journal. By now you most certainly know that we love being on the road, taking pictures all the way from beginning to end.

Our daughter is the chief chronicler and takes care of our travel journal. Not that we had one. Up until now. In fact, I didn't even know you could have a special journal for your travels. But thankfully there is Katie of Gadanke who handcrafts those fabulously entertaining journals out of recycled paper. Katie makes a travel journal for you that prompts you to notice more than you regularly do. This travel journal is such an extraordinary idea that I wish to share with all of you. It has a mini calendar, a map to point out where you were, space to paste travel stubs and receipts, pockets to collect smaller bits of memorabilia, there are even star stickers to rate your experience!
But what I find extraordinarily clever are the creative writing prompts that set you in such a humorous mood that you are bound to have fun, whatever happens. Who hasn't got lost on a journey! Me? The Loveliest Free Printables. Happy Friday!

Today I'd like to share with you my favorite free printables! In case you love free printables and missed this post from last week, you may want to check it out for free printable floral gift tags and luggage tags. (Button) Elephant in the Room-Tutorial. If you remember that button elephant I created a while back, you might also remember that I promised a tutorial asap!
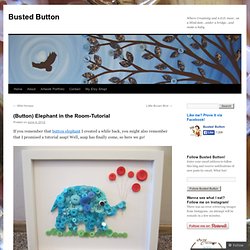
Well, asap has finally come, so here we go! To make this cute little elephant, all you need are some buttons, hot glue, a wee bit of paint, a canvas board (which you can find at any craft store) and a frame. First, draw out a nice, chunky elephant. - StumbleUpon. Craft Tutorials - Learn How to Make Crafts. If you are new to crafting or just want to learn how to do a new technique or use a specific medium, check out these educational how-to's and tutorials.

Creative Ways to Build Gross Motor SkillsFind many crafts you can make and then use to help develop gross motor skills in children. 10-Minute Crafts for KidsIf you are looking for a fast and easy craft for kids, browse through this collection of projects. How to Store and Organize Your Craft SuppliesLearn some tricks to about how to store and organize your craft supplies. Are Film Containers Safe for Crafts? This is a popular question here and also at Kodak. Celebrate National Craft MonthFind many ways you can celebrate National Craft Month in March. Easy Fundraiser and Bazaar CraftsFind a collection of craft projects that are good to make to sell at bazaars and fundraising events. How to Save Money on Craft SuppliesCheck out all of these ideas for saving money on your crafting supplies and also share your ideas.
Three Cheers for Stylish & Crafty Living. Go Origami! Origami Butterfly by Akira Yoshizawa - tutorial. Today is the 101st birthday of Akira Yoshizawa, the great origami master and the father of the modern origami.
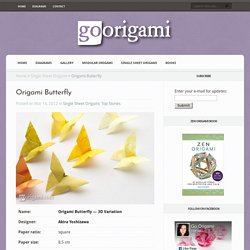
You have probably noticed that Google marked the occasion with a special origami doodle created by Robert Lang! Why not celebrate the event by making your own origami butterfly?! Here is a step-by-step tutorial for a 3-d variation of a classic butterfly by Akira Yoshizawa (first spotted on Nick Robinson’s blog), enjoy! UPD. A few people have asked me about the paper I used to fold those butterflies, so I thought I’d update the post with some photos. Tags: Akira Yoshizawa, Animals. From {panka} with love. Glowing jar project – varázslat a lakásban (EN/HU) A Beautiful Mess. I love using cloth napkins to dress up our dinner table, and through the years I've grown even more fond of their sustainability and cost effectiveness.

Though, I'm not sure how cost effective it is if you keep buying more and more cloth napkins each year! This holiday season I thought it would be fun to look at how I could dress up the napkins I already own to give them an extra festive vibe. Check out three simple ways you can give new life to your table linens. And hey! Two of them are even no sew!
Ribbon Trimmed Napkin This look is so (no sew) simple! Supplies:-ribbon-heat bond in width of ribbon-cloth napkin (buy mine here)-iron-fabric scissors (not shown above) Step One: Trim pieces of your ribbon to be about 1.5 inches longer than the width of your napkins. Step Two: Fold down the edges of each ribbon segment about 1/4" and iron flat. Step Three: Iron the heat bond to the ribbon (pressing with hot iron for two seconds), then peel off the paper backing. Pom-Pom Trimmed Napkin. Oh the lovely things.