
DanceSalmon
Average to the extreme. Avid reader and writer/ I wish I could be Snoopy... :P
Serialkillerorhipster_apres. Serialkillerorhipster_apres. The Museum of Me. Simplemente Tinistas ~
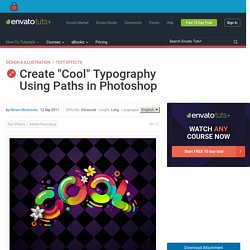
Encircle the Cat. Mali war. Aystein-Lunde-Ingvaldsen3.jpg (Imagen JPEG, 1024x579 pixels) Create "Cool" Typography Using Paths in Photoshop. In this tutorial we will demonstrate how to create some "cool" custom typography.

Let's get started! The following images were used during the production of this tutorial. We will use the circle path and parts of it and stroke them with brush. Pick Ellipse Tool (U) and choose Path option on the properties panel. This way you will create circle path and not the shape. Pick the Brush tool (B). Create a new layer, and with Brush tool choosing press Alt + Enter. Pick the Direct Selection Tool (A). Pick the Pen Tool (P) and add anchor points on the path as shown below. With Direct Selection Tool (A) select and delete the extreme anchor points of the path. Pick the Brush Tool (B), pick darker color, create new layer and press Alt + Enter to stroke the path.
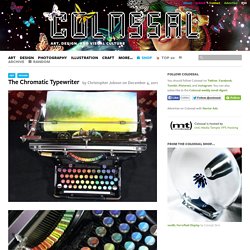
As you see we just cut parts of the original circle path by deleting anchor points. Create a new document 1600 pixels wide and 1200 pixels high at a resolution of 72 dpi. Pick the Brush Tool (B) size 80 px. The Chromatic Typewriter. Washington-based painter Tyree Callahan modified a 1937 Underwood Standard typewriter, replacing the letters and keys with color pads and hued labels to create a functional “painting” device called the Chromatic Typewriter.

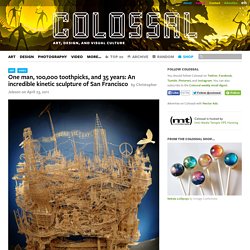
Callahan submitted the beautiful typewriter as part of the 2012 West Prize competition, an annual art prize that’s determined by popular vote. I don’t know how practical painting an image with a color typewriter is, but if Keira Rathbone can do it… (via dark silence in suburbia) Analog Double Exposure Photographs by Florian Imgrund. One man, 100,000 toothpicks, and 35 years: An incredible kinetic sculpture of San Francisco. Thirty five years ago I had yet to be born, but artist Scott Weaver had already begun work on this insanely complex kinetic sculpture, Rolling through the Bay, that he continues to modify and expand even today.

The elaborate sculpture is comprised of multiple “tours” that move pingpong balls through neighborhoods, historical locations, and iconic symbols of San Francisco, all recreated with a little glue, some toothpicks, and an incredible amount of ingenuity. He admits in the video that there are several toothpick sculptures even larger than his, but none has the unique kinetic components he’s constructed. Via his website Weaver estimates he’s spent over 3,000 hours on the project, and the toothpicks have been sourced from around the world: I have used different brands of toothpicks depending on what I am building. I also have many friends and family members that collect toothpicks in their travels for me.
See the sculpture for yourself at the Tinkering Studio through the end of June. Zoom.gif (Imagen GIF, 640x464 pixels) Manual/Your First Animation/1.A static Gingerbread Man. From BlenderWiki This chapter will guide you through the animation of a small “Gingerbread Man” character. We will describe each step completely, but we will assume that you have read the interface chapter, and that you understand the conventions used throughout this book. In Part I of this tutorial we’ll build a still Gingerbread Man. Then, in Part II, we will make him walk. Warming up Let’s start Blender. Default Blender start-up screen. We will organize our working area by placing objects on different Layers where we can hide them.
Layer visibility controls. Blender provides you with twenty Layers to help organize your work. And toggle visibility with ⇧ ShiftLMB . So let’s clean up the place. Layer control toolbox. Select the camera (triangle in bottom right) and the lamp (circle with dots) with ⇧ ShiftRMB . This leaves all the room we can wish for to begin our modeling job. Building the body The cube in Edit mode. Change to the front view with 1 NumPad. Editing context in Buttons window. Mysteriez! 3 - Puzzle Games on Shockwave.
Getting started.