
We Heart This - DIY of the Month: Braided T-shirt Bracelet. How To: Give your old t-shirts a second life.

Sorry dust rag pile! Photos: kirsten for we heart this I love using simple materials to make something fun and innovative. The supplies for this bracelet DIY are really basic, so there’s a REALLY good chance you own all of them already. I mean, who doesn’t have a stack of soft old T’s you can’t wear outside of the house, but love to much to toss in the rag pile?
As with most of my DIY’s for wht, this is very customizable. Supplies: • T-shirt scraps • 2 keychain rings • Scissors • Needles and thread • Glue gun • Ruler 1. 2. 3. 4. 5. 6. 7. More Options: • Add a strand of metallic thread into the braid • Add charms to the key rings or actual strips of fabric • Use the colors of your school or favorite sports team, or coordinate it with your latest spring outfit. Make Your Own Glitter Flats. In case you haven’t noticed in the past almost 3 years (!!) WANM has been in existence, I am not a crafty person. Nope, I leave the crafts to Chels and I stick to the kitchen (where disasters can easily be shoved down the garbage disposal!). DIY Wrap Bracelet - Honestly WTF. You should all know by now that we are all about stacking bracelets on our wrists.

The more, the better. In fact . . . the most, the best! With that being said, we’ll show you how to master a version of the ever so popular wrap bracelet. Stuff to Make in my Old Age. D.I.Y. Curls // How To Rag Roll Your Hair. I love the look of naturally curly hair!

My sweet friend, Katie, told me about rag rolling. It's a quick and simple way to get natural looking curls without using a curling iron! I asked her to share her method here on A Beautiful Mess because I knew you'd be itching to learn like I was! Enjoy... You'll need some cut fabric strips, a comb and some water. How to rag roll your hair- First, dampen the bottom of your hair (the part you plan to roll) using a spray bottle. Have fun styling! Braided Headband Tutorial. It's chilly outside here today and I'm loving it!
I enjoyed every minute of reaching into the closet and pulling out soft cozy blankets, snuggling up on the couch with my blanket and laptop to check my e-mail this morning... Don't get me wrong, I'm not a fan of temps below 40 degrees, but a high of 65, I'll take it! Anyway.... on with the tutorial. Fully lined zippered box pouch - pattern and tutorial - its a Pretty Modern life. I love the look of a zippered box pouch...so incredibly cute.
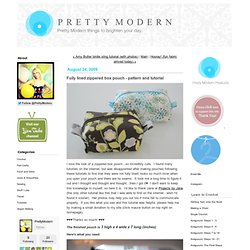
I found many tutorials on the internet, but was disappointed after making pouches following these tutorials to find that they were not fully lined; looks so much nicer when you open your pouch and there are no seams. Pleated tote (beach bag) tutorial. Before we went away, I decided that a new bag for the beach was a must – something big and roomy to hold books, magazines, sunscreen, hats, and all that other good stuff.

So I made this big pleated tote, and it worked perfectly. This is a picture of it in action: And here’s a little tutorial in case you want to make one for yourself – doesn’t have to be for the beach either, it could come in handy for schlepping all kinds of things around town. Here’s what you need: two pieces of your main fabric cut in shape A four pieces of the top shape (B) in a contrasting fabric two pieces of a lining fabric in shape C one piece of the long rectangle for the strap in the contrasting fabric two pieces of the top shapes (B) and one of the strap in a medium weight interfacing 1) Along the longest (22″) edge of the main fabric pieces, mark along the top at the following intervals: 3″ – 4″ – 6″ – 7″ – 9″ – 10″ – 12″ – 13″ – 15″ – 16″ – 18″ – 19″ 13) And voila, this is what it should look like. Boden Boulevard Necklace Knockoff & Flamingo Toes. Did you know Mother’s Day is about a week and half away??
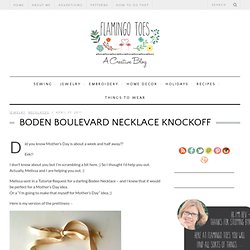
Eek!! FASTEST RECYCLED T-SHIRT TOTE BAG. DIY TUTORIAL and a giveaway! Happy Monday everyone!
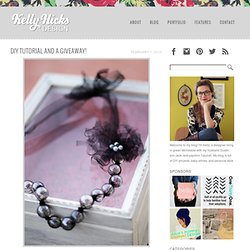
Today I am going to show you how to make this necklace and introduce my first giveaway! Below are the steps to make this tulle necklace. And to win this necklace, just leave me a comment below! A winner will be announced on Friday. Good luck! Step 1: Pick out your fabric and beads. Step 2: Measure the fabric around a bead and then add an inch, this is where you will cut.
Step 3: Cut the fabric the long way. Step 4: You should now have a long strip of fabric. Step 5: Sew the folded fabric at the open end. Step 6: You should now have a tube. Step 7: In order to turn the tube right side out, attach a safety pin to one end. Step 8: Feed the safety pin through the tube. Step 9: Once the tube is right side out, put a bead in the tube and center it. Step 10: Make a knot at each end of the bead. Step 11: Feed another bead into the tube and knot after the bead. Step 12: Sew the ends shut. Step 13: Add flower by gathering strips of the fabric together and sewing the center together. Whirl-it lampshade - free DIY tutorial. We really needed a new lamp, and we´ve planned to make one for months.
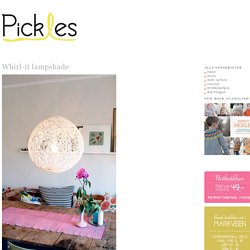
This week we finally got around to it. It takes a bit of different materials, but it´s really easy when you´ve started. We recommend making it outdoors, as it gets quite messy. The result is pretty neat, especially at night when the threads cast shadow on the walls. Most favorited last 7 days - page 2. Rolled paper flowers {tutorial} Welcome to flower week – five days of simple and delightful flower projects.

I could probably do three weeks of flowers because there are so many different ways to create them, but I’ve limited it to five of my current favorites. Before we get started, let me make a few disclaimers: 1. I find inspiration for projects all over the place {online, in shops, in magazines}, then figure out how to re-create them on my own.
Each of these projects are my adaptation of something I’ve seen elsewhere. 2. 3. Okay, so let’s begin. ...love Maegan: Pretty Side French Braid low Updo Hair Tutorial Fashion+Home+Lifestyle Blog. I wore a more relaxed version of this hair style in an outfit post in June of 2009 but for reasons unbeknownst to me, I never did a tutorial for it. Recently though, a few of my lovely readers have asked for it …so here it is. ...love Maegan: French Pouf! Chiffon & Tulle Flower Accessory DIYReader Request Maeg-it Yourself Tutorial Fashion+Home+Lifestyle Blog. * French Pouf Accessory : Pin, Belt, Hair from Ban.do * Okay, to be honest, this wasn’t exactly a reader request MIY but when Holly {who is planning her wedding} posted about it here, I was very inspired to make it for her as a little wedding gift.
But since I couldn’t find the exact peachy-nude chiffon as shown in the inspiration photos I had to settle for a soft, baby pink, which Holly may not be interested in. So Holly, if you like, I can make you one in either an ivory or a light gray. Magic Braided Leather Tutorial. Seriously this tutorial is magic. I’ve been wanting to share it with you for about a year now, but it’s taken me so long to sit down & figure out the best way to explain myself. See, I discovered how to do this while mindlessly watching an episode of House.
My mother-in-law has a rad purse from the ’70s or so; it’s leather with a very cool handle. Parts of the handle are braided & parts are smooth. I thought it was just insanely cool how the handle was braided with closed ends!! Page corner bookmarks. This project comes to you at the request of Twitterer @GCcapitalM. I used to believe that a person could never have too many books, or too many bookmarks. Then I moved into an apartment slightly larger than some people’s closets (and much smaller than many people’s garages) and all these beliefs got turned on their naïeve little heads. But what a person can always look for more of is really cool unique bookmarks. Placeholders special enough for the books that are special enough to remain in your culled-out-of-spacial-necessity collection. Page corner bookmarks are cute, practical and deeply under-represented in the world.* They’re easy to make, easy to customize, and will set you apart from all those same-same flat rectangular bookmarks.
If you like this tutorial, here are a couple others that might be up your alley. For the monster-loving adults in the room, try some googly-eyed paper monster wine charms. V and Co how to: jersey knit bracelet. I don't know what it is about this time of year that makes me just want to have my bare feet in the sand, be watching the sun setting into the ocean, and breathing in the warm salty air of the beach...as i get older, more and more i find myself missing that place i used to go to almost every.single.day. as a teen.
Cascading Garden Pom Poms! Great Wedding or Party Idea!