
Quilt in a Day - Patchwork Table Runner - Quilting Daily - Quilting Daily. Small quilting projects like table linens, accessories, and home décor are perfect for the quilter who wants to create a handmade gift or refresh their décor or wardrobe—but has little time to spare.
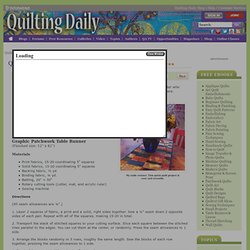
For example, I was inspired by these fall flowers to create a complementary table runner in similar colors. I reached for Amy Ellis's Graphic Patchwork Table Runner pattern, because I like the modern patchwork style. Plus, it's one of those quick quilt projects you can quilt in a day. Here are Amy's directions. Graphic Patchwork Table Runner (Finished size: 12" x 42") Materials Print fabrics, 15-20 coordinating 5" squaresSolid fabrics, 15-20 coordinating 5" squaresBacking fabric, ½ yd.Binding fabric, ¼ yd.Batting, 20" × 50"Rotary cutting tools (cutter, mat, and acrylic ruler)Sewing machine Directions (All seam allowances are ¼".) 1. 2. 3. 4.
Turn Denim Pockets into Fabric Art Gift Bags - Cloth Paper Scissors Today. If you follow this blog, then you know I have an abundance of denim pockets culled from my husband's jeans, and I'm always looking for fabric art projects to make with them.
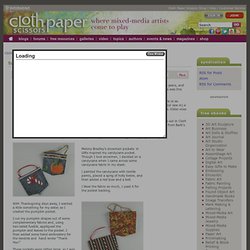
One of my favorite denim recycling projects was this Patched Pocket Panel that combines art with storage. Another way to use denim pockets creatively is to turn them into gift bags. You can make them as simple or as elaborate as you like. Just decorate the front, stitch on a fabric backing to make the pocket, and attach (or sew in) a handle. This is a fun project to do with kids. My colleague Barbara Delaney fell in love with this project, created by Melony Bradley, when it first came out in Cloth Paper Scissors Gifts 2011. Fun with stripes- Quilting Tutorial. Probably many of us like using strip piecing in our quilts.
Quilt in a Day - Quilt Patterns, Quilt Books, Rulers and Supplies by Eleanor Burns. Garden Fence. I first played with this block last Summer when I was inspired by the pillows on the cover of Martha Stewart Living.
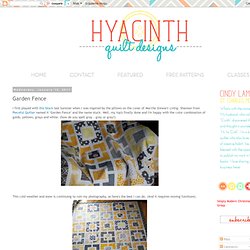
Shannon from Pieceful Quilter named it "Garden Fence" and the name stuck. Well, my top's finally done and I'm happy with the color combination of golds, yellows, grays and white. (how do you spell gray - grey or gray?) This cold weather and snow is continuing to ruin my photography, so here's the best I can do. (And it requires moving furniture). DIY : Scratcher Lotto Ticket. A string quilt block tutorial – paper pieced method. I’m so blown away by all the wonderful comments on my string quilt, now aptly named ‘Kaleidoscope’ (many thanks to Kerri who was the first to suggest it, followed by 9 others of you who had the same thought!)
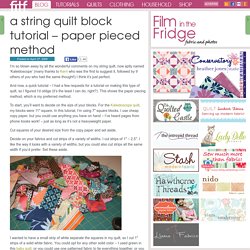
I think it’s just perfect. And now, a quick tutorial – I had a few requests for a tutorial on making this type of quilt, so I figured I’d oblige (it’s the least I can do, right?). This shows the paper piecing method, which is my preferred method. To start, you’ll want to decide on the size of your blocks. For the Kaleidoscope quilt, my blocks were 11″ square. Cut squares of your desired size from the copy paper and set aside. Decide on your fabrics and cut strips of a variety of widths. I wanted to have a small strip of white separate the squares in my quilt, so I cut 1″ strips of a solid white fabric. Next we’ll temporarily attach the white strips to the paper squares.
Pearltrees videos. Pinetree6. More about strip quilts – a mini tutorial. I’ve made many strip quilts in the past and I’m often asked for a pattern.
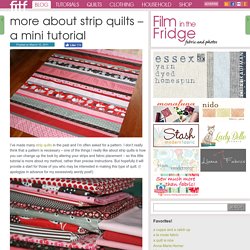
I don’t really think that a pattern is necessary – one of the things I really like about strip quilts is how you can change up the look by altering your strips and fabric placement – so this little tutorial is more about my method, rather than precise instructions. How to Quilt: Scrap Quilts. Finished Paintbox Quilt. The Paintbox Quilt is finished!
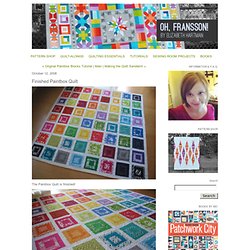
This quilt is made with 64 - 6.5" blocks in 32 color combinations (8 by 8 blocks with 1.5" sashing). Each combination is a Kona cotton solid and a monochromatic quilting print. One of the blocks in each combination is made with a printed center and outer ring and the other is made with a solid center and outer ring. I had a hard time deciding how to lay out the blocks for the quilt. In the end, I placed the two black and two chocolate brown squares (the darkest ones) at each of the corners. I alternated the orientation of the squares so the "pulled" corners were going in opposite directions. On the back, I made a pieced panel with a little rectangle of each of the Kona cottons. The letters on the back are just simple Kona cotton appliques, made using this technique. The washed and quilted linen is so incredibly soft, which makes this a very comfy quilt too!