
DIY Button Coasters. Make your own button coasters!
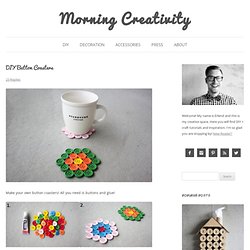
All you need is buttons and glue! 1. Supplies: Your favorite buttons and E-6000 adhesive. 2. DIY Confetti Bowl. Last weekend I made this DIY project with the boys, it's really easy to make and I can assure that you're gonna have fun!
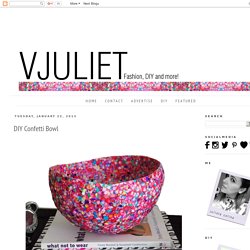
You'll need: confetti, one balloon, Mod Podge, a sponge and a small vase. Inflate your balloon, then insert it on to the vase so it's sturdier to work with. Add Mod Podge to the top half of the balloon with a sponge, then sprinkle confetti all over, you can remove your balloon from the vase and hold it to add the confetti on the sides.
Let it dry and add another coat of glue and confetti, you will need to add several coats until you achieve a thick coat. Hanging String Balls. Whattya need?
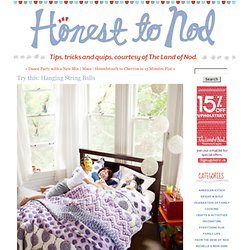
BalloonStringScissorsGlueJar How do I make glue string balls? Step 1: Hang inflated balloon from ceiling. Step 2: Put string and glue in the jar with a hole in the lid. Next, pull string from hole while wrapping around the balloon.
Blog Archive » GOLD LEAF PAPER MACHE BOWLS. So, I think this might be my favorite DIY to date.

It’s just so practical and pretty! A few friends and I decided we would get together once a month for an all day craft day. Just to create pretty things, simply for the sake of creating. Weather it be something we wear, or something for our homes, decorations for the holidays, or even little somethings for our babies.
I tend to get wrapped up in projects for other people that I fail to do all the projects I want to do for myself! We’ve been dying to try out gold leaf for a while now. ONE – To create your bowl forms, you’ll need to start with balloons. TWO – Cut up your newspaper into small strips. THREE – Place your balloons upside down (or right side up, whichever way you want to look at it) inside paper cups and let them dry overnight. FOUR – Once dry, pop your balloon and remove the latex. Paint your bowls entirely white (or any color of your choice).
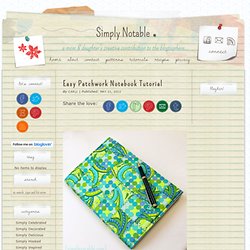
Easy Patchwork Notebook Tutorial. As this school year draws to a close, I can’t help wanting to get ready for next school year.
The cost of purchasing all the clothing, shoes and school supplies for 4 kiddos at the same time makes me want to hyperventilate a little bit. If I can spread out the expense over the three month vacation, it sure wouldn’t hurt! Fold a Paper Gift Box! Several years ago my oldest daughter came home with a handcrafted gift for me that she made in art class. The box she presented me was just as special and pretty as the unique and pretty handmade ceramic necklace it contained. Using scrapbook paper she folded two separate pieces, origami style, to create a delightful little gift box. I’ve made many since then – decorating areas of my home with scrapbook paper that match my home’s decor and stacking the boxes.
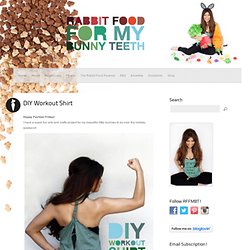
The only materials you’ll need are two sheets of 12 X 12 coordinating scrapbook paper which you’ll fold using the technique below. You can actually use any size scrapbook paper you’d like. Fold each corner up so that they meet in the middle. Next fold up the flat edges so they meet in the middle. Unfold those flat edges and fold the opposite sides so that all four sides have that same crease. Cut along the crease towards the middle of the paper on one side as shown. DIY Workout Shirt. Happy Fashion Friday!
Dreamcatchers. I’m really diggin the whole hippy thing.
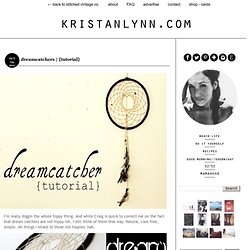
And while Craig is quick to correct me on the fact that dream catchers are not hippy-ish, I still think of them that way. Natural, care free, simple. All things I relate to those old hippies. hah. The point of a dream catcher is to weed out bad dreams. Depending on who you talk to, there will be two different stories on how this happens. Cute as a Button - Amazing Button Crafts from Around the Web. Lately I keep coming across the most adorable button crafts.
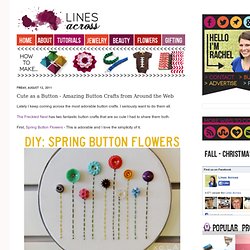
I seriously want to do them all. The Freckled Nest has two fantastic button crafts that are so cute I had to share them both. First, Spring Button Flowers - This is adorable and I love the simplicity of it. DIY: Earring Holder. DIY projects made from everyday objects. I always have trouble tossing empty Altoids cases, because they make the perfect mini containers for so many little things.
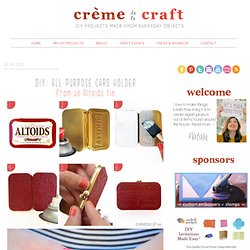
And when I realized they were the ideal size for holding credit cards and business cards, the DIY light bulb went off flashing in my head. I now use my upcycled Altoids tin to carry all my essentials including my ID, credit card, cash, lipstick and sticks of gum...yup, they all fit! You can use these little cases for just about anything including gift cards, office supplies, first aids kits, and my personal favorite, a mouse tin house. How to make a Peruvian Wave Friendship Bracelet.
Having written an article recently about making the most simple Friendship Bracelet, I wanted to quickly follow it up with my favorite Friendship Bracelet design. It is a design that I was not aware of way-back-when in school, when making these bracelets was so popular. The design is also surprisingly simple. I have taught the technique to a group of 8-10 year olds and they picked it up easily. I'll have you knotting in no time! Materials Needed 4 or more different colors of embroidery flossTape or a clipboardScissorsDepending on your taste, a thicker piece of cord, string, or even a shoe lace.
The great thing about this project is that is inexpensive. DIY Organizer from Old Window « My so called crafty life. Today I have a fun and versatile craft for you all, we’re going to make an organizer from an old window!
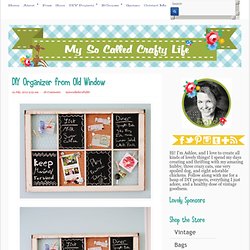
I made mine with some cork, chicken wire and chalkboard painted wood. It’s fairly simple to do, and the best part is that it doesn’t take long at all to make, you could craft one in an afternoon. Dream Catchers. Two Tips Tuesday. Tip #1: Two Tier Plate Stand. Diy wednesdays: laptop cozy. Recently we’ve been on the hunt for a laptop sleeve. Nothing fancy, just a simple way to protect our MacBook on its journeys around town.
The quickest, easiest, and cheapest solution we could come up with was to make a no-sew Maloo-esque “wrap” out of colored felt and Velcro dots. Now our little laptop is snug as a bug in a rug! Click here for the full instructions and more photos or just click “read more” below. DIY T-Shirt Upcycle You Can Actually Wear in Public. ReStyle a comfy sweatshirt! I am so in love with this restyled sweatshirt. When Amanda sent it my way I think I gasped aload! It's so beautiful, simple and cozy. Who doesn't want to look pretty in something so comfy! Here's how you can make your own... Supplies needed: sweatshirt, crochet doilies, scissors, pins, thread, bias tape, crochet or embroidery thread, sewing machine, crochet/lace trim (optional).
Step 1. No Sew Eyeglasses Case: Good Living Magazine Project #1. Page corner bookmarks.