
P.S.- I made this... Old Hollywood Glamour ~ Lace Halter Bustier DIY. * Black Bustier* Black Lace* Black Satin Ribbon * Needle/Thread/Scissors * Line your lace up with your bustier cups… make sure the pretty edge of the lace in on the outside closest to your arms.
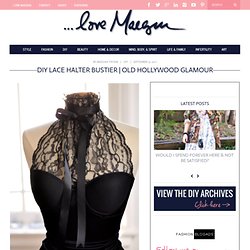
Decide how much lace you need by measuring or just eyeballing it and make sure to leave a little extra so the panels can overlap in the center. * Cut two pieces of lace at least 12″ long to be safe. One for each side. * Flip your bustier inside out. . * Carefully hand-stitch the lace to the inside of your bustier cup, right below the seamed edge… or about 1/4″ down. . * It should look something like this lying flat. * Try your garment on.
. * Readjust your lace to make sure it’s crossed over neatly and with your needle and thread carefully hand-stitch the edges of your ribbon to your lace. . * Trim off the extra lace at the top… this is a personal decision. . * Stitch your two panels together only at the center, not all the way up {though I suppose you can if you wish} * Trim the excess lace in the cups. DIY Chic: Printed Word Scarf. Personal style on a college budget can be a challenge.

Whether you’re a DIY guru or just want to spice up your wardrobe on the cheap, our new column DIY Chic is here to help keep you looking stylish without breaking the bank. If you are looking for a little inspiration, take a look at our past DIY posts on transforming your old jeans into skinnies and creating a pair of adorable button earrings. Statement scarves are a perpetual fashion favorite. I love that they can make any outfit look chic and put-together, but can also keep you warm and cozy on cold days. When I stumbled upon this adorable printed word scarf on Pinterest, I knew it would be an easy and simple project to recreate. What you’ll need: An old scarf – lighter colored fabrics work best, but feel free to experiment.A permanent markerA favorite quote, poem, or song lyric to write on the scarfA pencil and paper.
The step-by-step process: Before you begin, plan out your design. And voila! What do you think? Little Red Infinity Dress Tutorial. February 14, 2011 I’m always searching for a beautiful, well-fitting, versatile dress, and I finally found it.
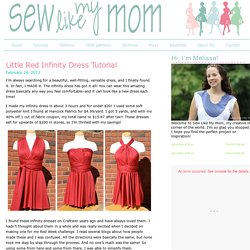
In fact, I MADE it. The infinity dress has got it all! You can wear this amazing dress basically any way you feel comfortable–and it can look like a new dress each time! I made my infinity dress in about 3 hours and for under $20! I found these infinity dresses on Craftster years ago and have always loved them. First, you need to do some measuring. So, 30/6.28 = 4.7. Then I decided on length of skirt and came up with 18″. To make your straps, you need to decide how wide to make them. To determine strap length, you need to make them 1.5 times your height. So, got that? To make your pattern, get packing paper, freezer paper, or a bunch of pieces of computer paper taped together. Then I measured 18″ down from that and made another line for my skirt length. Diy. I created this post for the Alt Summit blog.
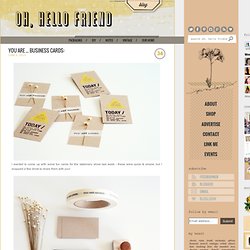
In case you missed it, I am posting it here at the blog. You guys know I like business cards ;) So here's a very simple business card DIY for you! - 1" round punch - Pre-cut business cards - 1 sheet of label/sticker paper - Information stamp (I got mine from vistaprint - they have some free stamp designs available or you can pay $2-$3 or something to upload your own design!)
- Scratch-off stickers (I got mine at ebay) Stamp your cards with your information. For this part, you'll need some kind of drawing software to create your circles. You could also do fortunes or even coupons if you have a shop. Since they were printed on the white label/sticker paper, they are really easy to just stick onto the card.
Then take the scratch-off stickers and place them directly over your round stickers. and you're done! I think these would be fun and memorable because they involve some effort on the receivers part to see the secret message underneath.