
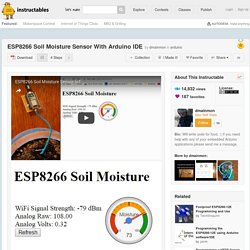
Incubator Controller. ESP8266 Soil Moisture Sensor With Arduino IDE: 4 Steps (with Pictures) Now that we've tested our circuit with a breadboard and confirmed that everything is working we are ready to put it together on a prototype board.
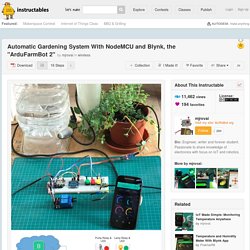
The photos above show the brown colored prototype board I used. I highly recommend using some 16 pin headers as pictured. These little socket strips allow you to plug your ESP8266 onto the circuit. Automatic Gardening System With NodeMCU and Blynk, the "ArduFarmBot 2": 16 Steps (with Pictures) Following the above diagrams, complete the required system HW installing the buttons and LEDs.
Verify that all sensors (DHT22, DS18B20 and LM393/YL69) as the OLED are powered using the external 5V. The NodeMCU is used only to provide the control signals. Remember that using the NodeMCU 3.3V external pins to provide power can turn the system unstable due the current consumption. LEDs Note that LEDs connected on NodeMCU, are for testing only. Buttons. Facebook. Tutoriales Arduino. Watch Dog Timers.
El módulo DS3231, un reloj para Arduino - Panama Hitek. ArduFarmBot: Controlling a Tomato Home Farm using Arduino and IoT - All. (If you like this Instructable, please do not forget to vote on it clicking the top flag.
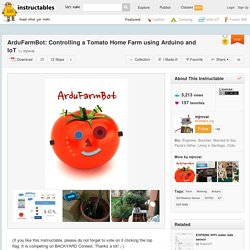
It is competing on BACKYARD Contest. Thanks a lot! ;-) One Fridge off the Grid - Reduce your energy footprint and spread the idea of distributed energy production. Hackster. [UPDATE] New rev. 3 PCB is now the heart of the UNplug toolbox Power plant in toolbox size: the new UNplug power generator can be carried around easily.
This is the fully functional prototype - currently only the H4 solar connectors are still on order. I just got the green side panels but need to find the right screws first. The new design includes: Hackster. Introduction The system is a suitable solution for people who love and want to look after plants in their house but very busy in daily jobs to do that.
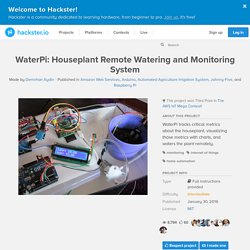
Growing plants requires time and effort in order to be successful because there are some regular things to do like watering them every day. Blynk. Hackster. WiFi Plant Watering ESP8266. So I was always forgetting to water my plants, and as a result they would get dry and sometimes even die.
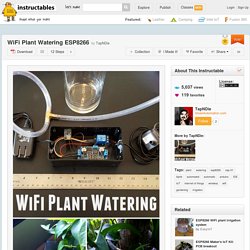
So I though it would be cool to be able to water my plants with my phone. Its connected to the internet via the ESP-01 module and can be used to water your plants or animals once a day for the duration of time you choose. The User Interface also allows you to water manually with the push of a button, and from anywhere in the world. Items needed are as follows:
Blynk projects. MicroController Electronics - The Internet of Things. Servidor Web con WIFI ESP8266. Objetivos.

Usando el módulo WIFI ESP8266. Objetivos.
Controlador de motor a pasos DRV8825 - HETPRO/TUTORIALES. Arduino Automatic Watering System -Use Arduino for Projects. I is a simple system, using Arduino to automate the irrigation and watering of small potted plants or crops.
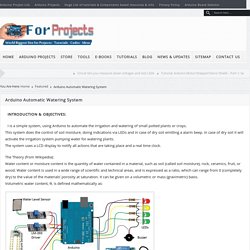
This system does the control of soil moisture, doing indications via LEDs and in case of dry soil emitting a alarm beep. In case of dry soil it will activate the irrigation system pumping water for watering plants. The system uses a LCD display to notify all actions that are taking place and a real time clock. The Theory (from Wikipedia): Water content or moisture content is the quantity of water contained in a material, such as soil (called soil moisture), rock, ceramics, fruit, or wood. Water content is used in a wide range of scientific and technical areas, and is expressed as a ratio, which can range from 0 (completely dry) to the value of the materials’ porosity at saturation. ARDUINO MPPT SOLAR CHARGE CONTROLLER (Version-3.0) After lot testing we observed that MOSFET ( Q3 ) in ver-3.0 design is burning repeatedly.We tried to modify the existing software but not find any satisfactory result.
The other problem was that MOSFET Q1 ( in V-3.0) conduct even when there is no solar input. To solve the above problems and enhance the power handling capability we are modifying both the hardware and software.This is named as Version-3.1 Charge Controller. This version is not completed yet.So wait until it is complete. ARDUINO SOLAR CHARGE CONTROLLER (Version-1) [ Play Video ] ARDUINO MPPT SOLAR CHARGE CONTROLLER (Version-3.0) Amperímetro con Arduino. Hola de nuevo, en esta actualización os traigo una parte de lo que será mi futura fuente de alimentación de laboratorio. Se trata de un medidor de intensidad, utilizando para ello el módulo ACS712 y un display LCD 16x2. Para abrir boca, os dejo un video del montaje en funcionamiento. Medidor de intensidad ACS712 Se trata de un pequeño sensor que mide la corriente utilizando el efecto Hall, y nos devuelve un valor de tensión entre 0V y 5V, proporcional a la intensidad que circula. Lo podéis conseguir online en webs como DealExtreme, Banggood o Sparkfun, por muy poco.
El código usado para medir la salida de este sensor, y convertirla en el valor de intensidad, quedaría algo así: ACS712 Current Sensor Read - ElectroDragon. The ACS712 sensor read the current value and convert it into a relevant voltage value, The value that links the two measurements is sensitivity (you can find it on the datasheet) which – for 5A model – has a typical value of 185mV/A. The sensor can measure positive and negative currents (range -5A…5A), and power supply is 5V for the sensor, and the middle sensing voltage is 2.5V when no current.
We are offering 5A and 20A version in our store. It’s DC and AC current sensing support! The value reading for this is also simple, use arduino default function AnalogRead() will be enough, however, that function outputs a value between 0 (0V in input) and 1023 (5V in input) that is 0,0049V for each increment. We will use the following formula to covert the 0 ~1023 value to an ampere value. Arduino MPPT Solar Charger Shield. A friend has approached me regarding his solar project. He wants to install a solar panel together with a battery and an inverter in order to have power at his allotment garden. He had looked at a hobbyist project where an arduino was used to build a MPPT (maximum point of power tracking) charge controller. I took a look at the design, liked a lot of what I saw and decided to build something similar. The basic idea behind an MPPT solar charger is simple. A solar panel has a certain voltage (in the region of 17 to 18 volts for a 12 volts pannel, somwhat dependent on temperature) at which it provides most power.
So the charger needs to convert an input voltage of 17-18V to an output voltage of 12-14V as efficiently as possible. Switching converters are controlled by the duty cycle of a (typically) fixed-frequency PWM signal. The next step was to figure out at which frequency to run our converter. Adventures in DIY Engineering: DIY Self Sustaining Solar Powered Backyard Hydroponic Garden. I've decided to change the way I write my blogs. After reading some of them back to myself, I couldn't help but try to make them a little more fun to read, and if that doesn't work; atleast i'm not bored writing it. Arduino Testing...: Midiendo inductancias con Arduino.
Arduino Soil Moisture Sensor and Code. This is a simple arduino project for a soil moisture sensor that will light up a LED at a certain moisture level. It uses Arduino Duemilanove microcontroller board. Two wires placed in the soil pot form a variable resistor, whose resistance varies depending on soil moisture. This variable resistor is connected in a voltage divider configuration, and Arduino collects a voltage proportional to resistance between the 2 wires. Insert the 2 probes (wires, pcb) in the dry soil and measure the resistance value and then pour water and measure it again.
Use a mid value for the resistor (eg: 50kΩ for 100kΩ in dry soil and 10kΩ in wet). Rain Sensor - All. GIRASOL ARDUINO - RECICLANDO CON ARDUINO. DIY DETECTOR HUMEDAD PLANTAS - RECICLANDO CON ARDUINO. Arduino Soil Moisture Sensor and Code.