
THE BEAD HIVE Wholesale Open to the Public. How About Orange. Here's a look at our upstairs guest bathroom.
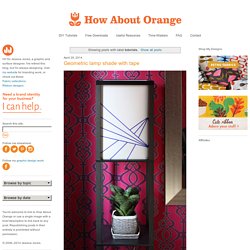
Last night I covered an accent wall with removable wallpaper. I love it! This bathroom has a peculiar layout. You walk in past the shower stall on the right, and when you hit the sink, you turn right to get to the toilet. Which is under a lovely arch at the end of a passage that is almost long enough to feel like a hallway. The kind folks at Walls Need Love sent the product to review. Like the Sunburst wallpaper I designed last year, this paper is essentially a giant self-adhesive wall decal, and it's easily to peel off and reposition.
I measured the wall and cut a length of paper that would leave a little extra overhang at the bottom. After a couple tries I had it, and then it was just a matter of peeling off the backing paper gradually while smoothing down the paper with the tool provided. I cut another piece to place next to the first panel, overlapping the seam by a quarter inch to match the pattern. Wind-up paper butterflies are my fave (guest post from amelia) I had a baby so I’ve invited some fave guests to take over for me while I spend time with the little guy.
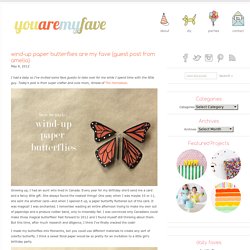
Today’s post is from super crafter and cute mom, Amelia of The Homebook. Growing up, I had an aunt who lived in Canada. Every year for my birthday she’d send me a card and a fancy little gift. She always found the neatest things! One year, when I was maybe 10 or 11, she sent me another card—and when I opened it up, a paper butterfly fluttered out of the card. I made my butterflies into Monarchs, but you could use different materials to create any sort of colorful butterfly. Materials: You’ll need heavy cardstock, 24 gauge wire, silicone rubber bands (I found mine in the hair aisle at Walgreens) needle-nose pliers, scissors, tape, a paintbrush, a black marker, and a white ink pen.
Step 1: Measure and cut your wire. Step 2: Find the center of the longer wire. Step 5: Find the center of the shorter wire, and wrap it around the base of the paintbrush. Stitch dictionary. Created by sarah on 06 Jun 2010 The stitch dictionary is arranged in alphabetical order and will help you to go to a stitch directly.

Just click on the alphabet given in the index to go to the stitch beginning with that alphabet. Some stitches are known by multiple names and all names are included here. Hovering over the stitch names will give you the most common name by which the stitch is known. Tags: edging and border stitch, embroidery, embroidery tutorial, feather stitch, fly stitch, hand embroidery, hand embroidery tutorial, hand embroidery tutorials, herring bone stitch, knot stitch, needlework, palestrina stitch, running stitch, stem stitch, stitch dictionary, stitches 50 Comments » Found - Mega Doily Rug. How to cut glass. I posted a picture about 1 week ago on Instagram, Facebook and Twitter of me cutting glass using just string.
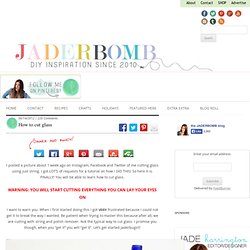
I got LOT’S of requests for a tutorial on how I DID THIS! So here it is. FINALLY! You will be able to learn how to cut glass. Deck of cards = awesome, easy, romantic gift! - OCCASIONS AND HOLIDAYS. I actually made this for my honey for our anniversary a couple of years ago, but with Valentine's Day fast approaching, I thought I'd share.

This is so easy to make, but it has a lot of impact -- who wouldn't love to get this? I want to say right now that I am not claiming this idea as original. Unfortunately, I made it over 2 years ago and now cannot find the post/site/etc. where I found the inspiration. As I recall, the one I saw was far more elaborate than mine. If you have seen this before, please feel free to post links in your replies. All right -- let's get to it! (Our initials are B and K.) The possibilities for this project are endless, but I didn't do anything fancy. Some were sweet (like that one) and some were wacky: Homemade Polymer Clay. At different points over the last few years I've played around with different kinds of homemade "clay.
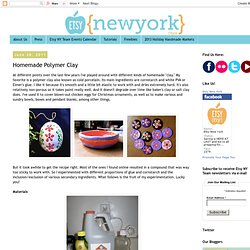
" My favorite is a polymer clay also known as cold porcelain. Its main ingredients are cornstarch and white PVA or Elmer's glue. I like it because it's smooth and a little bit elastic to work with and dries extremely hard. It's also relatively non-porous so it takes paint really well. And it doesn't degrade over time like baker's clay or salt clay does.
But it took awhile to get the recipe right. Materials 3/4 cup white glue1 cup cornstarch2 tablespoons mineral oil (I used baby oil but reportedly even vaseline will work)1 tablespoon lemon juiceNon-stick potWooden spoon Steps Add cornstarch to glue in a nonstick pot. Cook over low flame stirring pretty much constantly (you can take a quick break or two if your arm gets tired, which it will) until the mixture resembles mashed potatoes. Remove from heat! Let dry about 2-3 days, then paint, or not. Until next time --