
Face detection and tracking with Arduino and OpenCV. UPDATES Feb 20, 2013: In response to a question by student Hala Abuhasna if you wish to use the .NET Serial class, use the naming convention "\\\\.
\\COMn" and replace n with a number > 9 to define your com port for COM ports above 9 such as COM10, COM11, etc. Mar 23, 2012: Featured on Adafruit's Blog Mar 23, 2012: Featured on Interactive Design Dec 13, 2011: Featured on Floss For Science This guide will also be maintained on my blog In this project I have assembled a face detection and tracking system. You can see the video of the final project here: Basically, the webcam sends video frames to OpenCV running on a Windows PC. OpenCV (Open Source Computer Vision Library: is an open-source library that includes several hundreds of real-time computer vision algorithms. This is an integration project between hardware and software tools. This project would not have been possible without the team who developed OpenCV.
Software Required Code Required Hardware Required.
Digispark:tutorials:nrfmesh [Digistump Wiki] Requirements: 3x or more Digispark Pros 3x or more Pro nRF Shields (may also work with original Digisparks wired to nRF modules) Theory: This example implements a simple, easy to understand and change, Mesh network layer over the RF24 library.
![digispark:tutorials:nrfmesh [Digistump Wiki]](http://cdn.pearltrees.com/s/pic/th/digispark-tutorials-digistump-101457848)
Arduino Tutorials - tronixstuff. IDE и ATmega16, формируем bootloader. Зачем?
В целях обучения, покопаться в потрохах, исходниках. Плюс не очень хочется некоторые вещи на асме писать. Итак, сегодня я опишу как изготовить bootloader для ATmega16. После того, как вы его прошьёте, ArduinoIDE увидит вашу ATmega16, однако чтобы писать скетчи, придется еще слегка попотеть, но об этом в другой раз. ArduinoCheatSheet - The Mechatronics Guy. I really love cheat sheets.
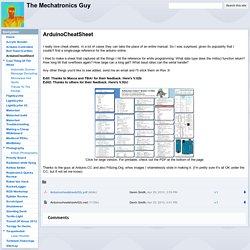
In a lot of cases they can take the place of an entire manual. So I was surprised, given its popularity that I couldn't find a single-page reference for the arduino online. I tried to make a sheet that captured all the things I hit the reference for while programming. What data type does the millis() function return? How long till that overflows again? Any other things you'd like to see added, send me an email and I'll stick them on Rev 3! Edit: Thanks to Macca and TBAr for their feedback. Click for large version. Arduino ds18b20 termometer. Most of recent TV sets are already packed with bunch of hi-tech stuff that change the way we perceive watching TV.
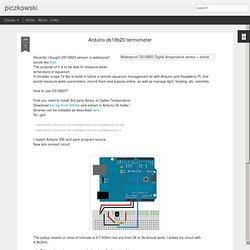
In the past we were bound to a range of channels, even though having satelite at home gave us quite a wide rande of it - counted in hundreds. The Internet added completely new possibilities. AvrSerial: UART Library. Peter Fleury's Home Page. Use Arduino code in non-Arduino AVR microcontrollersHardware Fun. I had a bunch of ATmega 16A and ATtiny 85 microcontrollers lying around and I was trying to find a way to program them using Arduino code.

There are two main reasons, why I wanted to use Arduino code. The first reason was to use the many built-in functions like digitalWrite, digitalRead etc. And the second reason was to use the various built-in and user contributed Arduino libraries. Since the official Arduino supports more than 3 types of microcontrollers (Uno, Mega, Leonardo), I had a hunch that supporting other microcontrollers should be easy.
Minibloq: graphical programming environment for Arduino by Minibloq. CANBus. Electronics : Microprocessors : I2C - Two-Wire Peripheral Interface - for Arduino. Tip A summary of everything shown below is available further down this page: This post describes how the I2C (Inter-Integrated Circuit, or "Two-Wire") interface works, with particular reference to the Arduino Uno which is based on the ATmega328P microprocessor chip.
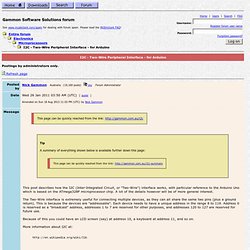
A lot of the details however will be of more general interest. The Two-Wire interface is extremely useful for connecting multiple devices, as they can all share the same two pins (plus a ground return).
I2C. Arduino-info - home. Arduino Tutorials - tronixstuff. Arduino Client for MQTT « knolleary. Using MQTT to connect Arduino to the Internet of Things. Recently I attended the AT&T Hackathon for Machine to Machine and Internet of Things.
Patrick and I didn't come up with a compelling application. Instead, we spent the time creating a tutorial on how to connect an Arduino with an Ethernet or GSM shield to the Internet of Things through 2lemetry's MQTT service. Here is the tutorial as it was written. Companion Site for the Book by Jeremy Blum. Tutorial series for arduino. TMP36 Temperature Sensor. Connecting to a Temperature Sensor These sensors have little chips in them and while they're not that delicate, they do need to be handled properly.
Be careful of static electricity when handling them and make sure the power supply is connected up correctly and is between 2.7 and 5.5V DC - so don't try to use a 9V battery! They come in a "TO-92" package which means the chip is housed in a plastic hemi-cylinder with three legs. The legs can be bent easily to allow the sensor to be plugged into a breadboard. You can also solder to the pins to connect long wires. Reading the Analog Temperature Data Unlike the FSR or photocell sensors we have looked at, the TMP36 and friends doesn't act like a resistor.
Remember that you can use anywhere between 2.7V and 5.5V as the power supply. Arduino programming. Arduino for Visual Studio and Atmel Studio extension. Sign in to write a review Sort by: Hi everyone, Now this is a great tool for debugging those tiny processors almost as good a the big ones. It needs some getting used to, but don't give up, in 30 minutes you will wonder how you ever debugged before looking at blinking leds to tell you what's going on. Just look at the how 2's on youtube. cheers and keep up the good work John I have been using Arduino IDE for ages, and it has served me well so far.
Interrupt based Pulse Counter. Interrupt based Pulse Counter Arduino sketch example for interrupt based pulse counting: //Number of pulses, used to measure energy. long pulseCount = 0;
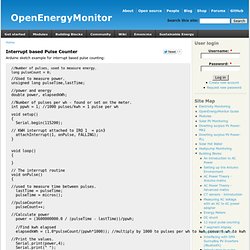
Interrup based pulse counting with sleep mode. This sketch detects pulses and prints to serial the character P. In order to reduce the power consumption the Atmega 328 is put into sleep mode in-between pulses. The interrupt pulse input (on digital input pin 2 or 3) is used to wake up the device. Unfortunately a value for power cant be calculated as the timers are off in sleep mode. OneWire in Due. Hi Kcore. Thank you for your time testing. Ok, those are good news! This leaves me more confident. Due libraries (official and 3rd party) /arduino/ - gfb - Random garblings. Introduction to pulse counting. Reading pulses from meters with pulse outputs. Lab3 - Laboratory for Experimental Computer Science. Watchdog and Sleep functions This example shows how to make use of the Watchdog and Sleep functions provided by the ATMEGA 168 chip .
These functions are useful if you want to build low power consuming devices operated by battery or solar power. The reduced power consumption is achieved by through a intermittent operation of the system .In case of Arduino your main loop will be executed once before the system is put into the sleep mode. After a few seconds t the watchdog wakes the system up and the main loop is executed again.
The ratio between main loop execution time and watchdog time determines the amount of power that will be saved. When we assume that the time to measure a sensor and making some decisions will take 10 millisecond and the watchdog is set to 8 seconds the on/off ratio is 800 which extends the battery live time by this factor. Interrup based pulse counting with sleep mode. Processing.org. Arduino meets processing - PUSHBUTTON.
The Arduino meets Processing project intends to make it as easy as possible for anyone to explore the world of physical computing. All you need is an Arduino board as well as the Arduino and Processing software, which you can download on their project websites. On this website we explain how to: set up electronic circuits with various kinds of sensors, The World Famous Index of Arduino & Freeduino Knowledge. Scratch for Arduino Makes Programing the ... Arduino Default Fuse Settings. S4A.