
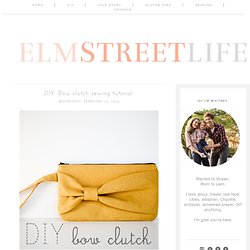
Basic Pocket TOTE. How many bags do you own?

Probably a lot. Maybe a better question is….how many bags have you made? Um, probably a lot. But isn’t there’s always room for one more? Similar to the KID PANTS series, I thought it would be fun to share a series of Tote bag tutorials. So, These are the bags we made at my design camp class for ALT in January. And they’re so much fun to make! They’re your standard tote bag, made from one piece of fabric, cotton or twill straps, with a simple pocket inside because I can’t stand losing my keys in there.
Ready to sew? Fabrics to Use: • Heavy Cottons such as Canvas, Duck, Upholstery fabrics, Corduroy, Twill • Standard Cottons such as quilting cotton, broadcloth • Knits Or basically, you can make it from whatever you like….a painting dropcloth, a dishtowel? (Cutting your fabric this size also means you can cut 4 bags from 1 yard of 60 inch fabric or 3 bags from 45 inch fabric). First, prep your pocket. Then decide if you want any compartments in your pocket. - StumbleUpon. Embroidery Designs at Urban Threads - Projects. Zuta torba sa masnom. And fiiiinally... the tutorial you've been waiting for.
This is my first real sewing tutorial - which scares me a bit, because I've never actually taken a sewing class, so I don't know all the terminology. What I do know is that I've learned to sew lots of things by reading tutorials, so hopefully I can make this simple enough that even you beginners can feel confident making a bag. And yes, a bag with a zipper! It can be done, I promise.There are plenty of photos, so hopefully that will help. If you have any questions, please leave them in the comments section and I'll be happy to clarify.
**Also, please note except where I say, "Sew close to the edge," I am using a 1/2" seam allowance throughout. Ok, let's get started! 1. 2. 3. 4. Sometimes, at the end of this step, if my strap doesn't feel sturdy enough, I'll cut a thin strip of interfacing and tuck it inside the crease before sewing. 5. 6. Razlicite torbe. Daydream Tote. Get your sewing skills together and make this gorgeous tote using our detailed steps.

What you need 5/8 -yard fabric for bottom & straps 5/8-yard fabric for top, pocket & large strips 5/8-yard fabric for lining & small strips 1-yard fusible fleece Supplies needed All purpose thread to match fabric Scissors & Rotary Cutter Pins Sewing Machine Iron Ruler Cutting Fabric Cut 2-15" w x 10" h- bottom tote fabric Cut 2- 15" w x 5 1/2" h- top tote fabric Cut 2- 15" x 15" lining fabric Cut 2-2 1/2" x 15" for large strips Cut 2- 2" x 15" for small strips Cut 1- 12" x 15" for pocket fabric Cut 2- 4" x 22" strips of fabric for straps Cut 4- 15" x 15" fusible fleece Read through entire pattern before starting to sew.
Remove all pins before sewing over them. All seams are a 1/4". Instructions Sewing on Strips and Top Fabric of Tote: 1) Take 2- strips of fabric, large and small, fold them in half the long way and press. 5) Pin in place and sew a seam. 6) Unfold and press the top. Teacher Tote. *Project by Jessica @ Running With Scissors* This tote was inspired by my 6th grade teacher.

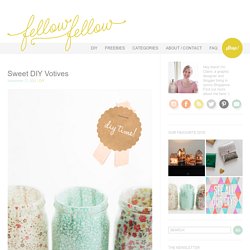
I remember her always carrying her purse, and this large navy blue tote that was kind of ugly and worn out. So here is a fun, colorful tote for the teacher that always has binders, graded papers, and other items to carry to and from their classroom. I designed the tote to have a basic shape, where it’s a rectangular bag. What makes this tote different is the scrunch handle. Made with white canvas for strength, and fully lined in turquoise, this tote could actually be reversible. The back needed a little detail, so one blue tree stands alone. The sewing is pretty basic and painting the tree design gives you lots of opportunity to make it unique for that great teacher who deserves a cute tote to lug all their supplies! Sweet DIY Votives.
Here’s what you’ll need: 1.
Measure the height and circumference of your jar, and cut strips of fabric to roughly fit (approx. 1cm wide – doesn’t have to be perfect). 2. In your small cup, pour in some glue and dilute it with a bit of water (about 1:2), mix well. It should be the consistency of slightly thicker water.. yes, I know I’m being vague but it shouldn’t make much difference to the end result. 3.
Note: – I find that it’s ok to have fabric going above the top of your jar because it can be easily cut off after it’s dried. – I don’t mind the look of the overlapping lines of fabric once the candle is lit, but if you do try not to overlap the strips in the gluing process. Bridal party gifts custom pouch set in your by handmadeclassics. Leather Fold Over Clutch. I’ve been eying leather fold over clutches in bright colors like these beauties below for some time now and thought they would make a really great DIY project.
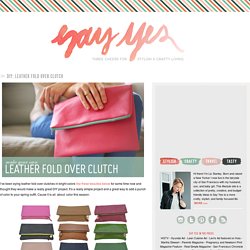
It’s a really simple project and a great way to add a punch of color to your spring outfit. Cause it is all. about. color this season. For these final product images, I teamed up with photographer Kate Skogen of JetKat Photo who specialized in weddings in the bay area. Check out her beautiful work here. I found this great looking faux leather in the most fabulous hot pink and knew we were meant to be together.