
DIY Sharpie Tie Die. I love this Sharpie tie die DIY from The Art Girl Jackie blog!
She did it with her adorable daughter and I think it’s a fun inspiration for this Spring and upcoming music festival season. Use this technique to spruce up your ratty t-shirts or maybe a pair of of cut off shorts. For another idea, check out how to spruce up your clothes with DIY leopard print here! What You Need: Pre-washed white or light colored t-shirtRubbing AlcoholLiquid dropper or medicine dropperSmall plastic cup(s)Rubber bandsVariety of colored Sharpies Do It! Choose a spot to start and put your cup in right side up and secure a rubber band around the cup rim holding the shirt tightly in place.Pick your colors and create a small design in the center of the stretched circle.
Photos and DIY via The Art Girl Jackie. Do-it-Yourself DIY String Wedding Lanterns Yarn Chandeliers. Jessica of Wednesday Inc shows us how to make those gorgeous twine chandeliers from the inspiration shoot she shared with us this morning.

Using balloons, glue and twine, you can also make these lanterns for your wedding – and then bring it home and use it as your very own mid century lampshade. What you will need are: balloons, glue, yarn, tray for glue, corn starch 1/2 cup of Corn starch, 1/4 cup of Warm water, clear fast drying spray paint, hanging lamp cord or fishing line (depending on your desired final product), and a lighting kit if you’re looking for a fully functional lantern. Jessica recommends using a sharpie to mark on the inflated balloon how much room you need to leave for the lighting cord. She also recommends coating the balloon with vaseline prior to wrapping the yarn coated with glue so it doesn’t stick on the balloon once it’s dry. You can see all the details on Jessica’s blog. Cartelera. How to sew your own stylish strapless dress at home. How to make a strapless dress fitted with flare with Gianny L.
How to sew your own mini strapless summer dress. Nyan Cat bag! For those who might not know who/what NyanCat is, check out this video warn you, it's not to everyone's tastes but it makes me smile every time I see it!

I made this bag for a recent button swap (hence the buttons) and although I just made it as a random large bag for my swap partner to use for whatever, she informs me that it's the perfect size for her netbook, which is appropriate seeing as nyancat is an internet meme and the raison d'etre of a netbook is to access the internet. Anyway, on to the pictures! Front: Back: I managed to put a zip in! Lining too! If I hadn't spent hours sewing on buttons, the bag itself would only have taken maybe half an hour to put together.
Elite Cyclery - Cancun. Origami Lotus Flower Instructions. Leather Fold Over Clutch. I’ve been eying leather fold over clutches in bright colors like these beauties below for some time now and thought they would make a really great DIY project.

It’s a really simple project and a great way to add a punch of color to your spring outfit. Cause it is all. about. color this season. For these final product images, I teamed up with photographer Kate Skogen of JetKat Photo who specialized in weddings in the bay area. Check out her beautiful work here. I found this great looking faux leather in the most fabulous hot pink and knew we were meant to be together. You’re done! TLC Family &How to Draw Flowers and Plants&. Flower Image Gallery Publications International, Ltd.Learn how to draw a rose and other flowers and plants with our step-by-step instructions.
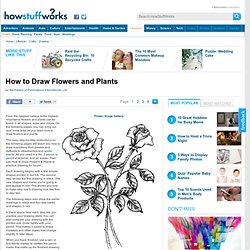
Bring out your inner artist as you learn how to draw a rose. See more pictures of flowers. How to make a 3D origami heart: page 1. How to Make Cherry Blossom Lights. Paper Flowers - Anyone Can Do That. Japanese Kusudama, this tutorial is featured on Craftuts Anyone can do that, I assure you.

The proof: I can, just take a quick look at my result below. And, believe me, I am neither meticulous nor particularly patient. You could even say I’m the opposite. Below you can see my very first attempt to create paper flowers. What you will need to make your own Kusudama paper ball? 1. 3. 4. (optionally) I prefer torn paper instead of cut. You have to start with a single petal. Now you have to glue your 5 petals into a flower. Apply the glue to only one side of each petal, except for the last one, in this case cover both sides with glue.
Your first flower is done. Don’t glue every petal right after you make it. When all 12 flowers are finished you have to glue them together. When two halves of Kusudama Flower Ball are ready you have to glue them together. More Design Please - MoreDesignPlease - DIY Doily&Lamp. Most favorited all-time.