Il Fabrique Un Miroir Connecté Avec Contrôle Vocal Sous Raspberry Pi (Video)
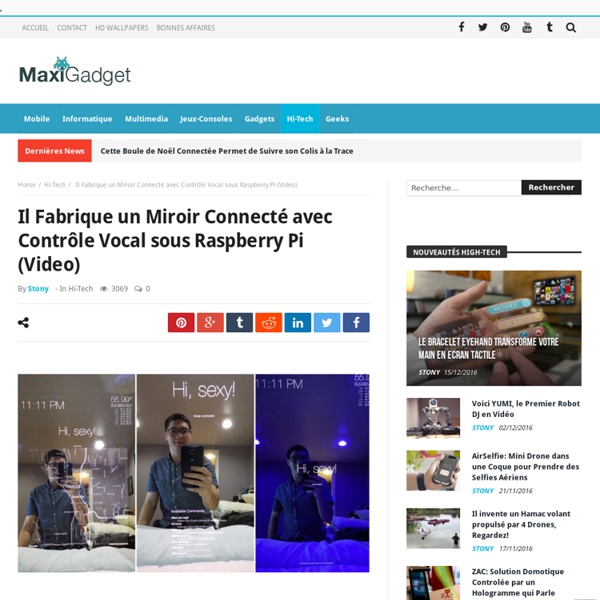
Inspiré par le travail de Michael Teeuw et Hannah Mitt, Evan Cohen vient de réaliser Smart Mirror, un miroir connecté sous Raspberry Pi. Ce modèle intelligent est entièrement contrôlé par commande vocale. Il peut donner la météo, des informations, la localisation, mais surtout allumer ou éteindre la lumière de la chambre avec ajustement de la couleur. Regardez la démonstration vidéo, c’est plutôt convaincant. Si vous souhaitez en savoir plus sur la conception du Smart Mirror , direction le site GitHub. source Requetes sur le meme sujet: miroir connecté raspberry piraspberry pi miroir tuto
Related: Mirroir
• SparkDev
MiniFablab – How to make almost anything
Touch Screen coffee table DIY with 32" TV and low cost CCD sensor - 3
As Wikipedia is way better than me on explaining : "A charge-coupled device (CCD) is a device for the movement of electrical charge, usually from within the device to an area where the charge can be manipulated, for example conversion into a digital value. This is achieved by "shifting" the signals between stages within the device one at a time. The CCD is a major piece of technology in digital imaging. Basically, the CCD you find in a scanner doesn't read lights in two dimensions, but on one line. As I couldn't find any tutorials explaining how they work on the internet, I tried to understand the logic by myself. By visually checking all the lines going from the control board to the CCD you can try to identify the 4 lines controlling the RGB LED, they are generally located at the extremity of the CCD board. I tried two CCD sensors from different brands and they where both using the same communication protocol but not on the same "line order on the flex".
Light, Fan, and Dimmer Control With ESP8266 and Cayenne
The previous owner of my house installed remote controlled ceiling lights in all the bedrooms. This was really cool for a couple weeks, but now I’m realizing that it can be really annoying when I misplace the remote. Each room has a separate remote that only works for that room. Extra remotes are both expensive and hard to come by. Making my own rf remote is impractical as they run in the 400mhz range and there is generally very little documentation about the radio codes for this fan model. To circumvent this, I disassembled one remote and soldered transistors directly to the physical button contacts.
Welcome to » The GaudiLab
GaudiLabs are creative spaces for working, thinking and living where culture and technology meet. We conduct open research in open source culture technology. Developing methods, process and devices to unite people and knowledge from different fields and backgrounds. The third space for third culture. GaudiLabs LLC GaudiLabs the corporation is a provider of open source solutions and network partner for open technology platforms. GaudiLabs – Laboratory spaces Head Quarter in Lucerne, Switzerland Open Source Lab Equipment The lab is equipped with high-low tech tools for mirco- and biotechnology. For more information see project page: Generic Lab Equipement Hack Sprints with GaudiLabs Hack sprints are short and intensive hack sessions where people interested in a particular subject meet and work together. Recent hack sprint subjects: Upcoming sessions: – Digital Microfluidics Hackfest – Transorgan on a Chip Hacksession – … your suggestion? GaudiLabs mobile DIY Mobile Gen Lab
Introduction · Smart Mirror Documentation
Arduino Nano: HMC5883 Compass With Visuino
HMC5883L are popular Compass sensors. They can be used for navigation systems, drones, and robots. In this Instructable, I will show you, how easy it is to program Arduino to use HMC5883L Compass, with Visuino - an easy to use graphical development environment for Arduino. Please note that the annotation on some of the pictures in this Instructable will work correctly on some browsers only after you click on the image to expand it. Please make sure you click on the image to see the annotation showing the correct spot on the image!
mjrobot
evancohen/smart-mirror: The fairest of them all
relayr for Developers | relayr
We support a variety of platforms for creating your IoT project. Whether you create your own hardware and connect it to the relayr cloud, or make use of our own connected out of the box sensors, relayr is the simplest way to realize your IoT dreams. You can start programming in: Why WunderBar? Get Started Immediately There’s never been a faster way to enter into the world of the Internet of Things. Work With What You Know Software Developers: The WunderBar’s sensors are pre-integrated and pre-programmed – there’s no need for tricky soldering, wiring or firmware debugging. Hardware Developers: Connect your projects to the cloud and apps with the WunderBar Bridge Module’s serial port. Your Imagination is the Limit WunderBar comes with enough hardware to realize your ideas, whatever they are. Any other sensors you’d like can be easily connected to the cloud and your apps through the WunderBar Bridge Module. Open Source Through and Through We’ve open sourced the WunderBar’s hardware and firmware.
Howtoons
Related: