

Home. Back to School Bling - DIY Neon Finger Knit Statement Necklace. Charlie came back from camp this summer begging for neon paracord.

Apparently, survival bracelets (more on that to come) were all the rage in the craft room at camp. Well, Allie and I co-opted the neon pink as soon as it was purchased and we just had to see what it would look like finger-knit. Voila! What a cool, bright, modern necklace for Allie as she heads back to school. Allie’s new school requires uniforms, so it’s fun for her to have a way to flaunt her style. The tutorial is straightforward. Materials: 16′ hank of 550 lb Nylon Paracord. Vintage Clothing, Cute Dresses, Indie & Retro Women's Clothing.
Glisters and Blisters. Fold a heart page marker. I hope you’ll whip up some heart page markers to share with those around you.
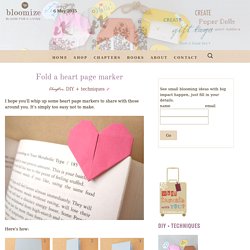
It’s simply too easy not to make. Here’s how: Use a square piece of paper. Fold in half. Crease. Flower Lavender Sachet Tutorial {Sewn By Hand} I love lavender and I’m always finding new ways to use it around the house, car, dryer…wherever! I created a sweet little flower lavender sachet that would be a perfect topper for your Mother’s Day gift, hostess gift, or thank you for watching my dog gift. You get the idea, right? Make lots of them to keep on hand! Feel free to sew away on your fancy sewing machines, but this is sewn by hand to keep it simple. This way you can make them anywhere! Geninne's Art Blog. DIY. Hace un par de días tuve el placer de organizar la fiesta de presentación de Dresseos, un nuevo vestidor de alquiler online que cuenta con piezas exclusivas de diseñadores muy reconocidos como Angel Schlesser, Amaya Arzuaga, Ion Fiz , Devota … [LEER TODO] Esta semana he podido permitirme un look más primaveral y estrenar mi nuevo crop top.
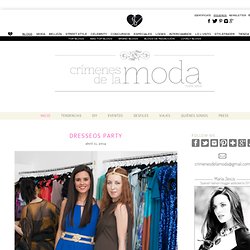
Mira que hace tiempo odiaba los crop tops y no los consideraba nada elegantes. Pero como todo en esta vida, hay que adaptarlo al estilo … [LEER TODO] Diy: mailing bag clutch. Tuesday, July 24, 2012 diy: mailing bag clutch linked to savvysouthernstyle , Jenniferrizzo Posted by Pinecone at 11:12 AM.

DIY pouch sewing tutorials. DIY Kimono Jacket + Hood. Recently, my housemate gave me some lovely mustard fabric… and this project emerged from it! Regrettably I did not document the steps that led to the finished product. This was partially due to the fact that I was very unsure about the end result mixed with the overwhelming excitement to start the project when I arrived home with the flannel lining. DESDE TENERIFE CON AMOR DIY: D.I.Y. SASS AND BIDE SHORTS. Terrarium Place Holder. Diy projects. Dare to DIY. DIY – Painted leather bag. I found a bag in this great color on Net-a-Porter.

I loved it, but it was way out of my budget. So I decided to make my version, with off course a little twist of my own. On the right you see the bag I found for just one Euro at the thrift store. On the left you see thee paint I used. DIY Crafts & Daily Design Inspiration. DIY projects made from everyday objects. Look to inspire. Creatively In Fashion.
Use code "SUMMER" for 20% off everything including sale items! Because im addicted. Blue Flower Earrings & Rings DIY. Every summer for the past 8 or 9 years, my family and I have spent time with our friends from Idaho.

They have two girls around my age and a boy that gets along well with my brother, so times are always crazy when the nine of us are all together. Yesterday was not only my last day of work and also the day that we met up with them! It's so exciting to see them again! There has already been a ton of laughter. Last year, I had the opportunity to travel with them to many countries in Europe.
I am in the center and Taylor is on the right. Today's project is really simple yet incredibly adorable. 3D paper diamonds. Hello there.
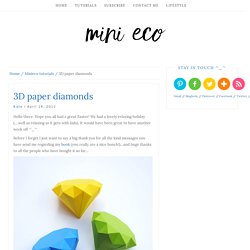
Hope you all had a great Easter! Behind The Seams. AMARILLO NEÓN SHOP&DIY. A Fabulous Fete. A pair and a spare . diy fashion. AdelynSTONE. Anthropologie Pratia Tank Top Tutorial. February 6, 2010 1:59 pm. A Matter Of Style: DIY Fashion. Aquí: heres how: DIY braided back shirt. 2nd Funniest Thing : DIY and unique pieces. V and Co.
Queen Of Funky DIY. Stars for Streetlights. When I was a little kid, I loved to make things with clay. I mean loved. My favorite things to make were tiny clay animals-- complete zoo sets for homemade dioramas, colonies of penguins, paddlings of ducks, and miniature replicas of every animal I ever owned. Stripes & Sequins …a fashion + DIY blog for the sparkle obsessed. Sock Bun Tutorial in 5 Easy Steps! I am not a hair person. Meaning, I can barely do my own hair in a ponytail. I also have very fine hair, so the topknots just point out the super fine strands. Lately, I’ve been seeing these hair donuts around, wondering what they could be used for, and after going to London, and having flat iron issues, I just said to heck with it and took a chance on the hair donut, and see if it a simpleton such as myself could figure it out.
Low and behold, even with no instructions, figuring out the sock bun was super easy, and it took only a few seconds! Here is how to do it, and once you try it, you’ll notice that if you can put your hair in a ponytail, you can do a sock bun! You’ll need: One hair donut, two hair bands, a comb or brush, and some bobby pins. Put your hair in a ponytail. Recycled Magazine Page Jewelry. (studs and pearls)
Products trending today on Wanelo. P.S.- I made this... Open wide zippered pouch tutorial size chart. Please refer to the full tutorial HERE for step-by-step instructions and pictures.
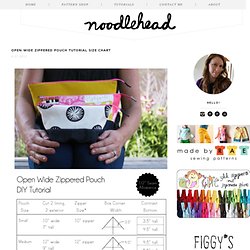
For the contrast bottom style pouches, simply cut two pieces of each measurement listed in the chart by the width of the pouch, and sew together using a 1/2" seam allowance. So for the medium size pouch you'll cut two pieces 4.5" tall by 12" wide and two pieces 5.5" tall (the contrast bottom) by 12" wide, sew them together using a 1/2" seam allowance, thus making the front and back exterior pieces.Approximate Finished Dimensions:Small // 4.5" H x 5" W x 3.5" DMedium // 6" H x 6.5" W x 4.5" DLarge // 8.5" H x 8" W x 5" D Fabrics: The Hello Kitty fabrics from the first post were purchased at fabric.com, seems like Hello Kitty is popping up a lot, so keep your eye open if you're a fan (yip yip!)
The medium size pouch is patchwork using an Umbrella PrintsTrimmings pack, if you've never seen their fabrics I suggest you check them out, all handprinted in Australia. Love their basecloth and style. My Showroom. Make something monday. The ombré trend has stolen my heart this year as it has with so many of you I am sure.
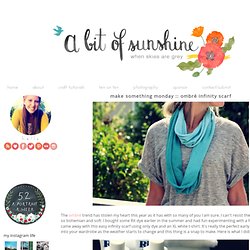
I can't resist the subtleness of it, so bohemian and soft. I bought some Rit dye earlier in the summer and had fun experimenting with a few projects and came away with this easy infinity scarf using only dye and an XL white t-shirt. It's really the perfect early fall piece to add into your wardrobe as the weather starts to change and this thing is a snap to make. More Design Please - MoreDesignPlease. Lushlee. LOVE AESTHETICS. Fashion Indie. Las mejores tiendas vintage de Nueva York. Anna de Aubrey and Me, se metió el currazo de proponer y organizar un reto entre bloggers, y a mi me ha tocado empezar en mi grupo.

Anita Patata Frita ha superado el reto con creces, yo espero estar a la altura. Por ello, Alana de Shop The Closet, me proponía como reto a que le dijese cuales eran las tiendas vintage de Nueva York que mas me gustaban y porque, aquí va! El vintage esta de moda en nuestro país, aunque con unos años de retraso respecto a otros paises. Ultimamente vemos constantemente que a cualquier prenda se le llama "vintage", aunque solo tenga unos años, y además, de las pocas tiendas que encontramos, los precios suelen ser prohibivos. En Nueva York es una tendencia que lleva años en la practica, por lo que podemos encontrar tiendas vintage y de segunda mano por doquier, y a muy buenos precios.
Esta es mi selección, Sin duda una tienda que las celebrities adoran, de la que es habitual (como sino), Sarah Jessica Parker. 9 Greenwich Ave Os gusta la ropa vintage? Un beso!! Hello hydrangea. Honestly WTF. Get Hooked. Shop The Coolest Clothing, Shoes & Vintage. I Spy DIY.