
Cut-n-paste. Origami-ish. Printables. Magic Boxes: A Life As Lou Online Class. Due to popular demand, I am doing a tutorial on the Magic Boxes I showed off in some previous posts. To begin, choose your paper. You need six sheets of matching paper (preferably a heavier weight). Choose one for your outside, budgeting for a contrasting one for your lid, and 4 to create the inside boxes.
Cut as follows (all measurement are in inches): Outside: 6 x 11 3/4ths Lid: 8.5 x 8.5 4 inner boxes: 8 x 8 The only challenging part of this project is creating the lid and inside compartments. 1. 2. fold the tips of your paper in so that they meet at the center. Fold in all four sides, and then unfold. 3. This fold gives you the sides of your box. 4. I have also colored four triangles. 5. 6. Do the same thing on the other side. 7. Repeat this process on your 8 inch and 8.5 inch papers. Now for the outside. 1. 2. To put the boxes in, first adhere one to the very top right corner, making certain that you are flush with the corner of the outside paper. Here are a few that I’ve made.
DIY Hand Stitching, part 1. One of my favorite crafts is hand stitching-- it's fun, addictive, expressive and relaxing :) Over the next few weeks, I'm going to share easy ways to make your own patterns for hand stitching along with some tips and ideas :) These are some samples of my past projects-- I like to draw patterns freehand and use my handwriting.

However, sometimes I adapt clipart type images to make a more complicated pattern, like the sewing machine or I just stitch the outline of an image I love, like the Goonies "Hey You Guys" silhouette :) I use a Back Stitch for all my hand stitching because it's very versatile and I like the look but you can use any combination of stitches for your projects... there's lots of fun ones! Today, we're going to start with handwriting & transferring your pattern :) You will Need: - Card-stock or Thick Paper (I cut a piece of 6x8" card-stock & folded it in half to create a greeting card) - Needle & Scissors - Embroidery Thread - Scrap Paper & Pen - Thumbtack or Piercing Tool.
Wind-up paper butterflies are my fave (guest post from amelia) I had a baby so I’ve invited some fave guests to take over for me while I spend time with the little guy.
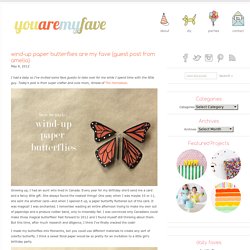
Today’s post is from super crafter and cute mom, Amelia of The Homebook. Growing up, I had an aunt who lived in Canada. Every year for my birthday she’d send me a card and a fancy little gift. She always found the neatest things! One year, when I was maybe 10 or 11, she sent me another card—and when I opened it up, a paper butterfly fluttered out of the card. I made my butterflies into Monarchs, but you could use different materials to create any sort of colorful butterfly. Materials: You’ll need heavy cardstock, 24 gauge wire, silicone rubber bands (I found mine in the hair aisle at Walgreens) needle-nose pliers, scissors, tape, a paintbrush, a black marker, and a white ink pen.
Step 1: Measure and cut your wire. Step 2: Find the center of the longer wire. Step 5: Find the center of the shorter wire, and wrap it around the base of the paintbrush.