
Stock Photos and Royalty-Free Images by Subscription - Shutterstock. Photoshop User TV. A Something-or-Other Episode Corey shows off a Hollywood text effect inspired by the new GIJoe movie.
RC has a Lightroom tip on toggling through crop overlay patterns. Scott shows off some post-processing techniques using the adjustment brush in Camera Raw. Matt has a tutorial on making perspective corrections on your photos. Pete shares a tip on maximizing your stock photography. This Week's Sponsors: Wacom | On One Software | iStockphoto | Mpix Links Mentioned in the Show Photoshop User TV Episode 292 is now playing! Download Episode 292 (In order to download this file directly to your computer, right-click (Control-click on Mac) on the Download link and choose the Save As option.) BEST FREE RENDER TEXTURES. Available: diffuse, normal, bump, displacement 1024x768 ...

Available: diffuse, normal, bump, displacement 1050x1059 ... Available: diffuse, normal, bump, displacement 1024x1024 ... Available: diffuse, normal, bump, displacement 2560x1707 ... Textures library - free surfaces for 3ds Max, LightWave. Tutorials - Photoshopcontest.com.
[CG Textures] - Textures for 3D, graphic design and Photoshop! Adobe Photoshop Tutorials from Beginner to Advanced. Photoshop Brushes – Free Photoshop Brushes at Brusheezy! Free Photoshop Brushes at Brusheezy! Efeito Blueprint. Descrição: Como recriar o efeito Blueprint que é muito utilizado por arquitetos. 01.
Pressione Ctrl+O e abra a foto para ser trabalhada, neste tutorial iremos utilizar a imagema abaixo. 02. Pressione Ctrl+J para duplicar a layer, sua paleta de layers deverá ficar como a da foto abaixo. 03. 04. defina os valores abaixo. 05. 06. 07. 08. 09. 10. 11. Site de origem: Participe deixando seu comentário, dúvida, sugestão, ideias, exemplos ou simplesmente dizendo um "Olá! " Caso não queira ficar de fora das atualizações diárias do blog você tem 3 opções bem práticas: Obrigado por ter votado no ::Tutoriais Photoshop:: para o iBest e Peixe Grande 2008 e 2009! Create an Amazing HDR Photo Effect.
Photoshop Tutorials. Step 1 Open up your image and check Image » Mode to see that RGB is selected in the menu.
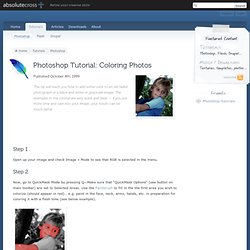
Step 2 Now, go to QuickMask Mode by pressing Q—Make sure that “QuickMask Options” (see button on main toolbar) are set to Selected Areas. Use the Paintbrush to fill in the the first area you wish to colorize (should appear in red)… e.g. paint in the face, neck, arms, hands, etc. in preparation for coloring it with a flesh tone (see below example).
Step 3 Go back to Standard Mode by pressing Q and a selection should now be around the area you filled in with the Paintbrush. Step 4 Next, click on the Adjustment layer icon at the bottom of the Layers Palette and choose “Color Balance” from the menu. Step 5 When you have the color you want for that area, repeat the whole process over again for the other spots of the photo that need colorizing. There you have it… from black-and-white or faded, to full color! Photoshop.