
How to generate extruded 3D model from images in OpenSCAD. Recently, to do a little bit of 3D modeling, I wanted to try my hand at making a modular back cover for my iPhone.
Yes, there’s too many 3D printable models of iPhone covers, but sometimes, we reinvent wheels not to have more wheels, but to have more inventors. To do something a bit more organic, my concept was to have a pattern of leaf veins for my iPhone backcover, Graftleaf. However, instead of drawing a leaf pattern myself, I generated the pattern from an image using free tools. That’s what the rest of this tutorial will help you do, and what I learned. First, I had to go find a creative commons image of some leaf veins. There were a good number of results, but I picked this one by Steve Jurvetson, which fulfilled my criteria above.
Next, I fired up GIMP, an open source alternative to Photoshop. Now we want to convert it to grayscale. However, the colors are inverted. Move switch the positions of the black and white arrows in “Output Levels” Emboss and impress images onto a surface in OpenSCAD. Earlier, I showed you how to extrude images in OpenSCAD, and a beginner’s guide to OpenSCAD.
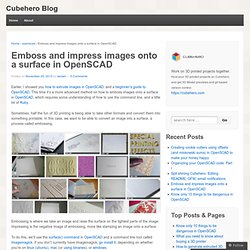
This time it’s a more advanced method on how to emboss images onto a surface in OpenSCAD, which requires some understanding of how to use the command line, and a little bit of Ruby. Sometimes, half the fun of 3D printing is being able to take other formats and convert them into something printable. In this case, we want to be able to convert an image into a surface, a process called embossing. Embossing is where we take an image and raise the surface on the lightest parts of the image. Impressing is the negative image of embossing, more like stamping an image onto a surface. To do this, we’ll use the surface() command in OpenSCAD and a command line tool called Imagemagick. Once you have that installed, we can use imagemagick from the command line to convert our image to grayscale. We’ll use the classic sample image from the field of image processing, lenna.png. ConceptFORGE/GUS Simpson at master · NicholasSeward/ConceptFORGE.
The Terrainator. Fabriquer son scanner 3D. La création de modèles en 3D est un travail long et ardu, il nécessite de bonnes compétences ; en d'autres termes, il faut d'excellents artistes/graphistes.
Pour faciliter cette tâche, on peut avoir recours aux scanners 3D, mais c'est onéreux et pas très facile à utiliser. Pourtant, la technologie de la barrière laser n'est pas très compliquée. Le site suivant vous propose de fabriquer un scanner 3D simple à partir d'une webcam, d'un pointeur laser, d'un moteur et de quelques engrenages. FoldaRap Build Manual. Tools required.
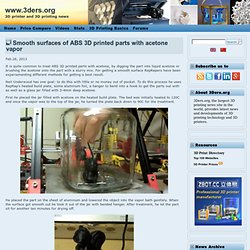
Smooth surfaces of ABS 3D printed parts with acetone vapor. Feb.26, 2013.
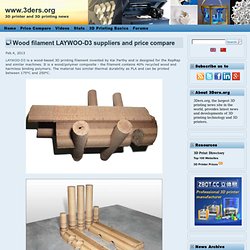
Free Sex Toy Designs for Your 3D Printer. Index of /Budaschnozzle/v1.2. RepRapCalculator. Wood filament LAYWOO-D3 suppliers and price compare. Feb.4, 2013.
La communauté dédiée aux imprimantes 3D. Extruder Calibration « RichRap. Entretien - Bricolage - Masquage et Adhésifs - TYBOAT.COM. 10mm x-ends for MendelMax 1.5 (Kühling's) by mnadamn. Rostock Prisma by JorgeRdgz. A derivative of Johann's Rostock but using 80/20 1010 T-Slotted aluminum instead of smooth SS rods.
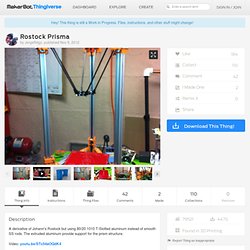
The extruded aluminum provide support for the prism structure. Video: youtu.be/STc54aOQdK4 The goal for my derivative of the Johann’s Rostock was to build a simpler, lighter and more robust structure. R3DWOOD OB1 Prism by Wired1. It really is as easy to assemble as it looks.
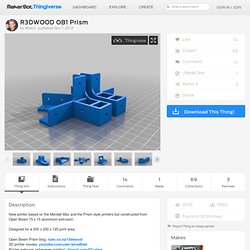
The main challenge you will face is pre-installing enough 3mm nuts in the extrusion before you put it together as they cannot be added after unless you take an end off - just refer to the photos here and my build blog nzec.co.nz/r3dwood/. Open beam extrusions required: 2 x top rails 442 mm each 4 x front/rear rails 330mm each 2 x side rails 330mm each 4 x diagonals 330mm each or 330 + 30 degree mitre (refer to the blog). MendelMax Feet, Integrated Floorboard by srepmub.
9G Hexapod by hardmouse. This is my first time to publish project on thingiverse.

Please let me know if I miss any steps or rules. The design is easy because I am not so good at adjust the printer's setting for complex models. 3D printer control for the Raspi. Pocket-Tactics: Faithful of the Luminous Goddess against the Dead of the Haunted Hills by dutchmogul. Instructions Each piece was printed on my Makerbot Replicator at a .10 layer height with 100% infill.

I printed them all one piece at a time, though you can feel free to try and print bricks of them. I had trouble doing so and it was probably due to my calibration. 3D Printing. MendelMax v1.5 Bill of Materials on KitBOM. Hot Ends. Fr. RepRap est la première machine autoréplicable de production d'usage général fabriqué par l'homme. RepRap se présente sous la forme d'une imprimante 3D, pilotée par un logiciel libre, capable d'imprimer des objets en plastique. Puisque la RepRap est composée de plusieurs pièces de plastique et que la RepRap a la capacité d'imprimer ces pièces, la RepRap peut être considérée comme autoréplicable — tout le monde peut la construire avec du temps et le matériel nécessaire. Cela signifie également que — si vous possédez une RepRap — vous pouvez imprimer beaucoup d'objets utiles, voire même imprimer une autre RepRap pour un ami... Le concept RepRap relève de la production de machines autoreplicables, ainsi que de les rendre librement accessibles au bénéfice de tous.
Nous utilisons l'impression 3D pour atteindre cet objectif, mais si vous possédez d'autres technologies qui peuvent se copier d'elles-mêmes, sont gratuites et à la disposition de tous, alors cet endroit est aussi pour vous. Universal Paste Extruder for 3D printers by RichRap. An assembly video for the Universal Paste Extruder can be found here, giving you details of how to build one up - youtu.be/iiyEOKpz_b8 You can print with Ceramic Clays, Silicone, Sugar pastes, solder paste for PCB assembly, Chocolate, Frostings, Masa Harina, and all sorts of other food’s or pastes that can be extruded through a syringe. A Blog post on the Extruder is Here - richrap.blogspot.co.uk/2012/04/universal-paste-extruder-ceramic-food.html.
Baricuda Extruder for 3D Printing Sugar and Chocolate by jmil. UPDATE 2: HOW-TO ASSEMBLE Visual instructions posted on my flickr: UPDATE: My Z-idler files are now posted at the request of bill20r3. NOTE: Sugar and Chocolate precision extrusion should be controlled NOT by precision of air pressure (which is hard) but instead by precision of temperature (which is easy). Temperature controls viscosity which controls extrusion rate at a given temperature.
The temperature to use depends on the material properties of your extrudate (read: the sugar).