
Projects. Beautiful Bathroom Redos on a Budget. How to Turn a Dresser Into a Bathroom Vanity. Mark For Sink and Faucet Placement Determine the placement of the sink.
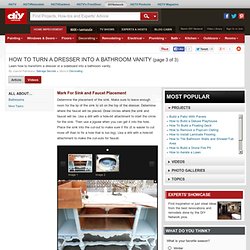
Make sure to leave enough room for the lip of the sink to sit on the top of the dresser. Determine where the faucet will be placed. Draw circles where the sink and faucet will be. Use a drill with a hole-bit attachment to start the circle for the sink. Plan for the Vanity Top If you are laying tile down on the vanity like we did, dry fit all the pieces in place. Gus & Lula: Beaded Chandelier Tutorial. Last week I showed you the beaded chandelier I made for our guest bedroom and promised a tutorial.
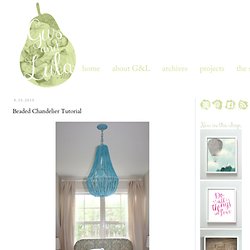
As I mentioned in my earlier post, I used the brilliant tutorial here as a starting point, and then added a few changes of my own. Here's the skinny on how to make your own beaded chandelier: Gather your materials: LOTS of beaded necklaces, cut into long strands (the Mardi Gras kind) Metal hanging garden basket A spool of thin-gauge wire Wire cutters Wire clothes hanger Pendant light kit (cord & socket) Metal chain to hang the fixture Light fixture mounting bracket, bolt & loop Light fixture ceiling cap Start with a hanging garden basket. Go ahead and paint it to blend with your beads (or the finished color of your chandelier if you plan to paint your beads).
I used a ladder to suspend the chandelier while I worked on it. Top it off. Add a little structure. Start beading! Trim away the excess. Add a chain and ceiling cap. Paint it up. Thick and warm crazy rug. This is a super easy rug to make and it is a lot of fun!
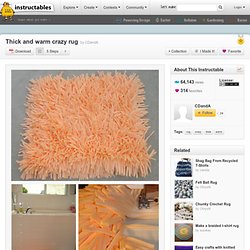
You will need about 5 yards of T-shirt material or something similar that coils up easily when stretched. You will also need a square (or any shape) of fabric for the base. The one I made is about 15" x 20" and it is super plush. Step 1: Base of rug Cut out a piece of fabric that measures 15" x 20" after you fold and hem in the sides. Step 2: Cut strips of fabric Next cut long strips one inch wide of the T-shirt fabric.
Step 3: Sew rug Take the long pieces of material and stretch them out so that they coil, then cut them into about 4 inch lengths. Step 4: Great time saver! Here is a great time saver! Step 5: That's all there is to it Keep sewing until you fill the base. How to make a book headboard. This works best in layers going from the outside in.
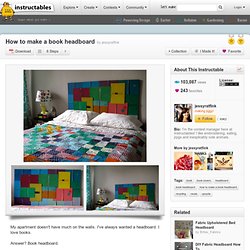
I decided to separate my covers by color and work with them that way. I chose to do purples and blues for the outside layer. My books overlapped the edges of the plywood by about five to six inches in most places in order to fit them nice and snug around the edges. 刺绣布艺墩子的做法,不要的旧衣服有用处了……_来自狂躁大儿童的图片分享. Hula Hoop Rug. Planting A Pineapple — Tickled Red - StumbleUpon. Did y’all know that you can take this and turn it into… This?

And that this will eventually produce… This? Yes, I’m talking about turning your average, ordinary grocery store pineapple into a tropical showpiece within your home. A plant that is not only impressive but will WOW! Planting a Pineapple 1. 2. 3. In 24 months (sounds better than two years) it will look like this. You will have an actual, large, utterly delicious pineapple in 24-36 months. The thought of growing my own pineapple always makes me smile and giggle just a little bit. Laundry Room Inspiration: Redecorate a laundry room on a budget.
I’m trying to act cool and chill about the fact that I’m FINALLY posting my six-months-in-the-making over-promised laundry room reveal, but inside, whole parts of my brain are in various stages of explosion.
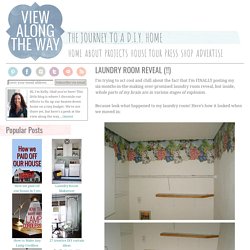
Because look what happened to my laundry room! Here’s how it looked when we moved in: That clothesline border helpfully clarified the purpose of the room, in case we ever got confused. Right after we moved in, we slapped a coat of paint on the wall, removed the popcorn ceilings, and left it that way, until last summer. See how to build a cozy outdoor gathering place for less than $500. DIY Bed Pictures, Photos, and Images for Facebook, Tumblr, Pinterest, and Twitter Pinterest. DIY: Lampshades with Clear - Throw Away Party Cups. DIY : The Lamp Shade Chandelier. Specifics & a mini-tutorial. Thank you so much for the kind & encouraging comments on yesterday’s office reveal.

It was a fun room to put my personality into and to try some new things and I think it turned out better than I had hoped. And did you like the fancy photos? Those were taken by my husband who very kindly dealt with my over-controlling nature when it comes to these types of projects. Thanks dear. Now, on to some of the specifics of my current favorite room in our house. The wall paint is the color that our entire house was painted. How I made my Instagram Wall. After our living room tour many of you asked for tips on making your very own Instagram wall!
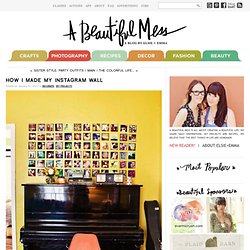
This method is perfect for instagram (or any square) photos and polaroids. Mine is not permanent because we are planning to put our home on the market in the near future. The method I used is perfect for renters or anyone uncomfortable with making lots of holes in the wall. Another method would be to mount your photos onto a large board or frame that can move to your next space with you.