
How to hand sew binding to back of quilt. Art and Quilting in Camden » Blog Archive » Foolproof miters on any width binding. Wednesday Sewing - Crazy Quilt Potholders. It's been awhile since I redid all my kitchen towels and potholders and they're beginning to look a little ratty. And a little scorched in places! Time for a facelift, so I began with potholders. These are inspired by crazy quilt blocks, without all the extra embellishments since they'll be washed a lot. And perhaps scorched again ... Materials:*scraps of fabric*small amount of backing fabric*insulbrite insulating fabric*about a yard of double fold extra wide bias tape for each potholder (or make your own with this tutorial)*embroidery floss 1. 2. 3. 4. 5. 6. 7. 8. 9. 10. 11. 12. 13.
Pot holders from jeans pockets - a tutorial. I saw one of these at a friend's house a few weeks ago, and loved the idea of them!
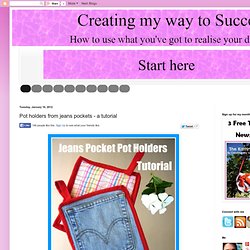
Having recently bought some jeans from the charity shop for 50c a pair, I thought I'd have a go at making my own pot holders! Here's how: First gather your materials. You will need 2 back jeans pockets, some fleece for the batting (padding) on the inside, pretty material for the other side of the holders and contrasting material for the binding round the edges.
Cut around the back jeans pockets leaving as much space as you can. Then neaten up the edges. Also cut strips from the contrasting fabric, 6cm (2.5") wide for the binding around the edge. YouTube. YouTube. How To Create A Blind Hem Stitch With A Blind Hem Foot At Home. You don’t need a blind hem machine to do a blind hem stitch! In this free video lesson from Craftsy sewing instructor Angela Wolf, she shows you how to use your own home sewing machine to hem your pants without having a single stitch show! Check it out, then check out her sewing class, Tailoring Ready to Wear and receive 25% off! Video transcript: Hello, this is Angela Wolf. Tips & Lessons > Sewing Inset or Y-Seams. Sarah stitched. Pretty quick pillowcase tutorial (& bonus french seam instructions) I guess you can read that anyway you’d like – this tutorial creates a pretty pillowcase, and it’s also pretty quick!
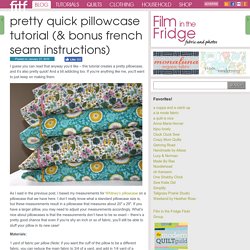
And a bit addicting too. If you’re anything like me, you’ll want to just keep on making them. As I said in the previous post, I based my measurements for Whitney’s pillowcase on a pillowcase that we have here. I don’t really know what a standard pillowcase size is, but these measurements result in a pillowcase that measures about 20″ x 29″. If you have a larger pillow, you may need to adjust your measurements accordingly. Materials: 1 yard of fabric per pillow (Note: if you want the cuff of the pillow to be a different fabric, you can reduce the main fabric to 3/4 of a yard, and add in 1/4 yard of a coordinating fabric for the cuff) 1.5″ x width of fabric for the trim (or, alternatively, you could use other trim here – I used rick rack for these pillowcases).
Tutorials. A string quilt block tutorial – paper pieced method. I’m so blown away by all the wonderful comments on my string quilt, now aptly named ‘Kaleidoscope’ (many thanks to Kerri who was the first to suggest it, followed by 9 others of you who had the same thought!)
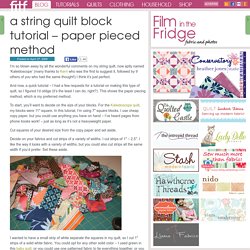
I think it’s just perfect. And now, a quick tutorial – I had a few requests for a tutorial on making this type of quilt, so I figured I’d oblige (it’s the least I can do, right?). This shows the paper piecing method, which is my preferred method. To start, you’ll want to decide on the size of your blocks. For the Kaleidoscope quilt, my blocks were 11″ square. Cut squares of your desired size from the copy paper and set aside. Decide on your fabrics and cut strips of a variety of widths. How to Insert an Invisible Zipper with Melissa Lunden - Quilting Daily. Make Your Own Ironing Board! - Tips & Tricks Series. How To Bind a Quilt With a Sewing Machine. How to Bind a Quilt. Interweave Store. Always Great, Always Free Quilting Tutorials.
Applique - Fused Edge Prep - Quilting Tutorial from ConnectingThreads.com. By Karen Johnson Why fused edge appliqué?
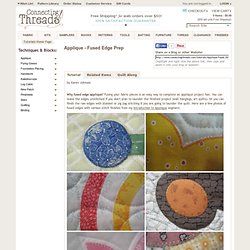
Fusing your fabric pieces is an easy way to complete an appliqué project fast. You can leave the edges unstitched if you don't plan to launder the finished project (wall hangings, art quilts). Or you can finish the raw edges with blanket or zig zag stitching if you are going to launder the quilt. Here are a few photos of fused edges with various stitch finishes from my Introduction to Applique segment.
Which fusible? Begin by taking a sheet of fusible and trace your pattern. Tip! Windowing fusible In our flower example here, less fusible in the finished piece is desired because the flower is large, so we're going to cut out some of the unneeded fusible web. To create the window, take your original tracing, and cut from the inside, approx 1/4" inside the line. At this point, do NOT cut the outer line. Prepare your fabric for the fusible piece.
Gently remove one side of the paper from the fusible. Continue to remove the paper gently.