
Improved Workbench for Woodworking - Workbench 3.0. How to Inlay Wood. Edit Article Two Methods:Simple InlayingInlaying Complex DesignsCommunity Q&A Inlaying contrasting material adds an eye-catching element to any wooden object, such as a picture frame, jewelry box, or piece of furniture.
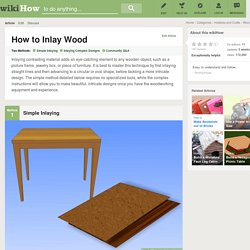
It is best to master this technique by first inlaying straight lines and then advancing to a circular or oval shape, before tackling a more intricate design. The simple method detailed below requires no specialized tools, while the complex instructions will allow you to make beautiful, intricate designs once you have the woodworking equipment and experience. Ad Steps Method 1 Simple Inlaying <img alt="Image titled Inlay Wood Step 1" src=" width="728" height="546" class="whcdn" onload="WH.performance.clearMarks('image1_rendered'); WH.performance.mark('image1_rendered');">1Select your base and inlay. Finishes and Furniture.
Plans. Turn a bought door into a fold-down worktable. Turn a bought door into a fold-down worktable Hollow-core door 2 of 20 x 94 x 2032mm PAR pine - shelf / front rail 1 of 32 x 67 x 2032mm PAR pine - mounting cleat 2 of 20 x 67 x 100mm PAR pine - leg blocks (adjust this to accommodate the folding leg brackets) 2 of 44 x 44 x 860mm PAR pine - legs* Pack of 4 x 30mm pockethole or wood screws 3 of butt hinges, 100mm and 16mm screws 2 of folding leg / flap brackets and 25mm screws 4 of Fischer wall plugs and 6 to 8 x 90mm long screws Spirit level Drill / Driver Kreg pockethole jig Orbital sander Tape measure and pencil *Adjust height of legs for height of worktable.

You can buy hollow-core doors and all the supplies for this project at your local Builders Warehouse. Bricolage. A réaliser. WoodWorking. Wood Shop Mike – Your source for woodworking tutorials, projects, and product reviews. Woodworking. DIY & Woodworking. Skill Set: Making A Butterfly Spline (Or “Arikata”) For our Woodworking Skill Set theme, we asked MAKE contributor Len Cullum to contribute some pieces on understanding basic tools and techniques.
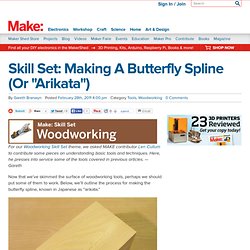
Here, he presses into service some of the tools covered in previous articles. — Gareth Now that we’ve skimmed the surface of woodworking tools, perhaps we should put some of them to work. Below, we’ll outline the process for making the butterfly spline, known in Japanese as “arikata.” When working with wider, thicker slabs of wood, it is not uncommon to have checking (cracks) in the surface, particularly at the ends. While there are a couple of ways of dealing with this such as filling the gaps with wood or putties or epoxy, I prefer to leave it as it is, treating it as a feature instead of a flaw.
What We’ll Be Using: Cracked piece – Port Orford CedarSpline piece – 1″ x 2″ x 3/8″ cherrySharp chisels – 1/2″ and 1″Marking knifeSharp PencilRouter with 1/4″ straight bitAdjustable squareAngle gaugeHammerGlue and brush Start with making the spline. Miter Joint Corner Clamp. Gluing a miter joint is a challenge .
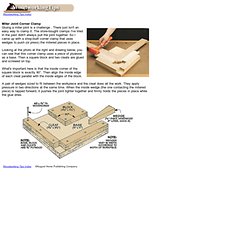
There just isn't an easy way to clamp it. The store-bought clamps I've tried in the past didn't always pull the joint together. So I came up with a shop-built corner clamp that uses wedges to push (or press) the mitered pieces in place. Looking at the photo at the right and drawing below, you can see that this corner clamp uses a piece of plywood as a base. Then a square block and two cleats are glued and screwed on top. What's important here is that the inside corner of the square block is exactly 90°. A pair of wedges sized to fit between the workpiece and the cleat does all the work. Box Joint Jig Plan - Take a Closer Look. No need to readjust the fence.
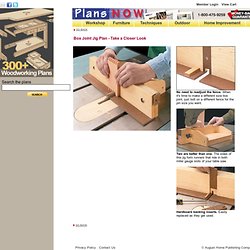
When it's time to make a different size box joint, just bolt on a different fence for the pin size you want. Two are better than one. The sides of this jig form runners that ride in both miter gauge slots of your table saw. Hardboard backing inserts. Easily replaced as they get used. Template Cutting with a Jig Saw & Woodsmith Tips. It’s much easier to rough cut large pieces using a jig saw.

The trouble is trying to stay close to the layout lines. To make things a little easier, I came up with a way to guide the saw along a template (photo below). The guide is nothing more than a ¼" plywood base with narrow sides that cradle the saw foot. (It’s held in place with carpet tape.) A guide pin mounted ahead of the blade follows the edge of the template and keeps the blade from drifting into the template and damaging the workpiece (drawing below). To use the guide, I steer the jig saw with one hand and place the other hand on the base to keep the guide pin in contact with the template. Popular Woodworking Magazine and Woodworking Magazine projects. Popular Woodworking Magazine and Woodworking Magazine projects. Milwaukee Tool, Klein Tools, Festool.
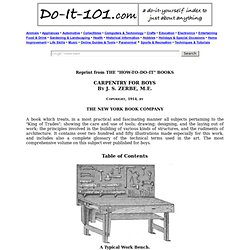
Do-It-101.com, Carpentry for Boys Table of Contents. Table of Contents A Typical Work Bench.
Acute. Sharp, to the point. Adjuster. A tool which measures distances and relative spaces. Æsthetic. Abstract. Alligator jaws. Woodworking Plans.