
Converting Color Images to B&W. Text and images Copyright (C) 2002 Eric R.
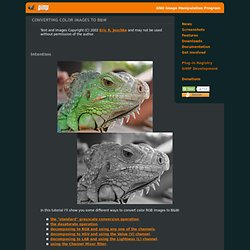
Jeschke and may not be used without permission of the author. Intention In this tutorial I'll show you some different ways to convert color RGB images to B&W: We'll examine each of these in turn. The Procedure Here is an example image, loaded into GIMP. Via Grayscale Here is what I get if I use the standard mode change to grayscale from RGB. Duplicate the original image (Ctrl+D) and right-click on the copy. I suspect GIMP uses a similar formula. Via Desaturate. Selective Colorization. Text and images Copyright (C) 2002 Eric R.
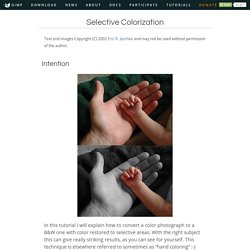
Jeschke and may not be used without permission of the author. Intention In this tutorial I will explain how to convert a color photograph to a B&W one with color restored to selective areas. With the right subject this can give really striking results, as you can see for yourself. This technique is elsewhere referred to sometimes as “hand coloring” :-) The basic technique is to duplicate the color photograph, convert the duplicate to B&W, and paste it as a new layer on top of the color image. Giving credit where credit is due: I did not come up with this method.
Reducing CCD Noise. Text and images Copyright (C) 2002 Eric R.
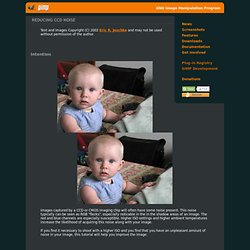
Jeschke and may not be used without permission of the author. Intention Images captured by a CCD or CMOS imaging chip will often have some noise present. This noise typically can be seen as RGB "flecks", especially noticable in the in the shadow areas of an image. The red and blue channels are especially susceptible. If you find it necessary to shoot with a higher ISO and you find that you have an unpleasant amount of noise in your image, this tutorial will help you improve the image. CCD Noise removal - Noise removal with selective Gaussian blur. Text and images Copyright (C) 2002 Atte André Jensen and may not be used without permission of the author.
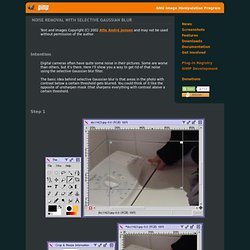
Intention Digital cameras often have quite some noise in their pictures. Some are worse than others, but it's there. Here I'll show you a way to get rid of that noise using the selective Gaussian blur filter. The basic idea behind selective Gaussian blur is that areas in the photo with contrast below a certain threshold gets blurred. Creating a Contrast Mask. Text and images Copyright (C) 2002 Eric R.
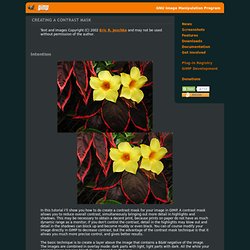
Jeschke and may not be used without permission of the author. Intention In this tutorial I'll show you how to do create a contrast mask for your image in GIMP. A contrast mask allows you to reduce overall contrast, simultaneously bringing out more detail in highlights and shadows. This may be necessary to obtain a decent print, because prints on paper do not have as much dynamic range as a monitor; if you don't control the contrast, detail in the highlights may blow out and detail in the shadows can block up and become muddy or even black. The basic technique is to create a layer above the image that contains a B&W negative of the image. Sepia Toning. Text and images Copyright (C) 2002 Eric R.
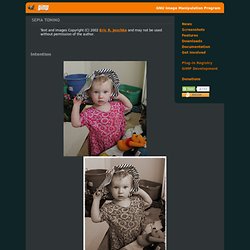
Jeschke and may not be used without permission of the author. Intention In this tutorial I'll show you how to sepia tone a color or black and white image. This technique is modeled on the traditional darkroom method of sepia toning in that the sepia color is applied "unevenly" to areas of different tonality. It works much better than most of the simple methods I've seen for image editors and provides great control! The Procedure Here is the original image, loaded into GIMP. Step 1 You can compare the result we will get below to GIMP's built-in Script-Fu for sepia toning (<Image> Script-Fu -> Decor -> Old Photo) as shown at right. Step 2 Duplicate the original image (<Image> Image -> Duplicate or Ctrl+D). Using whatever technique you like best, convert the duplicate to B&W. Whatever technique you use, convert the B&W image back into RGB mode when you're done (<Image> Image -> Mode -> RGB).
Step 3 Step 4 Step 5. Gaussian Blur Overlays. Text and images Copyright (C) 2002 Eric R.
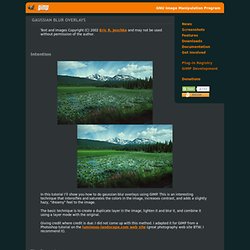
Jeschke and may not be used without permission of the author. Intention In this tutorial I'll show you how to do gaussian blur overlays using GIMP. This is an interesting technique that intensifies and saturates the colors in the image, increases contrast, and adds a slightly hazy, "dreamy" feel to the image. The basic technique is to create a duplicate layer in the image, lighten it and blur it, and combine it using a layer mode with the original. Giving credit where credit is due: I did not come up with this method. GIMP Surgery - Salvaging an Image with Blown Out Highlights. Text and images Copyright (C) 2002 Eric R.
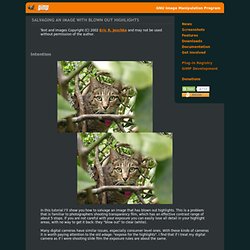
Jeschke and may not be used without permission of the author. Intention In this tutorial I'll show you how to salvage an image that has blown out highlights. This is a problem that is familiar to photographers shooting transparency film, which has an effective contrast range of about 5 stops. If you are not careful with your exposure you can easily lose all detail in your highlight areas, with no way to get it back: they "blow out" to clear (white). Many digital cameras have similar issues, especially consumer level ones. Blending Exposures. Text and images Copyright (C) 2002 Eric R.
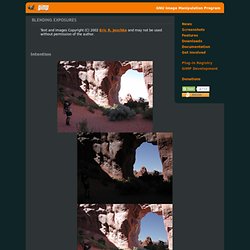
Jeschke and may not be used without permission of the author. Intention In this tutorial I'll show you how to do blend two different exposures of the same scene that you would like to combine to get the best parts of both images. This procedure works best if you have: (obviously) have shot two different exposures that would be pleasing to combine, had the camera mounted on a tripod (not strictly necessary, but helps greatly in aligning the images), the scenes are not too different at the boundaries of the blend. If you have only one image that needs exposure adjustment, you might look at using the "digital" neutral density filter or the contrast masking technique. "Smart" Sharpening.